How to make a summer shower with your own hands
The issue of hygiene in a country house or in a private home is very relevant - not everywhere there are amenities in the form of round-the-clock water supply, sewerage and other luxuries available to residents of apartment buildings. But this does not mean that the problem is unsolvable. Why not build a temporary shelter with a shower from scrap materials? Or maybe build a permanent building? It is not necessary to call a team of builders for this; it is not the gods who burn the pots. The article will tell you how to build a summer shower on your own plot with your own hands.
The content of the article
Preparatory stage
Where do all more or less significant construction projects usually begin? That's right - from planning. First of all, the following questions are determined:
- location of the building;
- water tank capacity;
- size of the building;
- its type is temporary or permanent.
Selecting a location
When choosing a location for a building, the biggest and most common stupidity is the idea of placing it under the canopy of trees, or somewhere behind the house. If you arrange the summer shower this way, firstly, the tank will be very doesn't heat up well, and secondly, the building will soon be chosen insects, for which moisture and shade - you can’t imagine better conditions.
To ensure good flow of water, the shower is located on a hill, or at least on a flat piece of terrain, but not in a lowland.
So, on the one hand, the shower must be located in an open, illuminated area, but at a short distance from the main building. After all, no one wants to make their way, wet and wet, to the house through the entire site in cool, windy weather?
Dimensions of the building and tank capacity
The height of the structure must be designed so that the tallest person bathing in the shower does not catch his head on the watering can. Recommended building height - from 2.5 to 3 meters, and the capacity of the water tank can be calculated approximately like this - for each swimmer there is about 40 liters of water, if he splashes in the shower for about ten minutes. This means that you need to multiply this figure by the number of people washing at a time - this is the required capacity. And this is provided that the tank must be refilled after bathing them.
The minimum size of the shower itself should not be less than a square meter, otherwise there will simply be no room to turn around. And then, the area is given excluding the waiting room, where you could calmly change clothes.
Little trick - if the tank is painted black, it will heat up in the sun much faster than if it were of any other color.
Temporary or capital?
There are three criteria here - the availability of material or funds to build something serious, construction skills and the capacity of the water tank.
If the household has bricks from old buildings, or you plan to intensively use the shower, and the funds allow you to fork out, it is better to do a capital building. But in the absence of these, you will have to use what is at hand.
If the owner does not know how to, say, use a welding machine, or simply does not have one, even if there are pipes and angles, it will not be possible to weld a frame for a building from them. Therefore, you need to initially calculate your strengths, and if you plan to build a building yourself, proceed from what you can do and what you can’t do.
Regarding the tank - if its capacity 200 liters or more, you will have to build a solid structure, otherwise the frame may simply collapse under its weight. And this is good if there is no one in the room at that moment.
Construction of foundation and drain
Before you start digging a hole for the foundation, you should mark it. Let's say the shower dimensions are 120x120 cm, you can even drive a small elephant calf there if you wish. Pegs are driven into the corners of the proposed foundation, and a cord is pulled between them around the perimeter. After this, use a tape measure to check that the diagonals of the resulting rectangle were equal. Further actions depend on what kind of building is planned to be erected - a temporary building or a permanent structure.
Simple makeshift
In this case, large labor costs will not be required. It is only necessary to remove the top layer of soil by 15-20 centimeters over the entire area of the resulting rectangle. Then a cushion is created to remove moisture, consisting of sand and crushed stone. They work like this - either mix the components in equal proportions and sprinkle the mixture over the entire area, or make a bottom layer of sand and a top layer of crushed stone. Thanks to this design, most of the soap will remain on the pebbles when washing, instead of getting into the soil.
Wooden pallets are placed on top of the cushion to serve as the shower floor. To extend the life of wood, it is recommended to treat it antiseptic impregnation and water-repellent compounds, for example, hot oil or drying oil.
Capital construction
If you plan to use the shower room intensively and for a long time, and not by one or two people, but by the whole family, it is better to choose the option of capital construction. However, you will have to make a solid concrete foundation.
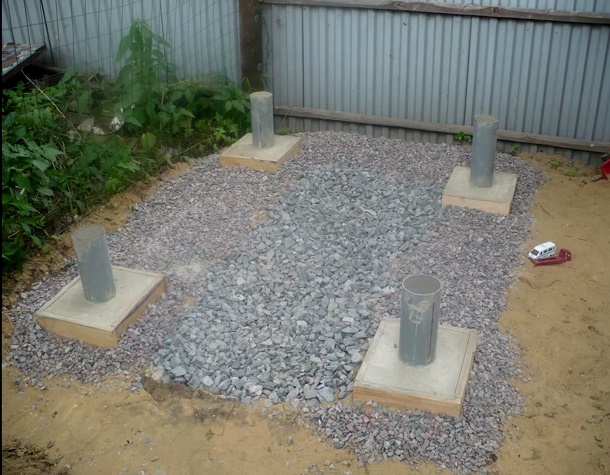
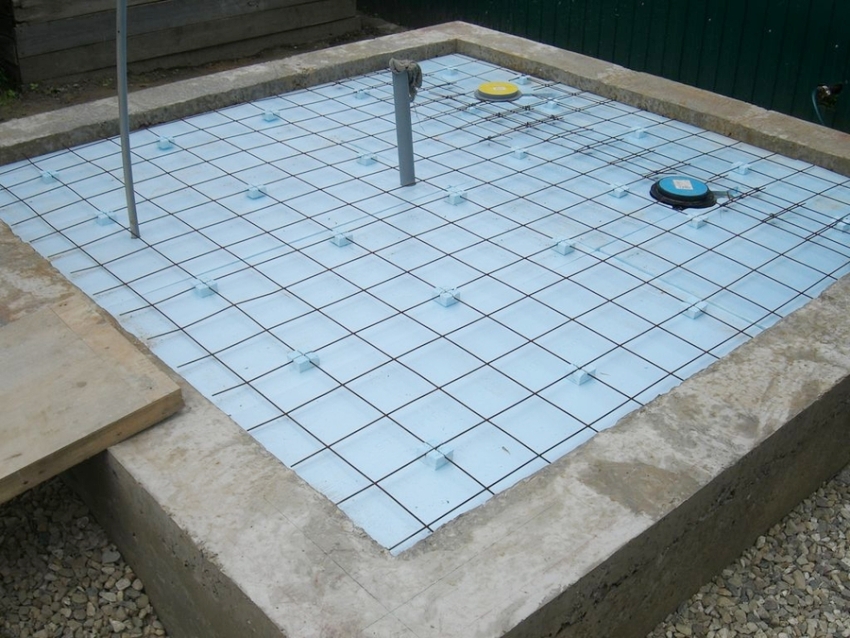
The hole needs to be made deeper - thirty centimeters. At the corners of the rectangle, mortgages are placed from old pipes or wooden beams. When using wood, it must be treated with a water-repellent compound and an antiseptic. It is also recommended to wrap the timber with roofing felt.
When pouring the foundation, you need to pay attention levelness of the floor, since water will accumulate in the holes. A smooth surface is achieved by using a level and rules in the work, as when pouring any screed. Do not disdain beacons - the task will be greatly simplified.
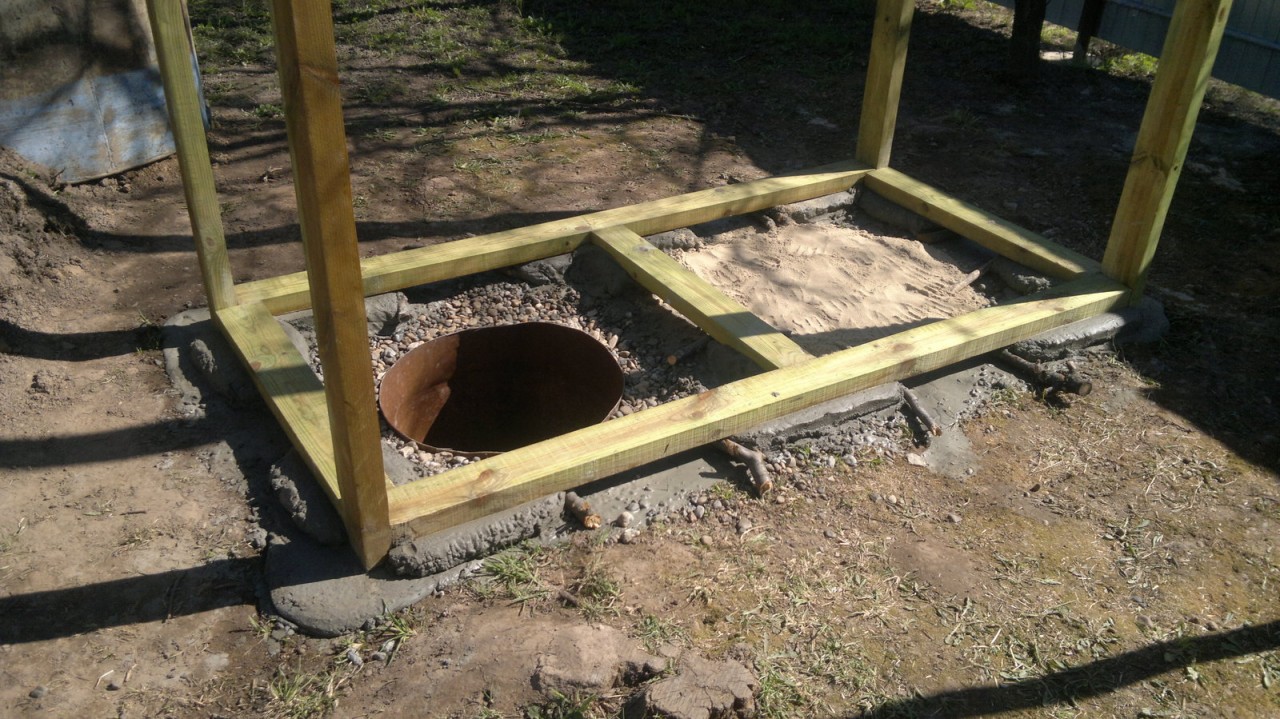
Drain - cesspool or drainage well
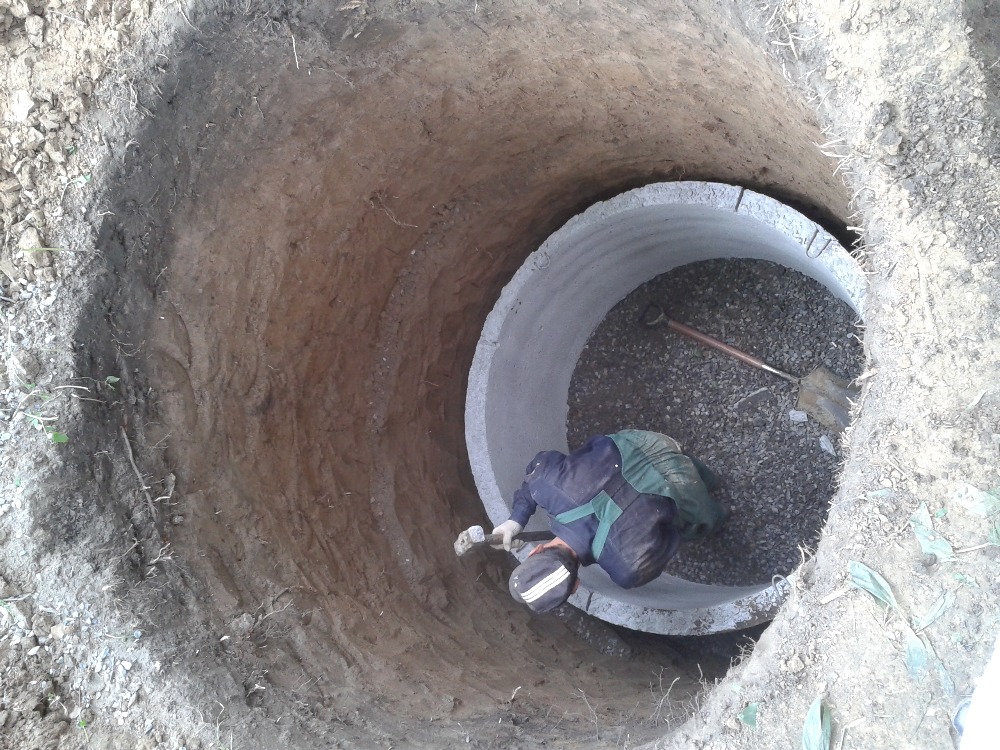
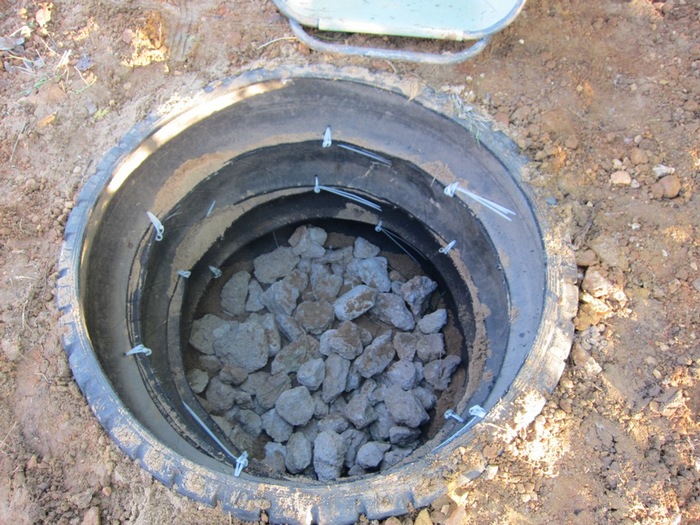
When arranging a cesspool, get ready for sampling a couple of cubic meters of land, since it makes no sense to make it smaller. A drainage cushion is made at the bottom using the technology described above, with sand and crushed stone. The walls of the cesspool must be sealed and do not allow moisture to pass through. For these purposes, ready-made concrete rings, bricks, even rubber tires from trucks are used.
The disadvantage of the design is the need to periodically pump out sewage from the pit. Two nuances are taken into account - access to it by appropriate transport, and the characteristic aroma emanating from the cesspool. Therefore, it is recommended to place it at least 3-4 meters from a residential building, closer to the road.
If the shower is not used very often, an option is to dig right under it. drainage well. It is a hole a couple of meters deep, at the bottom of which there is a cushion of sand and crushed stone. A perforated plastic pipe is inserted into the pit, into which a mixture of broken brick, crushed stone, slag and similar materials is filled to the top, acting as a filter element. Geotextiles are laid on top of the pipe and covered with a layer of soil. A wooden pallet is already installed on top of this structure, in which holes are made for drainage.
Tank Recommendations
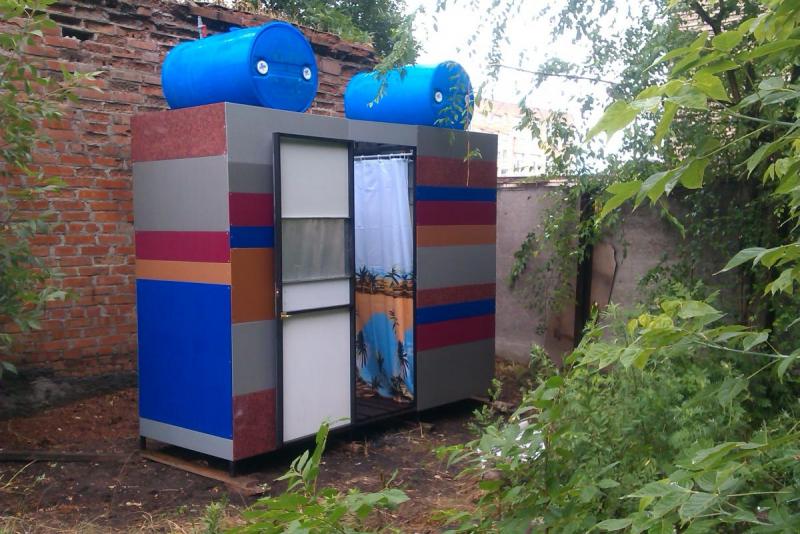
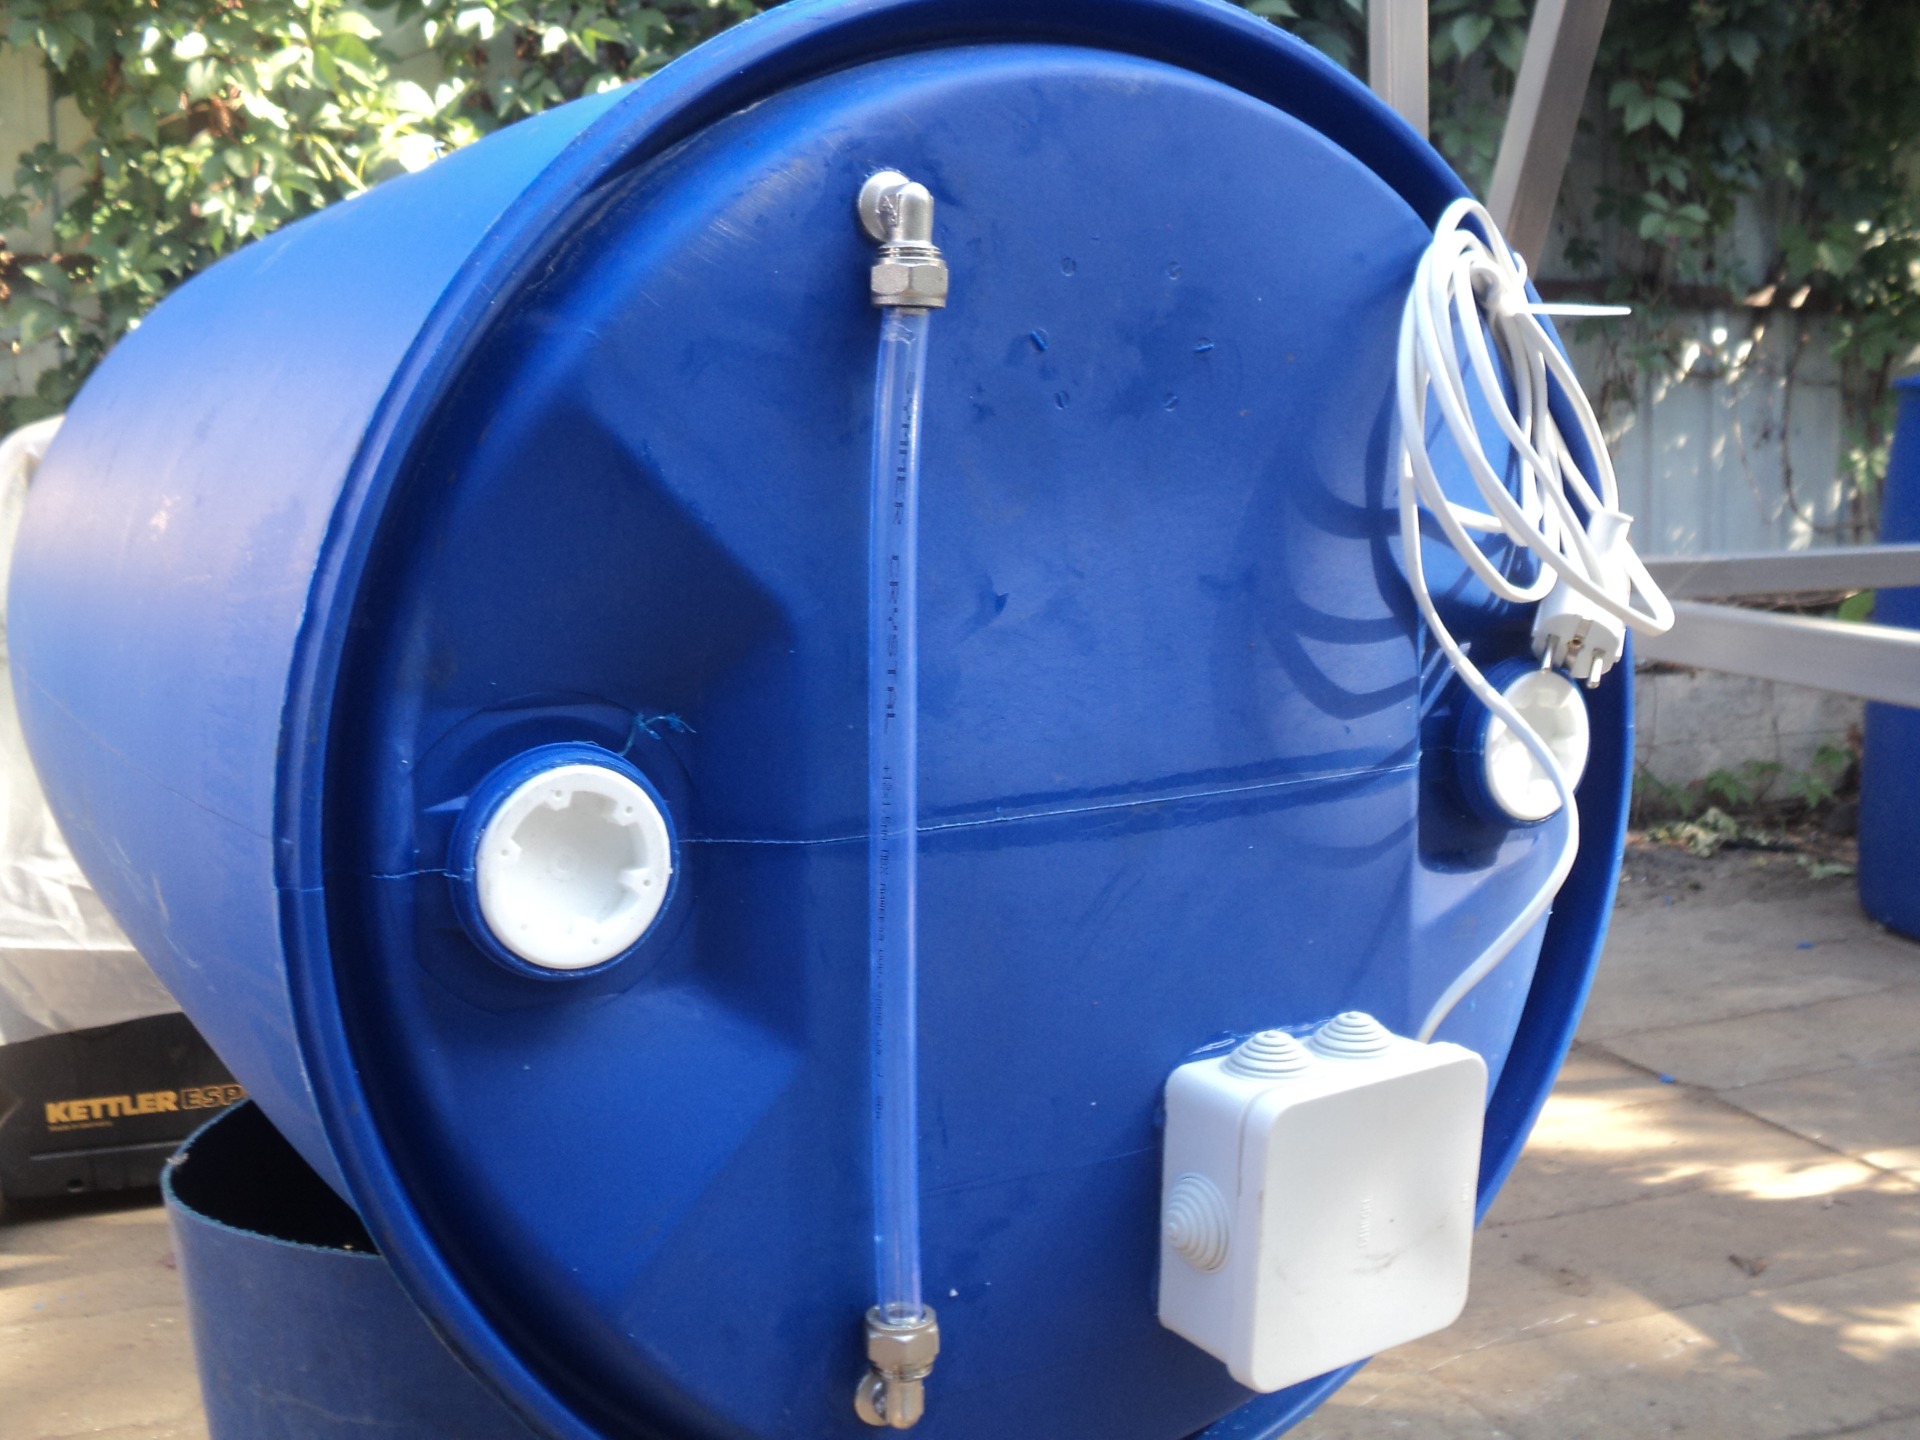
The simplest option would be to install a black tank on the roof of the shower, which is heated by solar heat. A hose is connected to the tank to fill it with water - you won’t be carrying, say, two hundred liters in buckets. There is one problem with this option - the sun does not always warm as much as we would like. And what to do in this case? There is a solution - heated tanks. There are three types:
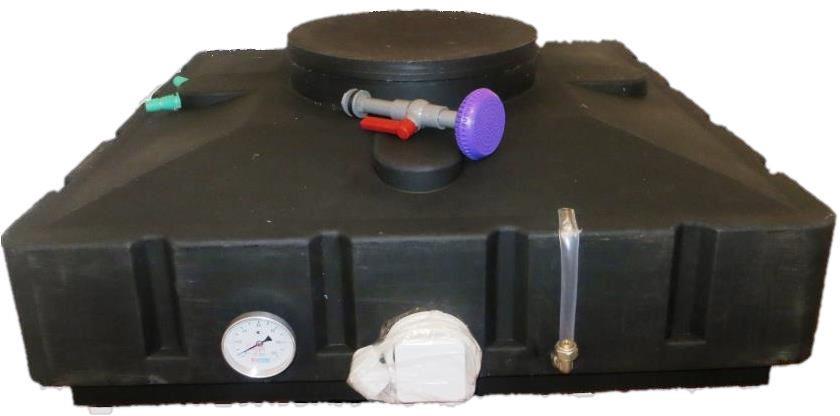
- Metal tank with built-in pump and heating element. This is actually a song - it is filled automatically, and the heating element maintains the desired water temperature. The downside is that you can use such a miracle tank if your dacha has a water supply system.
- Flat galvanized steel tank for low showers, there are options with a capacity of up to two hundred liters. It works on the principle of a boiler, has a small shower head, and also requires running water.
- A heated plastic tank does not require a constant supply of water, but there is also a disadvantage here - if the heating element is not automatic, it requires an eye and an eye.
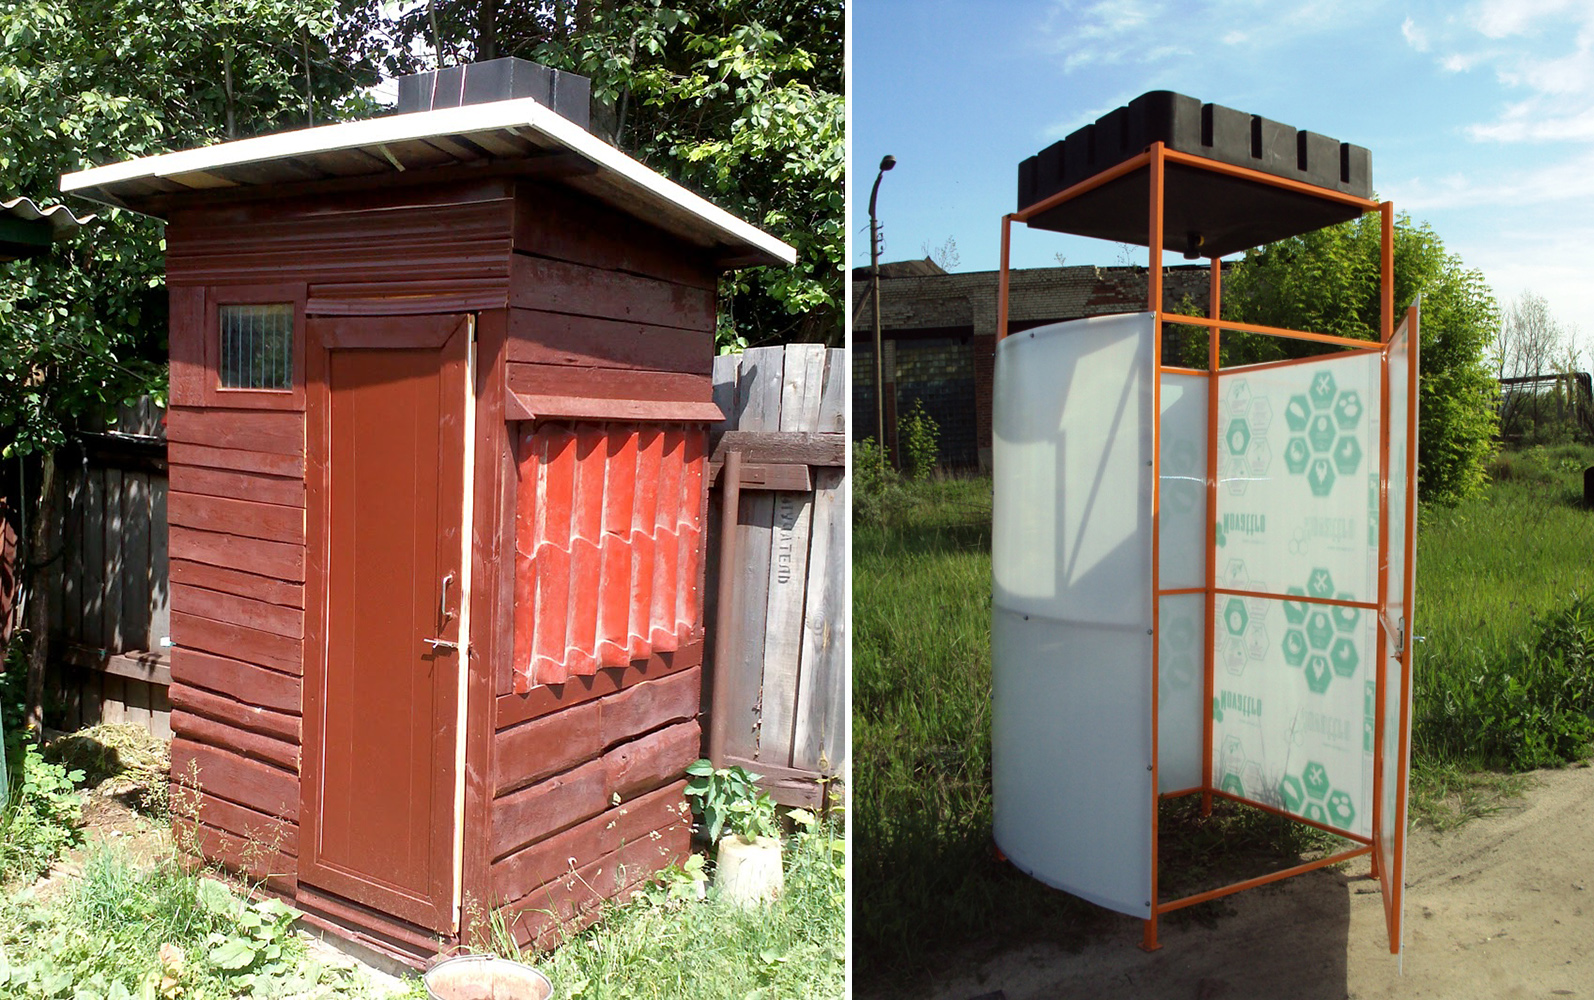
The simplest shower options

It is not always necessary to erect a permanent structure. In cases where the shower will be used once every five years, you can use portable options:
- A portable shower, where a kind of large heating pad serves as a water container, with a nozzle on which a small watering can is mounted. The “hot water bottle” has a special loop that allows you to hang it freely on a tree branch or on some kind of hook. The capacity is small - about 15 liters, and in the sun it will heat up very quickly. But you won’t be able to splash around in such a shower for long.
- Shower stand, which is a metal pipe on legs, with a watering can and a hose mount. The disadvantage of the design is the lack of a container and the need to connect a hose for washing. Plus - after washing, you can take it and bring the structure into the barn, out of sight.
Wooden summer shower
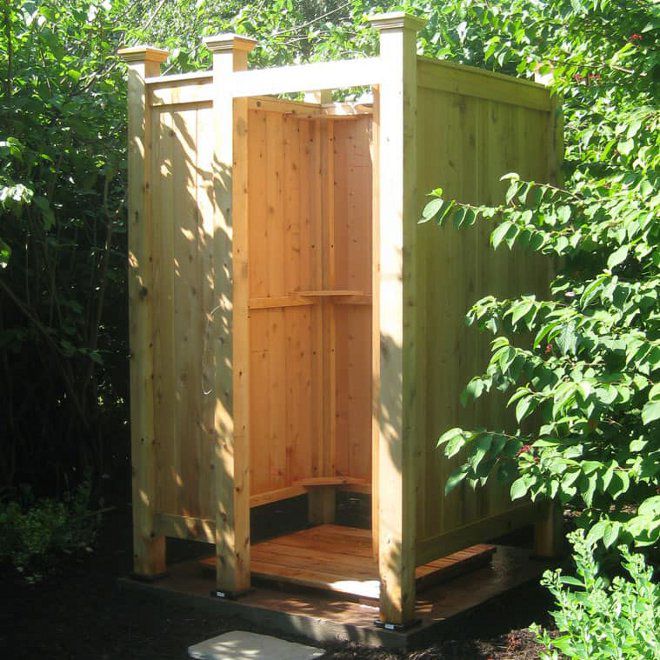
To make the structure you will not need much:
- in fact, timber - timber, boards, lining, slats - in a word, what it is planned to build an architectural monument from;
- wood screws or nails;
- rubber hose and watering can;
- crushed stone and sand to organize a drainage cushion.
We have already discussed how to organize the foundation for a temporary shed; we will not repeat it. Wooden beams impregnated with appropriate compounds will be used as mortgages here. To protect the wood from rotting, formwork should be made of brick or cinder block about 15 centimeters high in the corners, or even around the perimeter of the pit.
Boards of at least 30 mm thickness are used as the base of the structure. The size of the base corresponds to the perimeter of the pit. Four beams with a cross section of 100x70 mm are attached to the base, and then the resulting frame is tied with at least two jumpers. The top of the structure is also mandatory tie, since there will be a tank of water there.
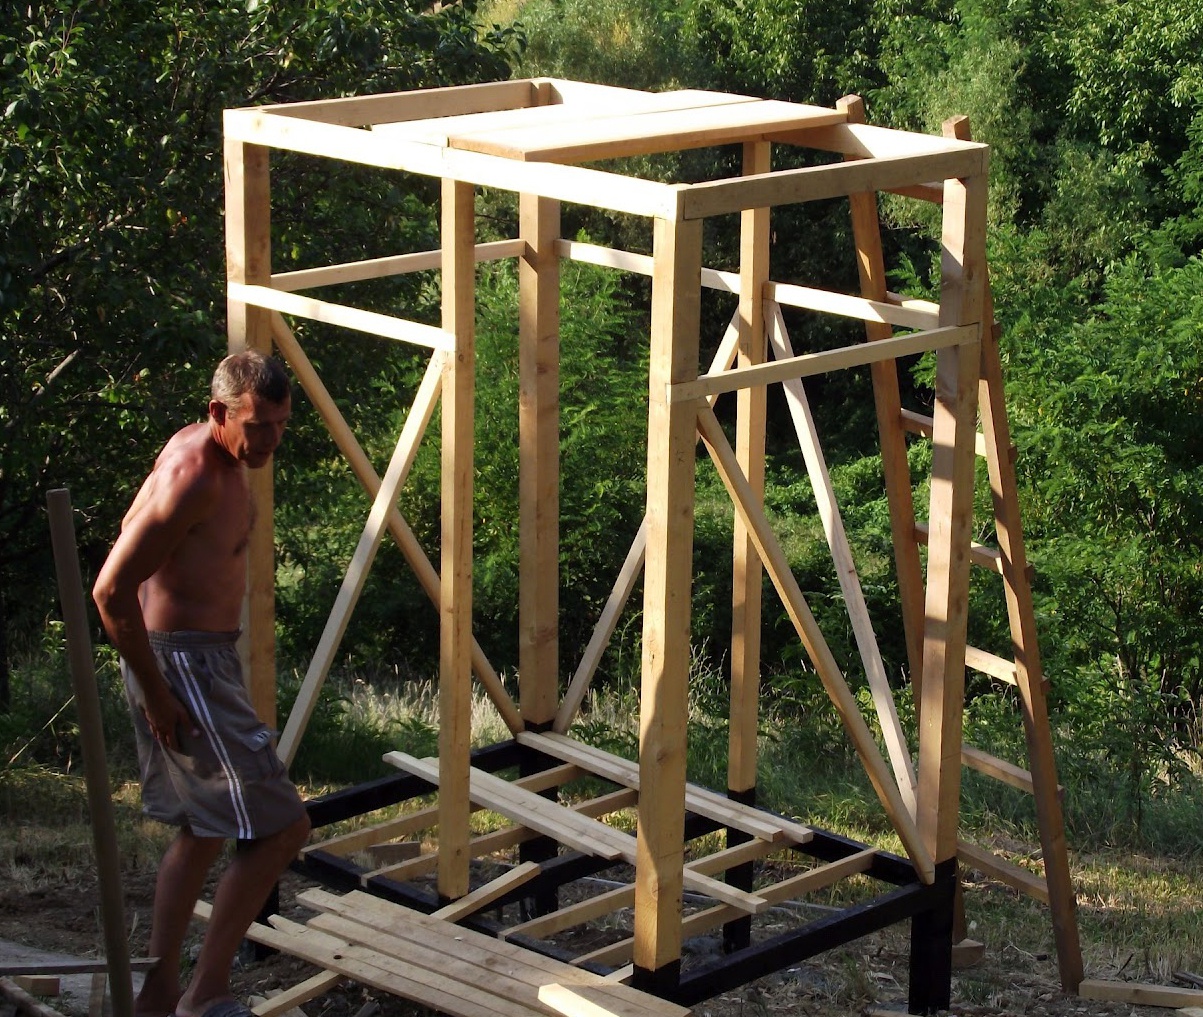
You can sheathe the frame at your own discretion with clapboard, blockhouse, slats - whatever God pleases. The main thing is to leave a gap of 2-4 mm between the boards, since they will swell from moisture. Approach the issue carefully protecting wood from rotting — there is no need to skimp on antiseptics, primers and varnishes. Ideally, it is best to paint all the parts before assembling the structure.
After assembly, it’s time to install the tank. The simplest option is to place it on the crossbars and securely fasten it with straps. But here, whoever invents something, so it will be.
Other temporary shelter options
The example above is essentially a template for the rest of the options. First of all, the frame is assembled, then something is sewn onto it. So, if you have time and money, you can make yourself a summer shower from:
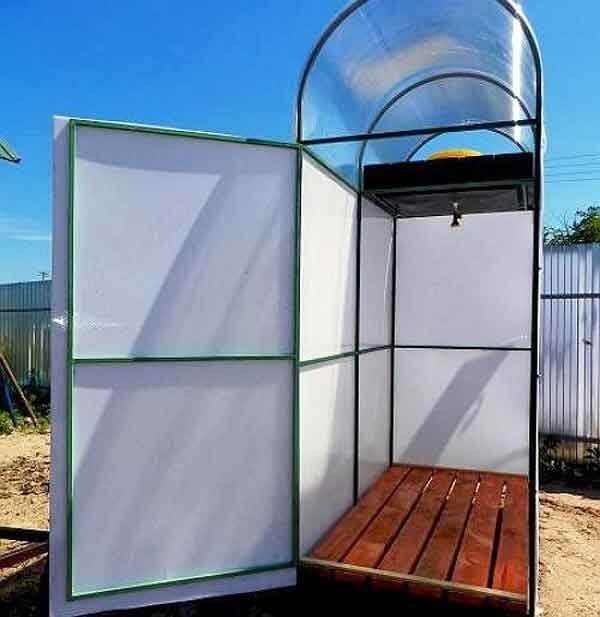
- Polycarbonate - in addition to this material, often used for the construction of greenhouses, you will need a profile pipe, say 40x20, and a corner 50x50 mm. The frame is made of metal, after which polycarbonate sheets are sewn onto it. To work, you will need a welding machine to weld the frame.
- Corrugated sheets — the design is similar to polycarbonate, the principle is the same. But the frame is sewn up, as you probably already guessed, with corrugated sheeting. Fastening the sheets, both in the first and second cases, is carried out using specialized metal screws.
These are the most popular, but far from the only options.
Capital brick building

Briefly about the work procedure:
- A strip foundation is being installed along the perimeter of the building. The depth of the trench should be at least 20 cm, width - about 40. The bottom is covered with crushed stone or broken brick. Then the formwork is placed and the concrete solution is poured, liquid enough to seep into the stones.
- After the foundation has settled for at least a couple of weeks, they begin build brick walls, controlling the verticality of the structure using a plumb line or level. When laying the top layer of brick, inserts are made from wooden beams. They will serve as a support for the tank, and they will also support the roof of the building. The doorway is reinforced with a metal corner or channel. A small ventilation window is made in the room. The roof is covered with corrugated sheets or slate.
- Drain arranged according to the scheme described above, it is recommended to make a drainage well in such a room, from which to make a drainage hole. The well is covered with earth on top and filled with concrete, leading out the drain pipe. To facilitate the draining process, the floor is made with a slight slope towards the middle. A wooden tray with holes for drainage is placed on top of the concrete floor.
- Tank in a permanent building, it can be supplied with a capacity of 200 or more liters, if the water supply on the site allows, then with a heating system. Everything, as usual, depends on the means.
That's probably all. It is simply not possible to describe all the intricacies of construction within the framework of an article - you will need to write a book.