DIY wooden chest
 The chest is one of the oldest human inventions. It is believed that the first chests appeared at the end of the Stone Age. They were used to store clothes, dishes, and household items. The material used to make chests varied depending on where people lived, their cultural traditions, lifestyle, available resources, wealth and position in society. Most often, chests were made from wooden planks, but wicker, metal, leather, fabric, felt, etc. were also used. Even the wardrobe we are used to is a descendant of a chest placed on its side. Now the chest is experiencing its rebirth. It is increasingly found in the collections of fashionable furniture designers and, with the right approach, fits perfectly into interior solutions of different styles and trends.
At the same time, it is not at all necessary to spend a lot of money on buying it; you can make it yourself from wood, with skillful hands and a basic set of tools. A hand-made and antique-style wooden chest is a unique item that will be an excellent decoration for your own home or a wonderful gift for people who value the originality and nobility of products made from natural wood.
The content of the article
Types of materials for creating a wooden chest
Wooden chests can be made from different types of raw materials:
- Plywood. Sheets of plywood are sold at any hardware store, are inexpensive, and you can choose any thickness. Plywood is easy to work with and retains its shape well. But products made from plywood alone look cheap and boring.
- Furniture panels made of solid wood of different types of wood. Expensive and noble material. They are very strong and allow you to create durable and reliable structures. However, they require some carpentry knowledge, are more difficult to find in stores, and are also very heavy.
- Furniture board. Cheaper material compared to shields. It’s easier to work with boards; even a beginner can handle them; they’re easier to cut into parts of the required size. Buying them in stores is not as easy as plywood.
- Furniture board + plywood. By combining these materials in one product, you can achieve excellent results and get a reliable, strong chest that has a beautiful and noble appearance.
What you need to make a chest with your own hands
Making a chest with your own hands, following the instructions given, is very simple; you need minimal knowledge about working with wood and the ability to draw simple drawings, as well as the tools and materials listed below.
Tools:
- manual router with copy cutter;
- jigsaw;
- miter saw (if available, possible without);
- grinder (not grinder);
- drill or screwdriver;
- wood drill;
- clamps, it is more convenient to use F-shaped ones;
- file;
- hammer;
- roulette;
- pencil.
Materials:
- dry planed edged board, size 25x100 mm, 20 meters;
- plywood 4 mm thick, 1 sheet 1.5x1.5 meters;
- wooden furniture choppers;
- furniture nails;
- ordinary nails;
- wood screws;
- screw-in hinges 2 pieces;
- loop for padlock;
- the padlock;
- stain;
- brushes;
- PVA glue for carpentry or construction.
Thinking through the design
First of all, you need to decide on the sizes. If you make a chest for yourself, then the dimensions are determined based on the place where you plan to put it and what will be stored in it. For example, if it is too bulky, it will look bad in a small room and interfere with movement around the room, and a small one may be inconvenient for storage.
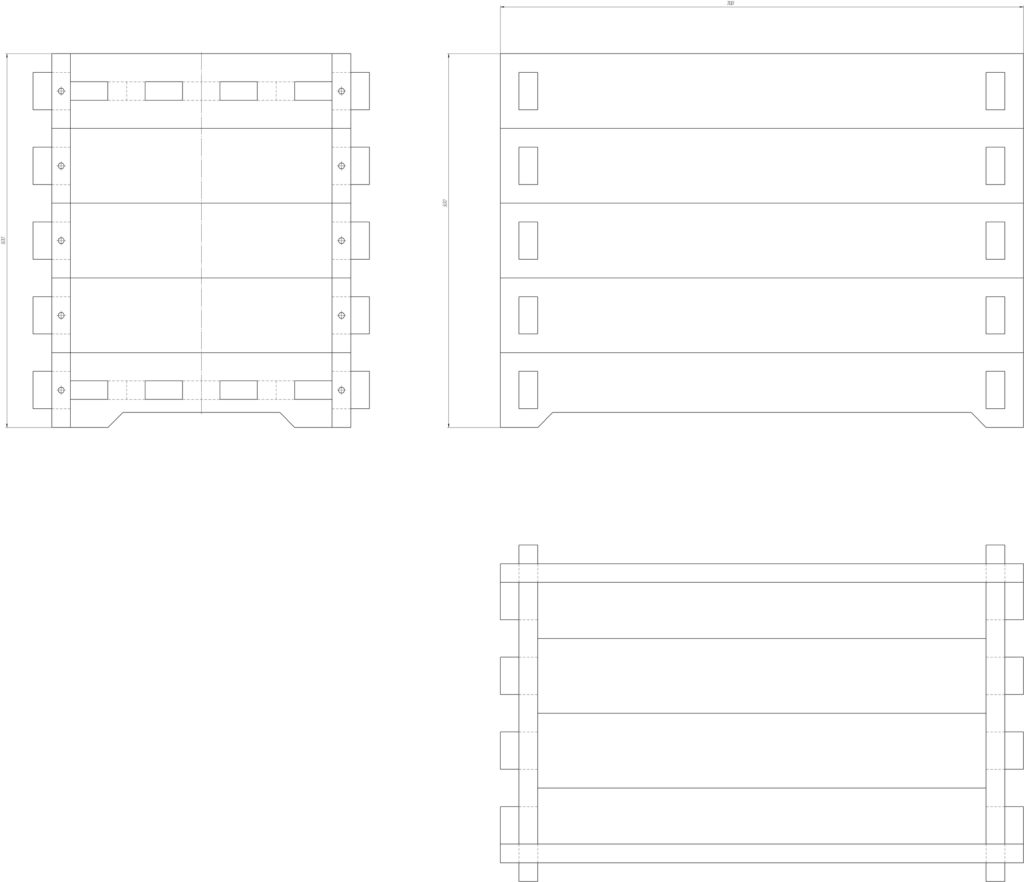
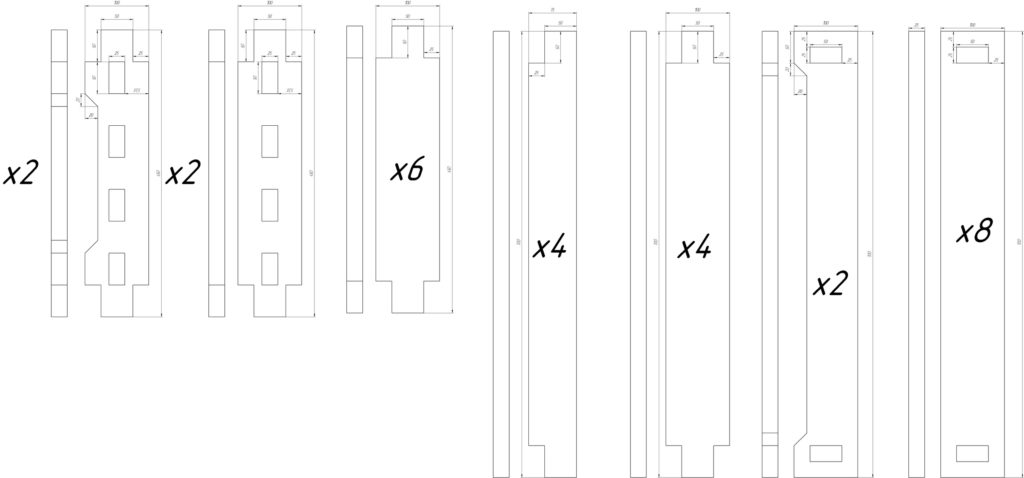
We make a drawing on a computer in any design program: Compass, AutoCad, Solidworks, etc. and print the parts in full size. If there is no experience in working with such programs, then we draw on paper, also in real size. Or take the drawing posted here.
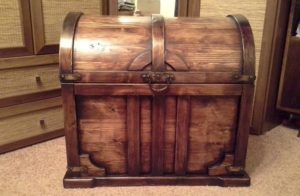
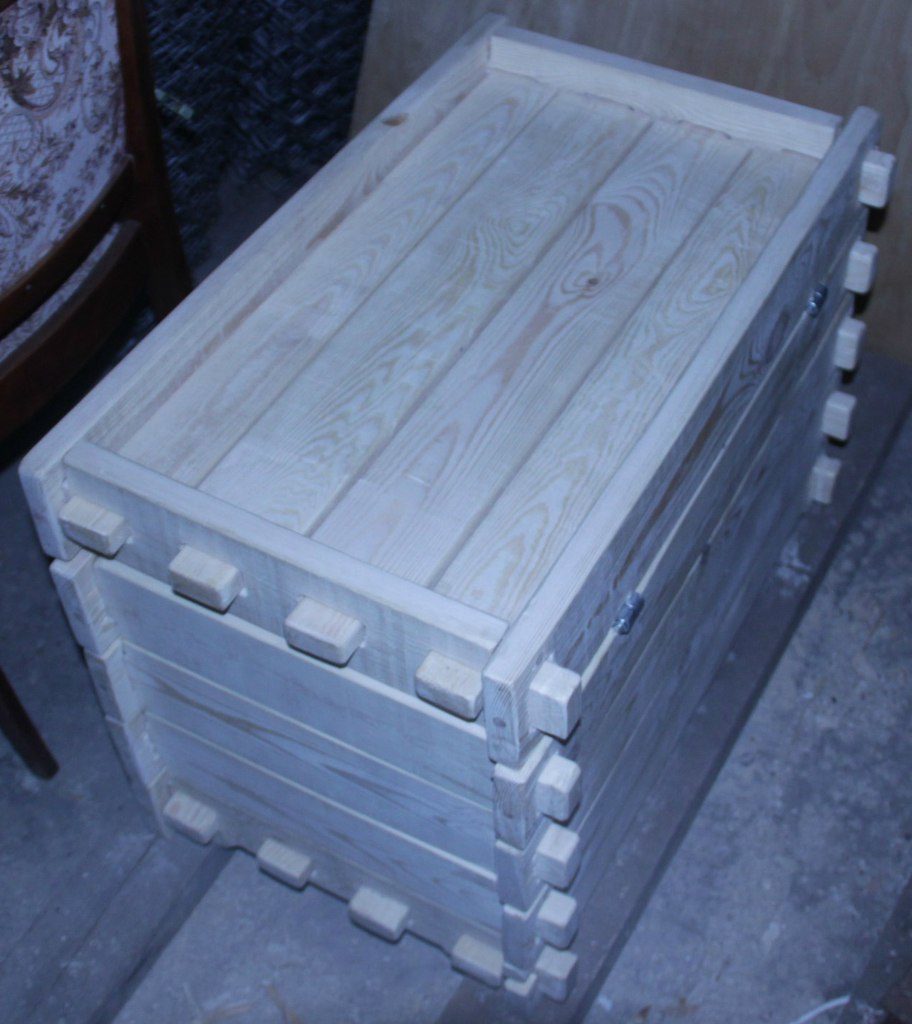
Flat lid chest with photo
The most convenient chest with a flat lid, it allows you to place various objects on top (lamps, vases), put books, or just sit with a pillow. The convex lid limits the options for its use and is more difficult to integrate into the interior. Therefore, here we consider the option of making a flat and reliable lid that can easily withstand the weight of an adult.
Making a decorative wooden chest with your own hands step by step
Let's start making the chest. Using a printed drawing, we cut out a plywood template with a jigsaw because there will be many repeating parts of the same type and size. At the edges we leave 1-2 mm from the border of the drawn line, so that we can then file it to the ideal size.

After finalizing the template, we cut boards of the required length with a jigsaw or miter saw (more convenient).
ATTENTION! Only dry furniture boards should be used! If made from ordinary undried lumber, they may subsequently crack, and the structure as a whole will become warped.
You should get 18 pieces. 700 mm and 10 pcs. 450 mm each. We place the plywood templates on the boards, press them with clamps and use a jigsaw to cut out the boards around the template, with an indentation of a few millimeters. We take a router with a copy cutter and trace it according to the template, ensuring that the dimensions match perfectly. The bearing of the copy cutter should touch the template, but not touch the workpiece, otherwise it will not cut accurately. We repeat the steps for all existing boards. Further:
- We process all surfaces with a grinding machine to get rid of burrs and irregularities.
- From plywood we cut out the inner lining for the chest: bottom, walls, bottom of the lid.
- We assemble each tier separately.
- Using the tongue-and-groove principle, in each tier we drill holes for the choppers with a drill or screwdriver, so that it passes through both boards at the point of their connection.
- Lubricate the hole with glue and hammer in the chokes.
- Repeat for all connection points.
- We stack the tiers one on top of the other, everything except the lid.
- We nail plywood of the required size inside the chest and onto the lower part of the lid with furniture nails.
- We mark the places where the hinges are attached to connect the lid to the box.
- We drill at an angle of 15 degrees with a drill or screwdriver.
- We disassemble the screw hinges and screw one part into the box and the other into the lid.
- We collect the loops.
The chest is ready!
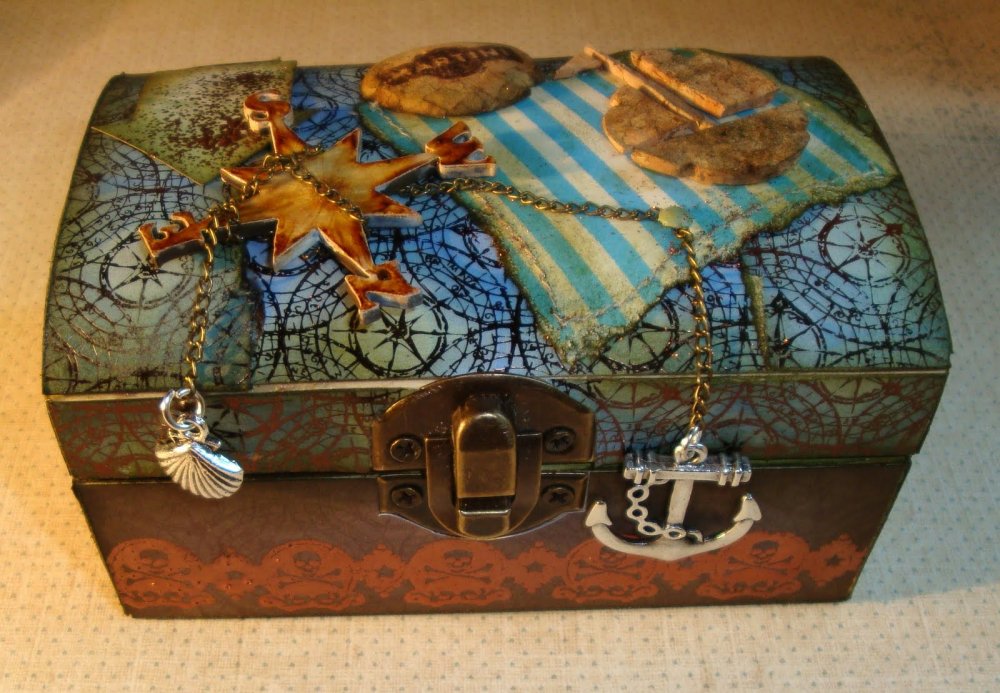
Antique wooden chest decor in pirate style
One of the popular options for antique decor is decorating a chest in a pirate style.It will fit perfectly into LOFT style interiors, or will be a great addition to a children's room in a marine style.
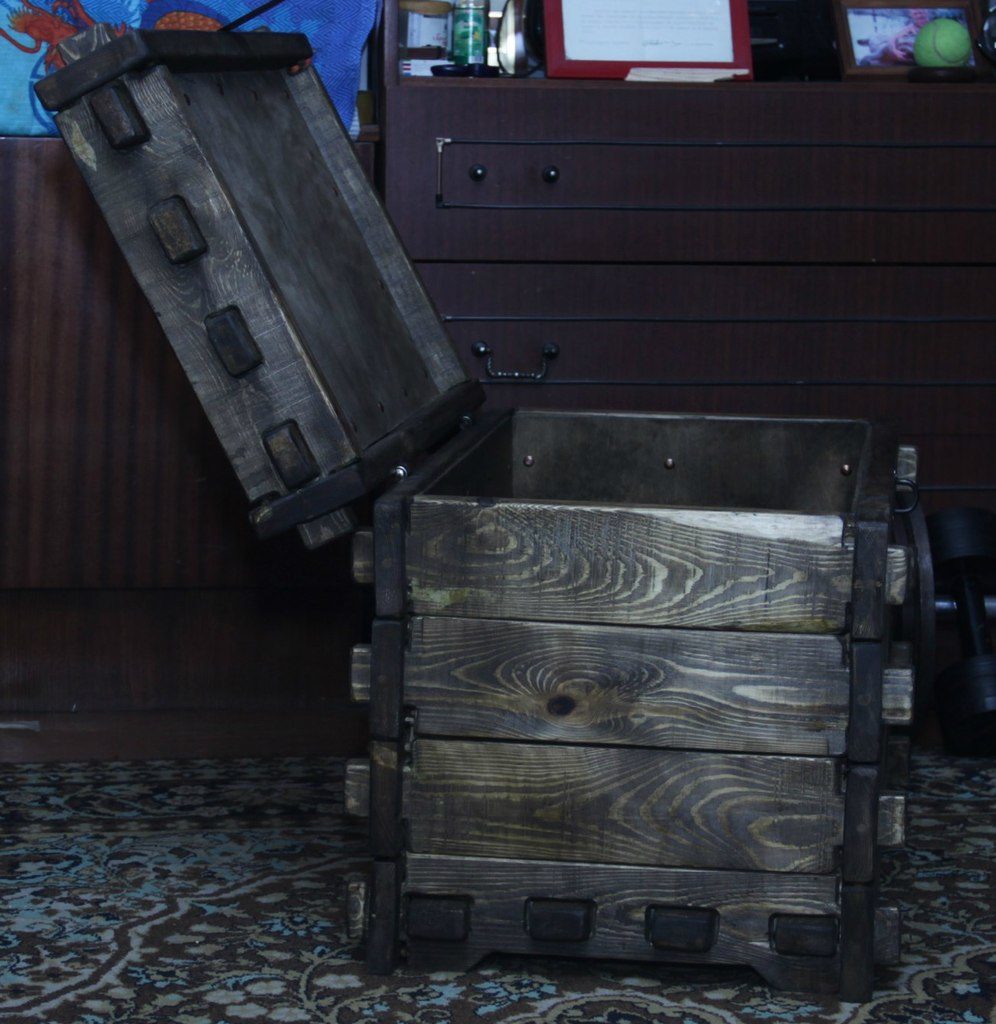
REFERENCE! Pirates most often robbed ships passing by. Sometimes they were lucky and got riches right in the chests of the owners, but often, the treasures they obtained turned out to be scattered, and they had to be put somewhere to be transported or buried in secret places, and the pirates had to make chests right on board from the remains of defeated ships. Authentic pirate chests are brutal and strict without unnecessary decorations. Their main characteristics are simplicity of form and reliability.
To make the chest look like an old pirate chest made by a shipwright, take an alcohol- or water-based stain in the color you like, for example “Oak”. Using a paint brush, treat the entire surface inside and out in 1–3 layers. The more layers, the richer and deeper the color of the wood. Waiting for it to dry completely. Coat with varnish as desired.
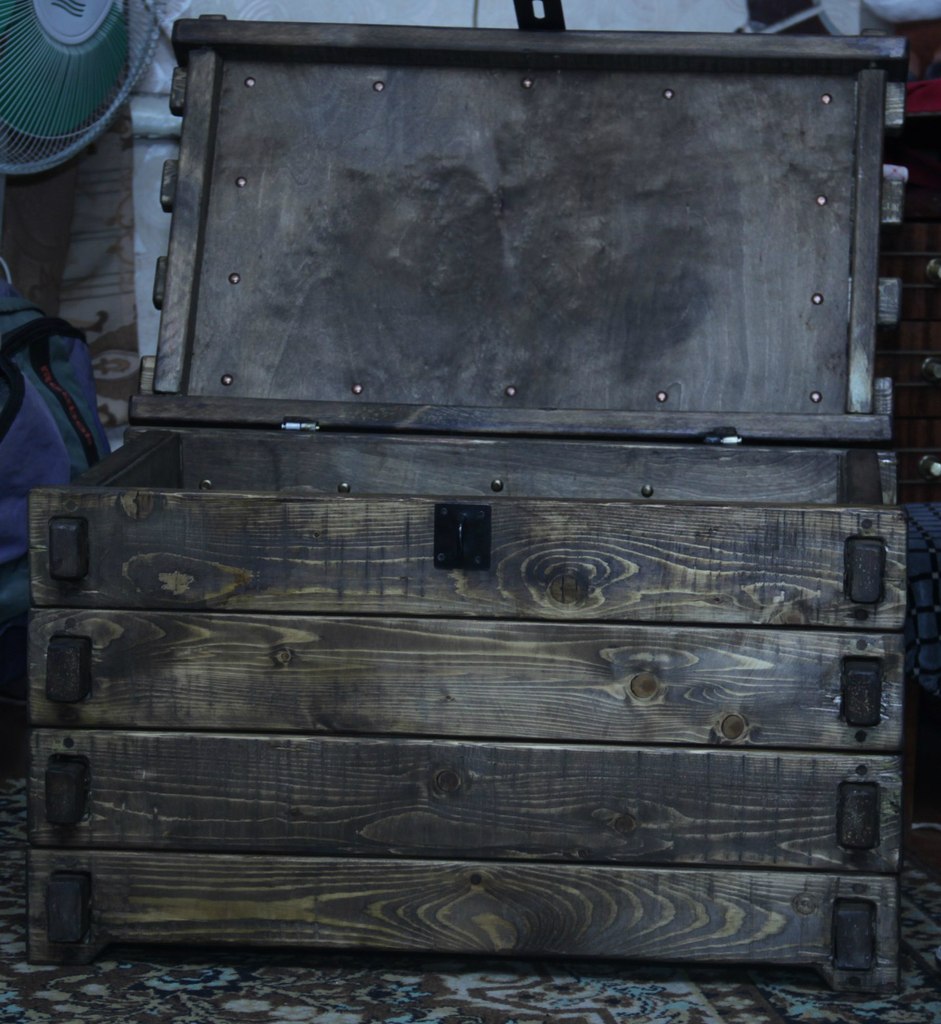
A mandatory element is a lock; it can be internal or padlocked. A padlock with hinges looks more interesting. You can take simple options that are sold at any hardware store or choose forged elements; they are more expensive, but they look more impressive. If the hinge is a classic metal color, not at all antique, it can be easily painted with an aerosol can in black, shades of copper, brass or antique silver. The choice of paints for such tasks is huge. We nail the loop for the lock to the lid and the box with nails or screw it with screws, and hang the lock.
Additionally, you can use other decorative elements: leather or metal overlays, wide and narrow metal ribbons, carved wood parts. Decoupage with geographical maps, pistols, sabers, hooks, and a scattering of pirate doubloons looks stylish and fashionable. Decor options are limited only by your imagination.
Now it’s easy to please yourself or your loved ones with an excellent original product, made of natural wood, existing in a single copy, which will decorate any room and will serve usefully for many years.