How to make a wooden rake?
A rake is necessary for every gardener and quite affordable tool. It would seem that there is no need to take on making them yourself. However, completely wooden rakes are extremely rare in stores. Due to the simplicity of the design and the availability of the material, the independent creation process will not take much time and will not require any great effort.
The content of the article
Design and features of the rake
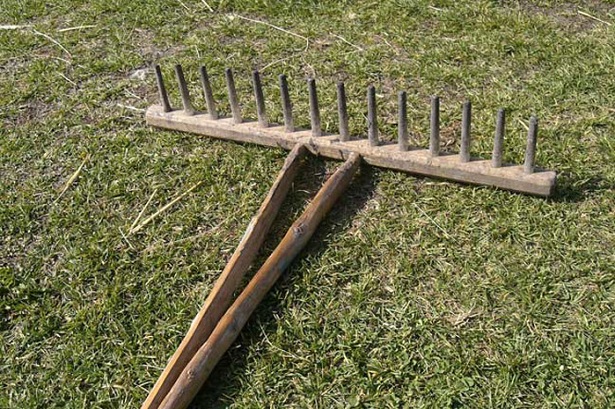
A tool that facilitates gardening work consists of three elements:
- pads with pointed teeth;
- stalk;
- coupling
Straight rakes, the main purpose of which is to loosen and rake grass, visually look like the letter “T”. The ridge and the stalk are fixed perpendicular to each other.

A good and easy-to-use garden tool should have a light and long handle. This will reduce stress during operation. It is necessary that the teeth are short, slightly curved inward, and spaced widely apart. The optimal number of them is no more than 7–9 pieces.
Cleaning grass with a homemade rake is no less effective than using a purchased device.
What kind of wood is suitable
It is recommended to make the instrument from various varieties:
- cuttings - from pine or other coniferous species (characterized by hardness, lightness, resistance to moisture);
- the block and teeth are made of birch, ash, elm, and rowan.
Birch is the easiest to work with, and ash has a higher strength index than oak. Elm has good properties, but is difficult to machine with cutting tools.
How to make a wooden rake
You need to prepare wood, an ax and a plane, a drill, a hammer, a knife, and nails. Start the process with the block:
- the tree is cleared of bark, dried in a dark and dry place - the workpiece should be rectangular in shape, approximately 50–60 cm in length, 5 cm in width and 3 cm in height;
- using a 10 mm drill, make holes for installing the teeth in 40 mm increments - due to the roughness of their inner surface, the teeth will hold more securely;
- between the holes intended for the teeth, holes are prepared in two places for the future fork of the handle.
Now they make the teeth. The same wood is suitable for them as for the block:
- squares with sides of 1.5 cm are drawn on the end part of the block;
- use an ax to split the workpiece along the markings;
- use a knife to give each part the desired shape - the length of the working part of the tooth (pointed) is approximately 10 cm, and the diameter of its head (wide part) should exceed the circumference of the hole in the block by 1-2 mm to ensure a tight fit;
- Before “planting” the teeth, their sharp edges must be blunted so that the walls of the hole do not ride up;
- To prevent the block from splitting during the process of hammering in the teeth (with a hammer or mallet), use a wedge-shaped clamp - to prevent them from falling out in the future, you can fix them with nails.
The length of the cutting should be from 170 to 180 cm. The diameter of the handle is approximately 3 cm. At its end, a cut is prepared for the fork. Its depth should be approximately 25 cm.
To prevent the handle from splitting during the process of spreading the fork at the ends (by 10 cm), a metal coupling should be fixed at the junction using nails.
At the ends, the resulting fork is equipped with spikes, which must correspond to the prepared holes. Then the block is put on the spikes of the handle fork.
Finally, the handle should be sanded and the block and fork should be coated with oil-based paint or waterproof varnish.