Insulating the attic with polystyrene foam from the inside: technology, insulation thickness
Insulating the attic with polystyrene foam is one of the main ways to protect the attic space from the cold. The material is lightweight, affordable, moisture resistant and has low thermal conductivity. However, it is brittle, so you should be careful during installation. Step-by-step instructions and a description of the process for laying sheets are presented in this article.
The content of the article
Material selection and calculations
Insulating the attic with foam plastic from the inside has its advantages and disadvantages. To get the highest quality result, it is recommended to choose the PSB-S brand 15, 25 or 35. The number means density - 15, 25 or 35 kg/m3, respectively. The sheets have dimensions of 2000*1000 mm, while the thickness can vary from 20 to 500 mm.
Insulating the attic with polystyrene foam of this type provides several advantages:
- good protection from cold;
- affordability;
- ease of installation;
- soundproofing;
- resistance to humidity;
- resistance to mold and rot;
- safe chemical composition.
However, insulating the attic with foam plastic has pros and cons:
- fragility;
- the material does not allow air to pass through, so you need to take care of ventilation;
- When a fire occurs, it melts and releases harmful substances.
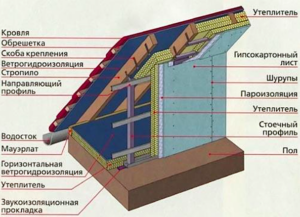
Insulating an attic roof with foam plastic is quite justified, since the material is inexpensive and has low thermal conductivity.It is secured from the inside between the cells of the frame, then a vapor barrier and finishing material are placed, as shown in the diagram.
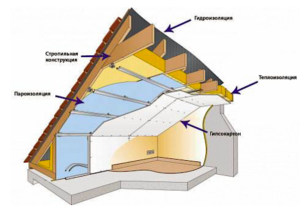
As you can see, the insulation of the attic roof with foam plastic is represented by a “sandwich” of 5 layers. Moreover, before starting work, it is necessary to calculate the amount of insulation. Online calculators are used for this, but they only give approximate results. More accurate calculations are carried out independently.
To do this, they focus on the thermal conductivity coefficient of the foam, which is 0.04 W/m*K. Based on this, we can say that the thickness should be about 135-155 mm. It is better to take with a reserve, i.e. from 160 mm = 16 cm. Next, this value is multiplied by the total area of the attic ceiling, for example, 50 m2. It turns out that insulating an attic with foam plastic will require 50 pieces of standard sheets or 8 m3, if counted in cubes.
Step-by-step instruction
To insulate an attic with polystyrene foam, you need to prepare available means, tools and materials:
- vapor barrier film;
- wooden beam (square section 40*40 mm);
- hammer with nails;
- stapler for construction work;
- knife with a sharp blade;
- polyurethane foam.
First, the thickness of the insulation for insulating the attic is calculated, a diagram is determined - this option can be taken as a basis.
The technology itself is as follows:
- A wooden sheathing made of timber with a width approximately equal to the thickness of the beams is installed.
- There is no doubt whether it is possible to insulate the attic with polystyrene foam. The material is quite suitable if you decide on the thickness correctly. According to calculations, it should be 155-160 mm. Lay it in two layers, creating a stop for an air gap of 3 cm.Stops are attached to the rafters using clamps at a small interval from the waterproofing material - 13 cm.
- The next step of the instructions on how to insulate an attic with polystyrene foam involves measuring the width of the cells between the rafters. Insulation boards are cut in accordance with this value. They should fit almost freely or with little effort so that the material does not collapse.
- Now you need to understand how to properly insulate an attic with polystyrene foam. The plates are placed on stops and fixed with special glue (foam). The gaps are also filled with adhesive. Moreover, you need to wait a few minutes so that it hardens well in the air.
- After installing the first layer of foam, cut off the remaining parts of the glue so that the second layer fits as tightly as possible. This is the correct technology for attic insulation.
- Apply foam adhesive over the surface of the rafters, as well as on the first layer. When it begins to harden, install the slabs so that they cover the seams (joints) of the previous layer.
- Do not press too hard on the plates. It’s good if there is an air gap left as insulation, i.e. the gap is about 5 mm.
- Then a vapor barrier is installed. The films are attached to the sheathing with a construction stapler. This is done to ensure that the insulation of the attic floor with foam plastic lasts as long as possible.
- The last stage is finishing, for example, with plasterboard sheets or OSB-type panels.
Insulation of the ceiling with foam plastic should be carried out taking into account the thickness of the insulator layer. It is better to take with a small margin and carry out the work in 2 stages. For example, first lay 10 cm sheets, and then 12 cm.It is better if the thickness is greater than required, because then the EPS attic insulation will really provide an acceptable temperature even in severe winter.
In some cases, combined foam + mineral wool insulation is also implemented. Moreover, the first material is placed from the inside, and the second - closer to the roof. It is worth considering that cotton wool can be seriously damaged by moisture. Therefore, you will need sealed vapor and waterproofing.