DIY kitchen renovation on a budget: how to do it beautifully, ideas
It is quite possible to do a kitchen renovation yourself. The work is carried out in several stages - first, an estimate is drawn up and the design is thought through, and suitable materials are selected. Then they begin to prepare the premises, perform rough finishing, install windows and doors. The last stages are associated with finishing, creating an apron and connecting communications. Each step is described in detail in the instructions below.
The content of the article
Preparation and selection of materials
Before you understand how to renovate your kitchen, you need to make a plan and also decide on finishing materials. In order for the result to look beautiful, and at the same time the estimate was not too expensive, it is necessary to decide on the materials for finishing the floor, walls and ceiling.
Floor materials
Kitchen renovation ideas involve choosing the right materials. In the case of flooring, you can consider the following options:
- Ceramic tile – it is difficult to install, the thermal insulation is low. However, it is very resistant to stress and dirt. In addition, today they produce many varieties of tiles, including those imitating certain materials, for example, wood.
- Linoleum affordable and easy to install, resistant to liquids and fats.However, it may suffer from a blow from a sharp object, for example, when a knife falls.
- Another way to do a kitchen renovation with your own hands is create a cork covering. Environmentally friendly and warm material, ensures pleasant walking. However, it can suffer from contamination and is not very durable.
- Laminate – durable, easy to install, resistant to any liquids and dirt. This is a good option for a beautiful kitchen renovation. However, it does not provide complete tightness - spilled water through the joints can get onto the substrate.
- Parquet, parquet board – very durable and reliable, but cannot last long due to the negative effects of humidity and spilled liquids. It is better not to use such material in the kitchen.

Wall materials
When choosing materials for wall decoration, you can consider the following ideas for do-it-yourself kitchen renovation:
- Washable wallpaper has a protective film that protects it from liquids and grease.
- Paint is the most budget option, affordable and at the same time giving a beautiful result. For the kitchen it is recommended to use semi-matte compositions.
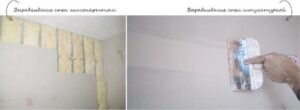
- Decorative plasters - these materials are suitable for kitchen renovation if the walls have large unevenness. Plaster allows you to get a smooth surface that can, for example, be painted or wallpapered.
- Ceramic tiles - as a rule, are used only to create aprons.
Ceiling materials
You need to do a kitchen renovation with your own hands step by step, choosing materials for all surfaces, including the ceiling. The following options are possible here:
- Suspended ceiling made of moisture-resistant plasterboard or plastic panels. It is resistant to moisture and fats and does not require special care.But it takes up a certain space, due to which the ceiling height is reduced by 10-15 cm.
- Stretch ceilings take up minimal space and are inexpensive. This is the main way to repair a kitchen with your own hands cheaply, but you need to take into account that such a surface can be damaged by a blow from any sharp object.
- Finally, there is an affordable way to finish the ceiling with expanded polystyrene or polystyrene tiles. By choosing laminated tiles, you can get a beautiful surface that is also resistant to moisture.
Repair instructions
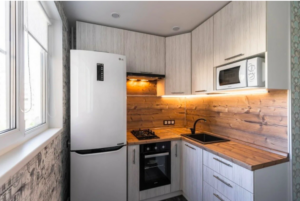
A budget do-it-yourself kitchen renovation option, the photo of which is shown below, involves rough finishing, installing windows and doors, after which the finishing touches and splashback are done. The main steps are described below.
Rough finish
At the first stage they act like this:
- Free the kitchen from furniture, utility networks, including electrical wiring.
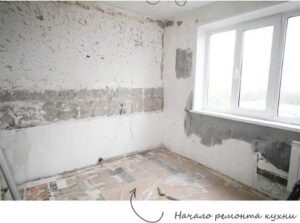
- Carry out rough work to level the ceiling, floor, and wall surfaces. Old coatings are first dismantled.

- Install new water meters (if necessary), connect the heating system.
- Replace old metal pipes with new polypropylene or metal-plastic ones (they are more durable).
- To understand how to renovate a kitchen, it is important to mark the electrical connection points. After this, new wiring is laid.
- The ceiling is leveled with plaster and a frame is formed for installing drywall or PVC sheets are stretched. You can also prepare the surface for gluing ceiling tiles.

- A budget do-it-yourself kitchen renovation also involves finishing the walls with plaster mixtures. After they are completely dry, the surfaces are thoroughly cleaned.
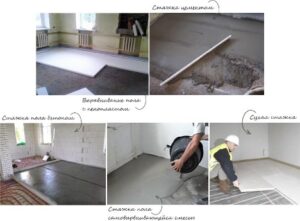
- Next, level the floor, lay a concrete screed or strengthen the boards, and cover them with fiberboard on top.
Installation of windows and doors
New windows and doors can be installed as needed. If the kitchen already has PVC and a high-quality window sill, you can only replace the doorway and panel, since old doors will clearly spoil the impression.
You can choose designs from different materials - traditional and modern:
- tree;
- chipboard;
- plastic.
By type it can be a classic swing door or a sliding door, like in a wardrobe. To save space, they often make a folding accordion, which looks more original.
Finishing
After the rough renovation of the kitchen walls has been completed, it’s time to start finishing. To do this, use appropriate materials, for example, polystyrene foam tiles for the ceiling, wallpaper for the walls and laminate flooring. The walls are first primed and decorative plaster is applied. Instead, you can whitewash it or immediately start wallpapering.

Apron finishing
Do-it-yourself kitchen renovation, the photo of which is shown above, also involves creating an apron. For this you can use different materials:
- Ceramic tile – durable, easy to clean and resistant to stains. It looks beautiful if the elements are small, for example, in the form of 10*10 cm squares.
- Glass – washes well, allows you to create beautiful lighting. But it can be fragile, so it is better to choose hardened materials. In any case, glass is fragile, so you need to handle such an apron carefully.
- MDF – modern panels that are easy to clean from dirt.A definite plus is a wide range of colors that can be selected in accordance with the design of the room.
After finishing and installing the apron, the sink, faucets are installed, a hood, faucets and sockets are installed. They purchase new furniture and hang it on pre-installed hinges. At the same time, it is important to focus on matching the design so that the room looks stylish and impressive.