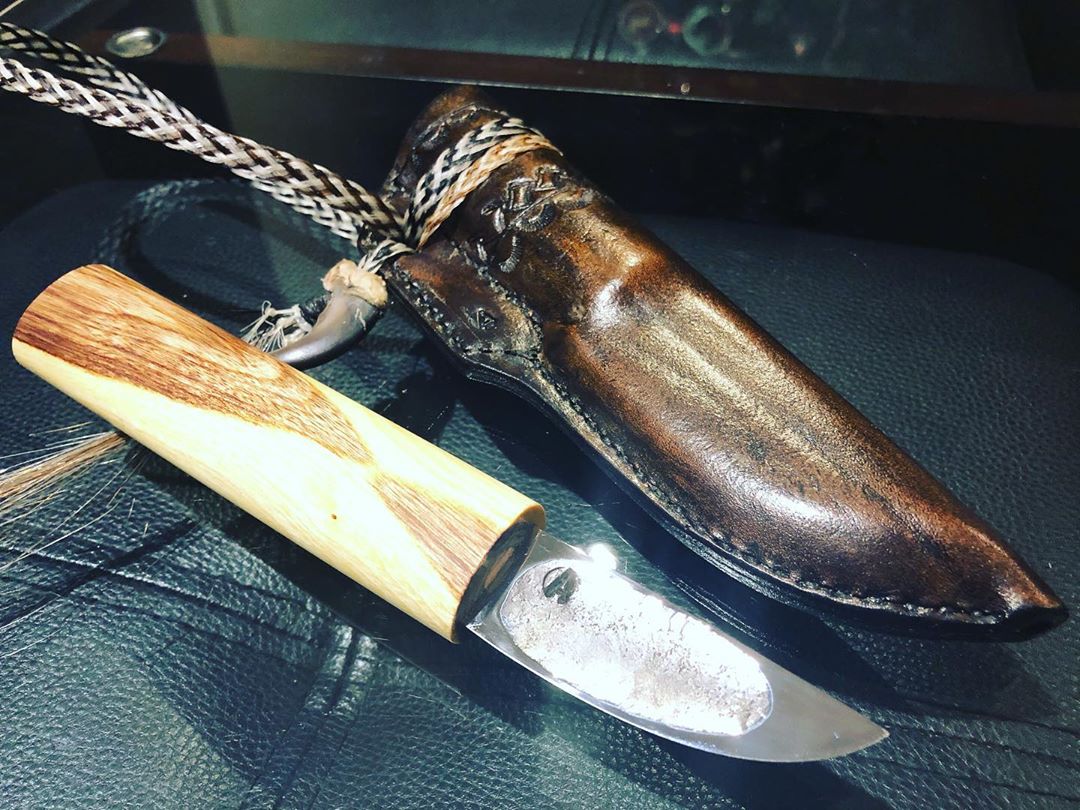
DIY Yakut knife
The most attractive feature of the traditional Yakut knife is its simplicity. It is also very easy to recognize even in the photo: by its characteristic shape with a practical fuller, which helps save metal and provides additional strength to the blade. There is nothing superfluous in the Yakut knife - neither excessive pretentiousness of shapes, nor excessive complexity in manufacturing. It is simple, original and reliable, and therefore worthy of creating a replica in your home workshop.
The content of the article
Blade making
The most common practice is making Yakut knives from old Soviet files - the metal is good, and the shape fits well. And at the preparatory stage, you will need to carry out only two actions with this workpiece: cut a piece of the required size and weld a rod to it.
The further order of work is a little more complicated:
- The file is slowly heated until the metal loses its magnetic properties (yes, a magnet for the first test is much better than guessing the temperature by color).
- The next stage is forging. For these purposes, a four-kilogram sledgehammer is well suited, which will have to forge the workpiece until it reaches a thickness of 2-3 mm along the entire length. We remember that the cooled workpiece needs to be heated to the optimal temperature in the forge (now you can navigate by the color that was during the first heating).
- After reaching the desired thickness, it is the turn of the shank and the leading edge, after the formation of which the slopes can be forged. The latter is not necessary if you prefer to form them using sandpaper.
- Now it’s the turn of the main highlight - the big dol. It is most convenient to hammer it with the sharp side of a one and a half kilogram hammer.
- Almost finished: leveling, normalization in oil, tempering and checking for cracks.
To carry out the latter, you can place a blade on two parallel bars (after release) and step on it. True, the help of a lightweight friend may come in handy, since the workpiece must withstand a weight of 60–70 kg; its strength will not be enough for more (or it will be enough, but it’s not worth the risk).
If the test was successful, you can begin the most exciting activities - sanding, grinding and polishing.
Handle of a Yakut knife
To make it, a small block of wood is suitable, in the end of which you will drill a hole for the shank. What follows is some pretty dirty work, so it is recommended to cover the polished blade with masking tape. When this task is completed, the turn of three important stages comes:
- selection of choppers for tight fixation of the shank in the block and dilution of epoxy with sawdust;
- assembling the knife (insert the shank, pour in the resin and drive in the wood chips);
- marking the center lines of the future handle.
That's all for now - the workpiece must rest for a day for the resin to harden. Well, after this time, all that remains is to give the handle the desired shape in any convenient way.
How to make a scabbard
The simplest option is a wooden sheath, made from two blanks, the width of which is greater than the width of the blade.On each of them the contour of the blade is marked (do not forget about the mirror image of the contours on the blanks). The grooves are selected along this contour using a chisel.
The next steps are sanding, checking the fit of the knife and gluing the sheath halves with epoxy resin. Well, after the resin has hardened, we give the sheath the desired shape, after which all that remains is to soak it in oil and make a pendant.
That's all: the creation of a Yakut knife with your own hands is completed. And in case some points remain unclear, the following video will help clarify them: