How to make a paper mug
“A paper mug” doesn’t sound too convincing at first glance. However, a cup made using the origami technique can help out when there is no glassware at hand. And yet, more often than not, such a device made of thick paper is used as a stand or gift for various holidays for loved ones.
The content of the article
DIY paper mug - cutting template
We recommend making crafts with your children. This is a fun and interesting pastime that is sure to be fun and playful. And the result of painstaking work can be presented to grandparents or you can decorate your desk with a bright mug, placing pencils and pens in it.
To use as disposable tableware, take waterproof paper and do not use this craft several times.
Mug made from A4 sheet
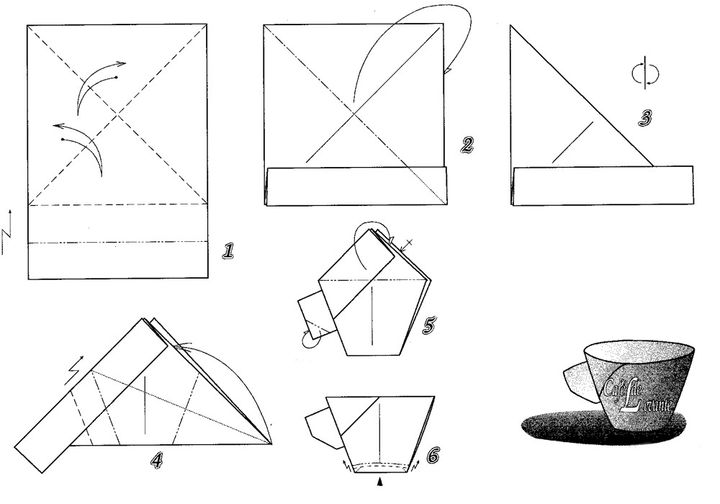
It is not difficult to find waterproof sheets on sale. Take one of these, its format should be equal to a regular landscape one. Fold diagonally and open. We bend the remaining part in half in a “slide”.
We fold the right side back diagonally. We rotate the workpiece 90 degrees to form a right angle. We make stable folds, as indicated in Figure 4. We bring the valves remaining on the surface inward. This way the mug will not fall apart at the slightest movement.
We form the handle with a zigzag - it will be more convenient and stronger.The final touch is to press the bottom edge with your finger to get a flat bottom. Disposable tableware using the origami technique is ready.

Paper cup for postcard
Nowadays, communication is based on instant messengers and email. Therefore, it will be doubly pleasant to receive an invitation to tea with a postcard, which is made in the shape of a cup. All you need is paper and some free time.
The manufacturing guide includes several steps:
- We take a sheet with dimensions of 15*15 cm. It is advisable that it be decorated with an ornament or a stylish pattern.
- Fold it in half along a straight vertical line.
- We open and bend from the right and left to the center.
- We fold the lower corners towards the middle of the structure.
- We bend them over each other to get the “bottom” of the future mug.
- We turn the craft over and see a rhombus - it needs to be stretched in different directions for the product to be stable.
- Separately cut out and glue the handle.
All that remains is to issue an invitation and send it to the recipient whom you really want to see as your guest.
Thick and durable paper mug
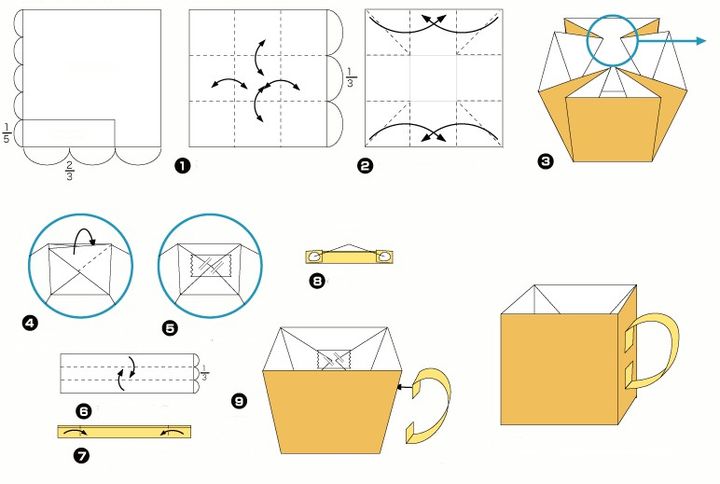
Experts recommend making the cup from water-repellent paper in two parts, where the handle is constructed separately. So the outline will be closed, representing a hexagon or square. This will make it possible to place liquid in it without fear of spillage.
We proceed according to the following scheme:
- We divide a square of paper with dimensions 6*6 cm into five parts on one side and into three parts on the other. Cut out to create a handle for the mug.
- We divide paper with dimensions of 15*15 cm into nine parts - this is the basis of the future cup.
- Draw diagonal lines with a pencil and bend them, as shown in Figure 2.
- We assemble the model according to the diagram. Joining the edges inside the glass, glue it with glue.
- We fold the blank for the handle in three and attach it to the base.
The product is ready. When it dries, you can pour water into it and drink it calmly without fear of leakage.

The first disposable cups appeared in China. At first, only ritual utensils and children's toys were made using the origami technique. Then they began to use thick paper to make tea cups. They were performed without a handle.


