Where to start laying laminate flooring
 Despite its relatively short history, laminate is one of the most popular floor coverings. The ability to quickly and effortlessly install such floor coverings played an important role in leading the market for such materials. If you have certain skills and tools, you can do the work yourself, which will significantly reduce the cost of repairs. They are not particularly difficult, but you will need to adhere to the requirements for the work.
There are several rules, the observance of which helps to give the appearance of the floor and the room as a whole the most favorable visual effect and guarantees a long period of operation of the coating.
IMPORTANT: If the floors are installed throughout the apartment, you should start from the back room and end with the corridor or hallway. If the installation is carried out in one room, you must adhere to the following rules:
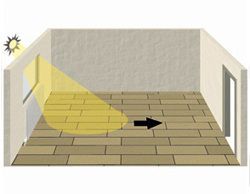
when laying lamellas longitudinally or perpendicularly (relative to the flow of light), it does not matter from what angle the work should begin. Traditionally they start from the corner of the room from the window side;
It is best to start installing lamellas diagonally from the center of the room. It is possible to start installation from the corner of the room.
However, in this case, the problem lies in the difficulty of choosing the right angle. Professionals can choose a design installation option (herringbone laying or artistic layout), but this requires experience.
The content of the article
Step-by-step instructions on how to start laying laminate flooring in a room
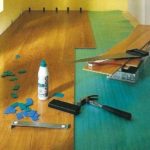
 The underlay is laid on the concrete floor screed. This helps smooth out small irregularities and provide a damper between the concrete and the laminate.
- A technological gap is made along the perimeter of the walls using homemade spacers 12 mm wide or purchased ready-made wedges. This gap will help prevent swelling of the floor covering caused by fluctuations in humidity or temperature levels in the room.
- After completing the preparatory work on leveling the floor, constructing the base and the technological gap, you should consider the laying scheme of the coating in relation to specific circumstances.
- Next, pre-lay the first row. Its purpose is to determine the length of the last lamella.
- From the first row of laminate it is necessary to cut off the connecting lock from the wall side.
IMPORTANT: If, during preliminary laying of the first row, it turns out that the last lamella must be cut by more than two-thirds, it is necessary to shorten the first lamella in the row by one-third of the length.
The nuances of laying the first and subsequent rows
Next, you should lay from the first row of dies, taking into account everything described above.
The second and subsequent rows are laid so that the joints between the lamellas along the length of the installation are shifted (do not coincide along the rows). Practitioners recommend moving it by one third of the length, and manufacturers - by half the length of the bar.
IMPORTANT: Compliance with this requirement ensures the strength of the connection.Failure to do so leads to the coincidence of the locations of the castles in one line, which reduces their strength several times.
If the first plank in the second row was trimmed by one-third of the length, then in the third row the first plank was trimmed by two-thirds.
INIMPORTANT: If the flooring is installed simultaneously in the entire apartment or in several rooms connected to each other, in order to avoid swelling of the floor covering in the doorway, it is necessary to create a technological gap, which is hidden using a threshold.
Basic rules for laying laminate flooring
High-quality floor covering is only possible with proper preparation of the base for it. Installation can be done on ceramic tiles, concrete or wood or other durable and level floor.
IMPORTANT: Fluctuations in surface level should not exceed 2 mm per 1 linear meter.
If this indicator is exceeded (using a building level), it is necessary to level the floor. Depending on the base material, this is done with the help of an additional coating made of different materials (leveling liquid, OSB boards, plank covering). Before installation, the base must be absolutely dry and free of debris and dust.
When performing work, the following factors must be taken into account:
direction of light flux;
placement of furniture in the room;
structural texture of the laminate: the presence of embossing (simple or in register) or chamfer.
- To hide the connecting seams between the slats, they are laid with the long side parallel to the light flux in the room. If the installer is right-handed, the far right corner is traditionally the starting point for installation. For a left-handed person, a layout starting from the far left corner of the room will be more convenient.
- If the geometry of the room suffers, it is better to use a diagonal laying pattern, which will mask this drawback.
- Installation of laminate with chamfer and embossing is carried out in rows located perpendicular to the light flow.
- When performing work, it is necessary to control the gaps between the locks.
- Cutting the planks to diverge the joints of the locks must be done taking into account the minimum length of 40 cm, otherwise the lock connection loses its strength.
- Manufacturers put an installation diagram on the packages, which makes it easier to work and know from where and where.