DIY table for a circular saw
 The circular machine is a powerful mechanism that boasts good maneuverability and performance. There are also disadvantages that can be avoided by making the design.
The content of the article
How to make a table for a circular saw
Creating a table consists of several stages:
- Creating a project plan. You need to measure the space and choose the appropriate size of the structure.
- Purchase of materials. In the same step, the required saw is selected.
- Step-by-step assembly of the structure. Everything is done according to the drawings made.
Materials and tools
We will need the following materials and tools:
- Sheet of particle board or plywood, 20 mm thick.
- Tool with disc-blade.
- 5x5 cm block for creating legs. The cross-section may be smaller if you plan to create a low-power saw.
- Varnish or primer.
- Solutions for protecting wood from water.
- Wood glue.
- Self-tapping screws.
- Drill and set of drills.
- Screwdriver.
- Jigsaw.
- Machine for milling work.
- Clamps.
- Tape measure and marker for marking.
- Plane.
- Sandpaper.
Reference! Also, we must not forget that a circular saw is equipment that runs on electricity. That is, we need a power source into which it will be connected.
Measurements and drawings
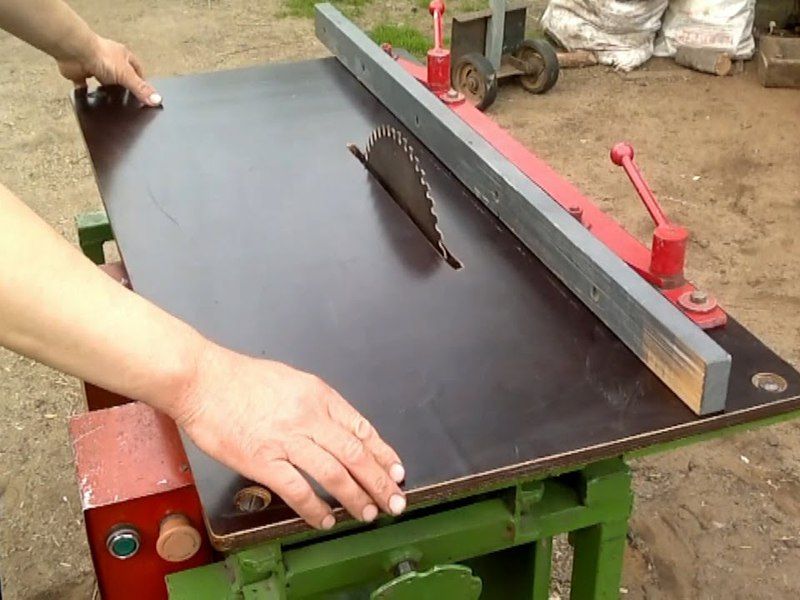
The work begins with the creation of design drawings. This step measures the width and length of the table that is being created.The average value is 120 cm wide and 120 cm long. The following materials are ideal for creating the base:
- Plywood.
- Chipboard.
- OSB.
- MDF.
- Chipboard.
We are not considering a metal base, since the material is more expensive and the weight of the structure will increase several times. Of all materials, plastic is considered the worst and is not recommended by experts.
Before starting assembly, all wooden elements must be treated with solutions that protect against moisture and rot. After the material has dried, you can begin work.
Attention! It often happens that due to improper installation of the saw, which is installed under the tabletop, the table is overhanging on one side. The blade must be installed in the center of the table.
Important points when working
There are some safety requirements. They will help you avoid injury in the workplace. The requirements are as follows:
- Before turning on the saw, you need to check the reliability of the clamps. If necessary, tighten the fasteners.
- Very often, the cause of injury is a large number of unnecessary things at the place of work.
- It is necessary to check the correct operation and fastening of all parts of the system. If there is a problem somewhere, it needs to be fixed immediately.
- Do not keep the material close to the place that is being cut. This is dangerous because knots and shavings can get on exposed parts of the body, as well as in the eyes. Therefore, while working, be sure to wear glasses and clothes with sleeves.
DIY table for a circular saw: step by step
The creation process consists of the following stages:
- The material must be marked using a tape measure and a marker. We cut the templates with a jigsaw.
- Now we mill the edges.
- We take sandpaper and process the surface, making it as smooth as possible.
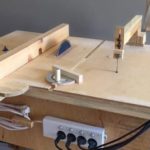
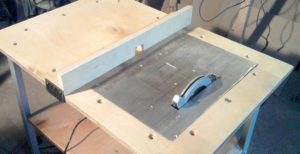
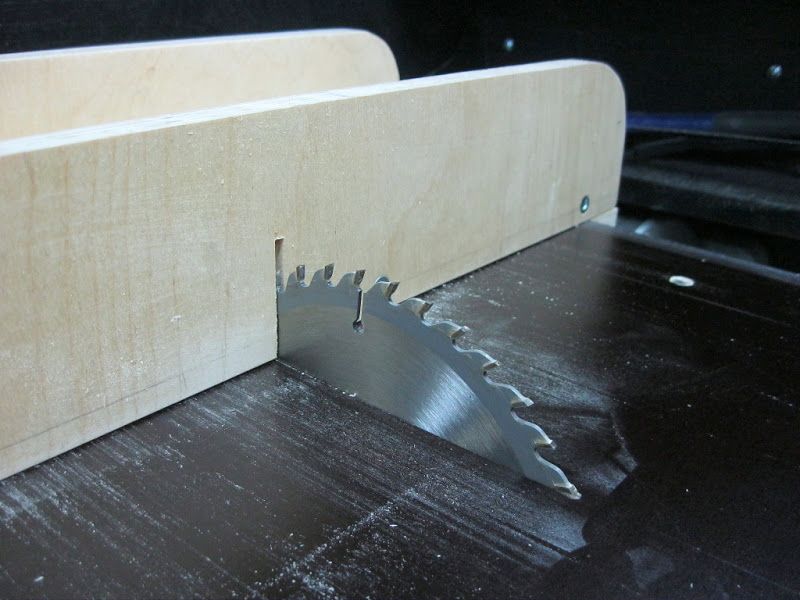
- Now you need to turn the tabletop over and mark the place where the saw blade will be installed. This is done as follows: place the tool and trace the sole. We remove the disk. Using a router, we make a hole from 0.5 to 1 cm (depending on the length of the sole).
- Now we need to measure the saw and the notch. We mark the clamps and slot locations for the cutting tool.
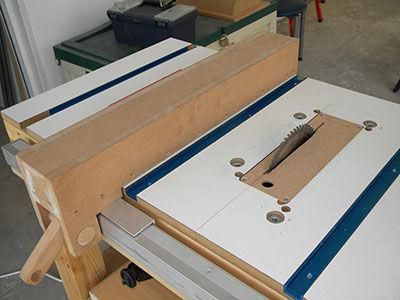
- The next step is to create stiffeners. They are made on the basis of 5x10 cm boards. They need to be positioned so that the distance to the edge of the tabletop is about 10 cm. The smaller side of the board is applied to the tabletop. On one side we make a stroke, and on the other we need to transfer the markings.
- Now you need to mark the positions where the screws will be mounted. We drill holes for them. We install fasteners every 100 – 150 mm. We make them relative to the length of the stiffener.
- Now you need to mark the longitudinal stiffeners and cut them out. We use glue to fix them, and also press them with clamps. After these stiffeners have dried, we install the side ones in a similar way.
- Now you need to install the clamps. Self-tapping screws are used for this. The clamps do not need to be removed. We tighten the structure using self-tapping screws around the entire perimeter. We made the holes for them in step 6.
- We set the tension for the stiffeners. We use self-tapping screws, the length of which will be greater than the length of those used to fix the ribs. After tightening the tabletop, you can remove the clamps. Now we have a finished tabletop.
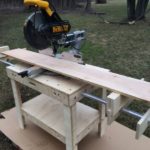
- The next step is to make the legs. To do this, we take a wooden beam. The legs can be any length, the main thing is that they provide comfort during work.The average distance between the tabletop and the floor is 120 cm, and the length of the legs should be several centimeters shorter.
- We cut out the legs and attach them to the tabletop. Their location will be a little off-putting. We fix the bars with bolts (we install them on the outside of the stiffeners).
- You can increase the rigidity by making a few additional ties between the legs. For this we use timber.
- Now you need to mount the disk plate. We install it inside the hole that we prepared. It is important that the disc fits into the slot without obstructions. We fasten the sole with bolts.
- Cover the table with varnish or primer. This will reduce slipping.
- Additional elements can be installed. For example, a protective cover, a disc tilt adjuster or a carriage.
- If you have minimal knowledge of electronics, you can bypass the start and stop buttons of the saw. These buttons can be installed in a convenient place (most often on the outside of one of the stiffeners).
If you have minimal experience in creating such structures with your own hands, you can easily make a table for a circular stove. The most important thing is to securely fix the saw, regularly check all fastenings, and adhere to safety precautions.