DIY desk
Designing a desk yourself is not as difficult as it seems at first glance. To raise the level of skill, you should first work on creating a simple structure from a table top, two sides and a back wall. An experienced home craftsman can assemble more complex types of tables, for example: classic, built-in, folding, corner, wall-mounted, add-on, folding, with drawers, bureau, window-sill table, with a cabinet.
The content of the article
Drawing up drawings and diagrams for creating a desk with your own hands
Before creating any of the listed models, you need to decide on its design, dimensions and design. The design is selected arbitrarily, the main thing is to take into account the rational location in the room. To determine the dimensions, it is advisable to correlate the parameters of the room with the preliminary design of the future product.
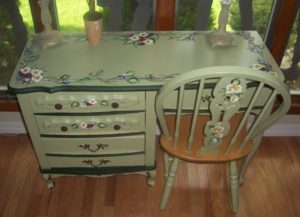
The master creates the final design to his own taste, because his work must be practical and unique. Exquisite decorative elements will help - bent metal legs, additions in the form of original handles to built-in drawers, decoupage tabletop decor.The construction of drawings, deadlines for completing the work, methods, materials, and other nuances depend only on the desire and skills of the craftsman.
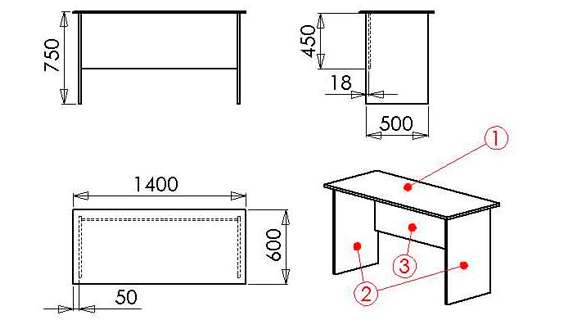
The first stage of creating a desk is design or drawing (diagram). The future object on the diagram is usually sketched by the master in 3-D format, for the convenience of recording the general dimensions of the furniture - height, width, length, depth. The component parts of the structure are numbered and labeled separately, and their individual dimensions (width, length, thickness) are also calculated and marked there.
In the drawing, dimensions are calculated in centimeters or millimeters. The method and type of connection of parts is outlined.
IMPORTANT! The diagram indicates the dimensions of the parts strictly down to millimeters, in order to avoid errors in future cutting of the sheet.
According to a correctly calculated and drawn up diagram, parts can be easily manufactured and the assembly of the product will be simplified.
Here are some designed desk layouts:
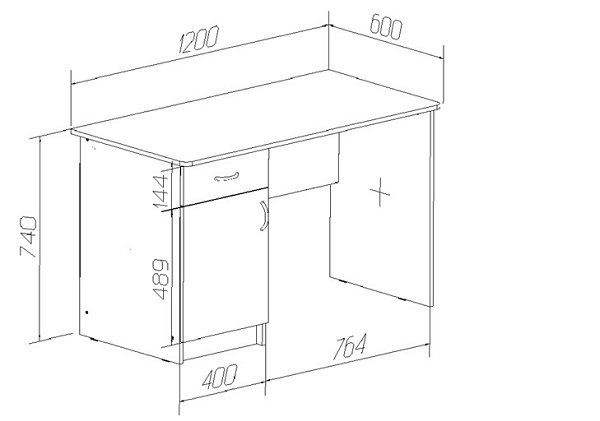
Simple.
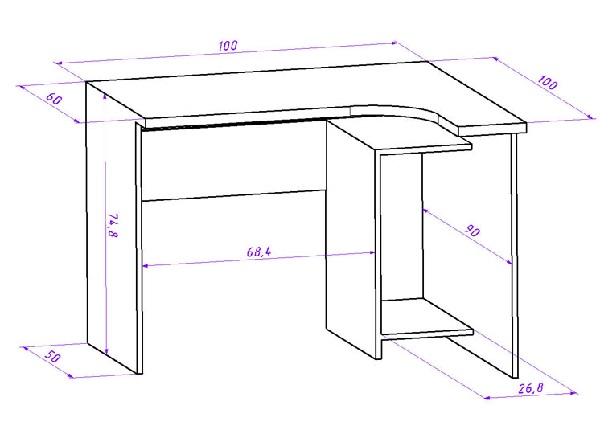
Angular.
With add-on.
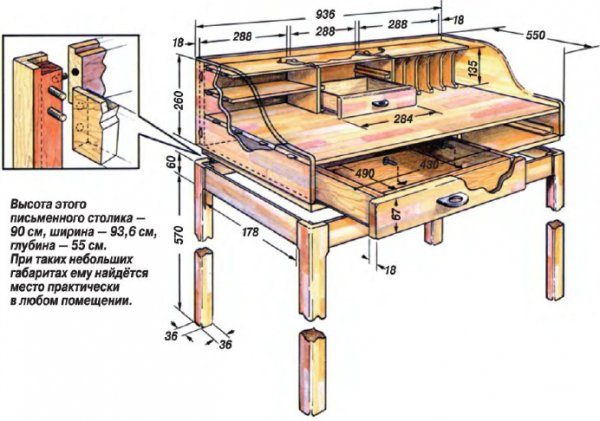
With a cabinet.
With drawers.
Features of drawing up a drawing for a desk for a schoolchild
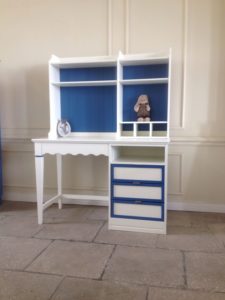
An indispensable household item for a schoolchild is his personal desk. The child spends a lot of time behind it, doing homework. In a situation where it is extremely necessary to create comfortable conditions for studying, but there is no financial opportunity to buy a table, self-assembling a study desk will help out.
In this case, the desk will cost much less. It's quite easy to make for a student.
Project of a classic table-desk.
The design can be supplemented with:
- Drawers, bedside tables on either side;
- Shelves, racks;
- Organize a niche under the countertop.
REFERENCE.To save space in the room, it is advisable to design the table as a corner or folding one.
When drawing up a diagram of a desk for a schoolchild, it is recommended to take into account some features:
- It is better to choose a universal table configuration in terms of size and number of additional elements. For cases of forced rearrangement of furniture.
- The dimensions of the table are selected individually, depending on the age category of the student (first grader/high school student).
- For the corner option, determine the location of the “wave” of the tabletop depending on the child’s writing characteristics (right-handed, left-handed);
- It is better to make the bottom of the drawers from cheaper, non-laminated chipboard.
Preparation of materials and tools
 After the model has been selected, a drawing has been drawn up for it, then we proceed to the next stage - selecting the necessary tools and preparing the main material.
For any type of assembly work on cabinet furniture, the list of tools is as follows:
- Jigsaw;
- Drill;
- Screwdriver;
- Hammer;
- Drill;
- Level;
- Roulette;
- Clamps;
- Iron;
- Hacksaw.
More complex types of DIY desks for schoolchildren, drawings of which are available on the Internet, require the use of a milling or grinding machine.
The basis is most often taken from natural wood (pine, oak, alder, birch, beech) and its derivatives: chipboard, laminated chipboard, MDF, board, plywood;
To fasten the structure, stock up:
- Plastic corners;
- Bolts, nuts, nails;
- Self-tapping screws;
- Wood glue;
- Dowels, dowels;
- Liquid nails.
Suitable for paintwork:
- Paint, brushes;
- Varnish;
- Glue gun;
- Sandpaper.
Product assembly process
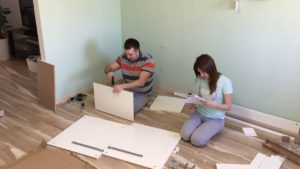 The assembly process can be divided into several stages:
- According to the available drawings, all components are cut out with a hacksaw or jigsaw.
- We cut out two rectangular side panels of the table, protruding in the form of legs.
- We drill holes at the ends of the frame - grooves for dowels. Now we firmly place the panels and frame on the dowels, after applying glue into the deep hole. Then we tap the block with a hammer, placing the dowels in the sockets.
- We attach the frame to the side panels. Two partitions are installed in the niche and secured with self-tapping screws. The tabletop will be placed on them.
- To strengthen the structure, we nail the back wall.
- Let's start cutting out the tabletop. We cut out the part with a jigsaw according to the drawings.
IMPORTANT! To avoid chipping, it is better to use a thin jigsaw.
Carefully sand the edges of the tabletop with sandpaper. The edges of the desk are often covered with paper edging, but this does not last long.
The second option is gluing with melamine tape. It is fixed using a heated iron and thick fabric. Excess tape is trimmed with scissors.
The most reliable edge will be PVC; an industrial hair dryer and a respirator are used to glue it. Glues under the influence of high temperatures, about 500 C.
We place the tabletop on the dried frame and secure it with plastic corners and self-tapping screws.
Add a partition leg.
The bottom of the boxes is made of fiberboard, the walls and facade are made of chipboard. We attach one of the guides to the niche under the drawers, and the second on the outside of the drawer. We insert the drawers with guides into place.
IMPORTANT! If there is a heavy load on the box, it is better to install metal guides. Plastic ones are suitable for a school desk.
We fix the handles on the drawers and disguise the fastenings with stickers to match the color of the table.We fasten the table shelves with self-tapping screws.
Decorating the table - the final stage of work
 The final step will be decoration. A piece of furniture should combine both rigor and sophisticated beauty; accordingly, the decoration will be a little limited.
- To give a business style, the tabletop can be treated with drying oil or stain and then varnished. The desk will gain shine.
- To add casualness to the tabletop, you can depict a design using a stencil, draw strict stripes, or use the decoupage technique. Cover the entire surface with glass or plexiglass. The child will definitely love the rainbow tabletop.
- The easiest and most affordable way is to cover it with self-adhesive film, colored electrical tape or old newspapers. The result will be a rather original model.