DIY epoxy resin table
If you want to create something unusual and interesting for your home, you should pay attention to material such as epoxy resin. This is one of the simplest and most effective methods of creative interior design. The very interesting properties of this material allow you to implement the most unusual design ideas. You can make a table from epoxy resin with your own hands, which will become a real masterpiece; thanks to the use of various fillers, you can significantly diversify your work.

The content of the article
Features and types of products
This material has very high characteristics. It is worth noting that it is not used in its pure form, because its characteristics do not appear. Its hardening can only be achieved by mixing with the corresponding component, which is called — hardener.
Process - manufacturing An epoxy resin table involves applying a synthetic material to a wooden base. As a result of your actions, you will be able to create products with increased strength and resistance to various chemicals. From product characteristics manufactured from epoxies, You can highlight the appearance, as well as the characteristics of the material.
NOTE. For private use, it is recommended to choose a material that is used in a cold state.
General operating principles
As a rule, you can purchase epoxy material in stores already included. This the kit includes the resin itself and a special hardener, which acts as an activator of chemical reactions.
How to prepare material
It is important to familiarize yourself with these features of the material:
- The hardening process is irreversible, therefore, all work must be carried out in strict accordance with the manufacturer's instructions.
- To mix both components, you will need to prepare two containers, also a stick for thoroughly mixing the composition. First of all, you need to measure the required amount of resin, and then after, in pour in the hardener as required volume. Further, mix well until a homogeneous mass is formed.
- The base of the tabletop must be in a horizontal position, otherwise the surface will be uneven. You can only work on a completely dry surface.
IMPORTANT. Before starting work, be sure to read the instructions provided by the manufacturer. Note, What Mixing proportions may also be different for different manufacturers.
How to create an original product
In order to build a very attractive and unusual table with your own hands, you will have to carefully prepare for this process. But eventually All not as difficult as it might seem at first sight.
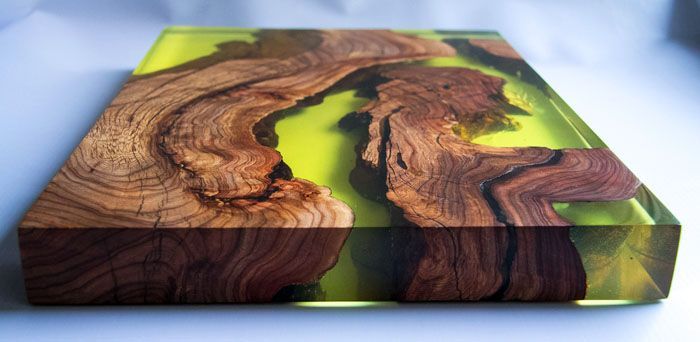
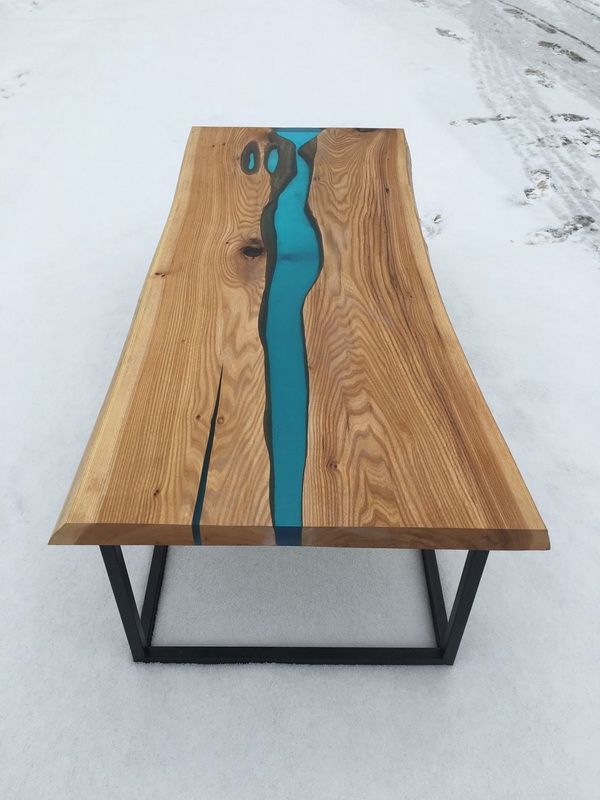
NOTE. You have a lot of different options available to you on how to make an unusual and original product.These are single-color countertops, as well as products with splashes or a combination of colors. Don’t limit your imagination and you will certainly be able to create an original and unusual product.
Step-by-step instruction
It is worth understanding that the success of your final result will depend on the correct execution of all manufacturing procedures. And one of these stages is the thorough removal of any contaminants from the surface of your base, as well as dust.
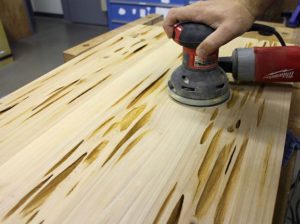 Next, when you clean the base, it needs to be primed. If you skip this step, be prepared for the fact that the expensive material will simply be absorbed into the wood, which has pores, air bubbles will form, and this will inevitably ruin the appearance of your product.
- When you complete the preparatory stage, you can safely move on to the next stage. Prepare the required amount of resin and hardener mixture. Mix the ingredients thoroughly containers.
- At this stage, it is very important to maintain the mixing proportions, otherwise you can spoil the material and your time will be wasted. Follow the instructions for preparing the mixture provided by the manufacturer. If desired, you can add dyes or some decorative details to the already prepared mixture.
- Apply the finished mixture onto a wooden surface - base. If after pouring you notice the formation of air bubbles, you should try to remove them. To do this, you can use a hair dryer. Just point it at the area to be treated and turn it on.
- After fifteen minutes the mixture will start Let it harden little by little, but don’t rush. You can proceed to the grinding stage only after the resin has completely hardened.Leave your work for about one week and only then proceed to the last treatment procedure. To increase the service life of this design, treat the surface with a layer of varnish.
Tabletop decoration
Various decoration options are available to you, your imagination is unlimited. Let's look at some of the most interesting ones.
Table top with filling
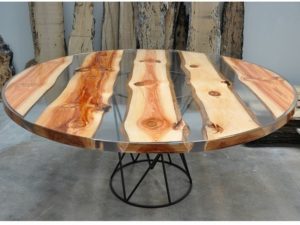
This option rightfully considered one of the most original. Stones and various small figures, coins and any other objects can be used as filler.
The manufacturing process looks like in the following way:
- First thing It is necessary to degrease the workpiece and clean it thoroughly. If necessary, the workpiece should be painted.
- It is necessary to make low sides on the workpiece.
- Place filler on the bottom of the base. If you have chosen a filler small volume, then the resin can be poured in one layer. If the speech coming about larger filler, pouring must be done in pairs layers, and the break must be at least two days.
Penetrations epoxies into the recesses of the figured filler is happening gradually, this will take up to 3 hours. Experienced craftsmen advise first immersing textured products in resin and only after that using them to make countertops.
IMPORTANT. All products that you will use in the manufacture of countertops must be thoroughly cleaned and well dried. If these details are too lungs, before moving on to the next stage of work, it is recommended to glue them to the base, to they didn't float up.
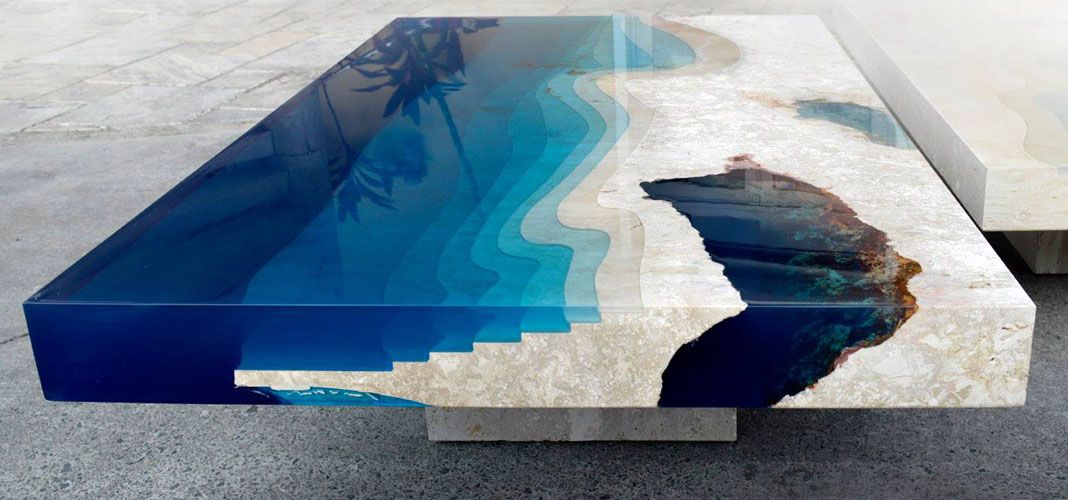
One-color or multi-color solution
IMPORTANT.If you decide to use a material as a base that has pores, therefore, it can strongly absorb moisture. This must be taken into account and pre-primed.
 Before you start working directly with the resin, you need to thoroughly clean the base. Degrease it and only then can you proceed to the stage of preparing the resin itself.
- By mixing epoxy in the required proportions with hardener, you need to pour the mixture onto the base of the countertop. Leave the mixture to spread during fifteen minutes.
- Now you can begin the step of removing any bubbles that have formed, if any.
- Leave the structure to harden. When the product dries well, you can move on to the final stage. — grinding and polishing.
REFERENCE. If You If you chose a one-color solution, then you will need to add a special dye to the mixture. It is advisable to choose it from the same manufacturer where you purchased the resin. If you have chosen the option with a combined color, then during the filling process you need to use mixtures of several shades, which must first be mixed in several containers.
Glowing tabletop
This option too counts very interesting and attractive, you can see it in the photo. Let's say you decide to create a table with a wooden top and a unique designer design. In this case, you need to follow the following algorithm:
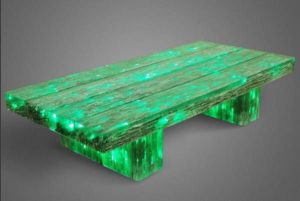 Make grooves on the base, they will be necessary to get the effect of depth.
- Sand the surface.
- A fluorescent pigment must be added to the resin, which should already be mixed with the hardener.
- Fill the base with the prepared mixture.
- When the material is completely dry, cover it with a layer of varnish and each layer must be sanded well.
Your glowing table can be actively used. As you can see, the manufacturing process is wrong complicatedas it may seem at first sight. Main, stock up on all the necessary materials and carefully think through your actions. In this case, you will be able to create a truly original and interesting product that will last for many years and will delight you.