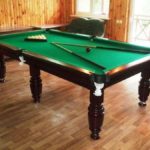
DIY billiard table
A billiard table is an excellent addition to the interior of any room. The design and appearance allow the table to be an independent unit of furniture.
A billiards table can be bought at any sports store, but its cost is simply exorbitant. The size of the finished product may also not fit into the available space, especially if you plan to organize a billiard room furnished with furniture. How to build a billiard table yourself, what material and working tools are required, how to correctly determine the dimensions will be described in detail in this article.
The content of the article
Preparing materials and tools for creating a billiard table
 Making a table yourself is not particularly difficult. You can get all the necessary lumber in the store.
The main thing is that when making bars yourself and subsequently assembling them, you must be careful and take your time.
It is necessary to carefully check the dimensions, and only then saw off or fasten the parts.
IMPORTANT: under no circumstances should you use raw lumber: when dry, the table parts will shrink and the billiards will be irrevocably damaged.
Materials that will be required during work:
- table legs made of profiled timber;
- timber for the manufacture of slats and planks;
- sanding paper of medium and fine grain size;
- lining fabric;
- green cloth;
- mosquito net for creating pockets;
- water-repellent impregnation, nitro varnish, epoxy resin putty;
- triangular rubber edging;
- chipboard or plywood;
- pockets;
- 200 pcs. self-tapping screws;
- euroscrew 20 pcs.;
- nails;
- wood glue.
Please note: the cheapest countertop option is multi-layer plywood. But it should be noted that the cost of the material will correspond to the quality.
Tools you will need:
- folding meter or tape measure;
- construction pencil or marker;
- level;
- electric drill and drills;
- power saw, grinder, jigsaw;
- tool for screwing in screws;
- set of wrenches;
- pliers and hammer;
- file or rasp;
- milling cutter;
- flutes and spatula;
- stapler with staples.
Execution of product drawing
 Nowadays it is easy to find a suitable drawing of a billiard table on the Internet. The main thing is that the project must fit into the dimensions of the room in which the gaming table will be located.
If there is no suitable option, you can prepare a sketch yourself on paper or, even better, on graph paper.
You can also order a sketch from an experienced woodworking master. He will competently complete the drawing and put down all the necessary dimensions. This option will help save personal time on making the sketch and save you from the hassle of making parts and assembling the billiards.
IMPORTANT: we must remember that the aspect ratio should be 2 to 1.
The optimal product sizes are:
- length: 2.0 m;
- width: 1 m;
- height: 80 cm.
When calculating the dimensions, it is necessary to take into account the area of the room in order to create conditions for the movement of players, and also determine the place for the rack where the balls and cues will be stored.
The width of the billiard room must be calculated so that on all sides of the table the space to the wall is greater than the length of the cue.
Traditionally, a room of 20 m2 or 4 by 5 meters is allocated.
IMPORTANT: it is imperative to take into account the free area for the unhindered movement of those participating in the game.
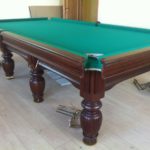
Step-by-step assembly of a billiard table
 All bars must be solid and not consist of separate elements. This will give the part strength and evenness. We mentally divide the length of the transverse bar into 4 parts. Example: table length 3 m. 3:4 = 0.75 m. Every 75 cm we insert fastening bars and connect them to the transverse ones with glue and screws. We fasten two outer bars with transverse ones with nails. The size of the bars in cross section is 7.5 cm x 4.0 cm.
We check the accuracy of the shape and angles of the finished frame, which should be exactly 90.
While the glue dries, we will make legs, the size of which in cross-section is 100x80 mm.
We lubricate the ends of the legs with glue, install them at the corners of the frame and additionally fasten them with screws.
We clean the finished base with sandpaper: first medium-grained, and then fine.
We cover the sides of the base and legs with nitro varnish for 3 - 4 layers.
IMPORTANT: The edges of the bars at the base must be strictly straight.
Tabletop. We take the material chosen for the countertop, carefully inspect it, and if we find any irregularities on the surface, remove them with a file or sand them down.
We mark the contours of the pockets. We cut out the grooves with a hacksaw and clean out the “excess” with a chisel.
When assembling a billiard table with your own hands, the drawings, dimensions, photos of which are given in the article, we process the edges of the grooves with a file and sandpaper.
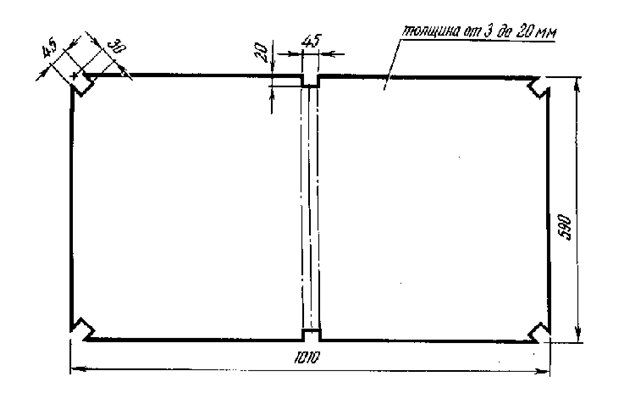
Sides and decorative strips. We prepare decorative strips: to do this, we saw off the corners of the blanks at 45 degrees.
We clean the cut corners with a rasp and sandpaper. We do the same with the blanks for the sides.
We cover the parts with nitro varnish for at least 3 layers.
Apply glue to the rubber edging, about one centimeter, and nail it to the end of the rim with two nails. Then, we pass the edging along the entire side, slightly stretch it and secure it in the same way as at the opposite end.
We cut strips from the green cloth that will cover the tabletop. The strip should be of such a size that you can cover the sides and rubber edging, bending the edges.
Apply glue along the edge of the fabric along the entire length. Glue the fabric. It takes 5-7 minutes to dry. Thus, we cover all the sides.
The fabric at the corners is sealed after the fabric is securely glued along the length of the side.
We bend the edges, apply glue, let it dry a little, press it to the surface and secure it with nails.
Billiards field.
IMPORTANT. Before stretching the cloth, spread it on the stove and leave it in a stretched position for a day. During this time, the cloth will absorb moisture and become equal to the air humidity in the room. If this is not done, then literally after a few days the tension of the felt will weaken and the balls will not roll out well.
We nail the tabletop with nails, every 20 - 250 cm, to the base. Lubricate the surface and edges of the tabletop with glue. Place the lining fabric on the surface and smooth it with a rag from the center to the edge so that no wrinkles remain. You also need to iron the edges.After the glue has set, the edges of the fabric need to be tucked under the tabletop and secured with staples using a stapler.
Then we spread the cloth on the tabletop, distributing it so that the edges protrude equally on all sides.
How to make a billiard table with your own hands? Along the long side, bend the edges and nail them to the staples. We do the same with the short side of the tabletop. The edge of the cloth must be folded under the tabletop by at least 1.5 cm.
The fabric is stretched evenly and extremely strongly.
Installing the sides when assembling a billiard table with your own hands, step-by-step assembly instructions for which are presented in the article, must be especially careful and careful.
We fasten the sides with 3-4 screws, having drilled holes in them in advance and countersinked them so that the screws are flush with the surface.
First you need to install the sides near the side pockets.
After installing the side, carefully apply glue to its upper surface and apply a decorative strip. The plank is installed flush with the outside of the side.
IMPORTANT: the nails must be placed not at the end of the bar, because then there will be problems with installing the brackets for the pockets.
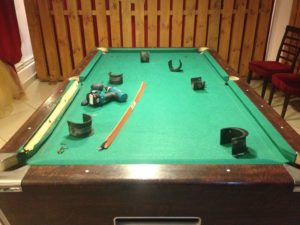
We are preparing the grid. We cut out a square from the mosquito net, depending on the size of the ball. Fold and stitch on both sides. We put pockets on the staples using wire staples.
Place the bracket in the center and mark the holes in the bracket with an awl or nail. Remove the bracket. Now you can clearly see how to correctly install the bracket with the mesh.
Testing the product for strength and comfort
 There are several ways to help check a billiard table:
- Checking pocket geometry.
- Board research.With a small impact, directing the ball along the side, it should roll without changing the line of movement.
- Quality rubber edging. When hit hard along the length of the table, the ball should hit the sides several times.
- Checking the cloth tension. If the cloth is tensioned correctly, then running your palm across it with force, thin folds will appear.
- Checking the frame. If you follow the dimensions and carry out the assembly correctly, the frame will not “walk”.
- Checking the playing field. When running over the surface of the table, your hand should not feel any irregularities.