DIY cabinet with louvered doors
Recently, wardrobes built into niches have been in great demand. But, you can also think about furniture with hinged doors. It is no less aesthetically pleasing and, most importantly, you can make such a cabinet yourself.
The content of the article
Preparing materials and tools to create a cabinet with louvered doors
 First you need to measure your niche. For example, let’s take the size: niche width: 120 cm, height: 240 cm.
REFERENCE: a very important parameter is the depth of the wall. If you are planning to organize a closet with a classic rod (when things hang perpendicular to the door), then you need to remember: the depth should not be less than 50 cm (standard hanger size).
Let's say that our depth is only 50 cm. It should be noted that the facade itself will take 5 centimeters, therefore, we will not be able to use the standard rod option. But, there is a Euro hanger on sale - it is located on its side, and things are placed with the front side facing the doors.
Let's divide our furniture into two parts: on the right we will organize a hanger, on the left - shelves.
How to make a built-in wardrobe with louvered doors with your own hands? So, we will need:
- Standard louvered door facades (60 by 60 cm), we need to purchase 8 of them. The product can be painted in the desired color.
- If we need material for partitions and shelves, we will take standard laminated chipboard, which can be cut and trimmed by sellers at the materials warehouse. We need a part - 240 by 45 cm and 8 shelves - 60 by 45 cm.
IMPORTANT: the indicators are given taking into account the fact that the parts will be attached directly to the wall; if it is necessary to use side walls, then take into account its width when cutting the laminate sheet (standard - 16 mm)!
You should take care of the parts on which the doors will be installed. Details can be made visible or not, it all depends on the selected loops. In our example, we will use regular loops. Therefore, you need to ask the supplier to process two sections: 240 cm high, 10 cm wide. The chipboard and edges must be selected by color.
You will also need:
- Self-tapping screws and special invisible fasteners (eccentrics) that will hold the partition and shelves.
- Screwdriver.
- PVC strips - for attaching door parts to each other.
- Barbell.
Assembling a built-in wardrobe with louvered doors
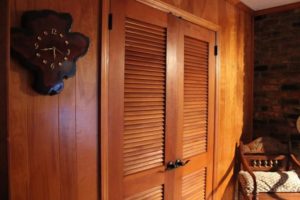
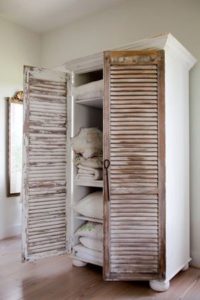 So, we have come to the most important part of the work - assembling a cabinet from louvered doors with your own hands, the photo of which is above. First we install the partition. Before installing it, you need to make holes in the laminate for screws (this can be done with a drill).
It is necessary to measure exactly 60 centimeters from the left wall and begin to attach the partition. Installation holes must be made in the wall, floor and ceiling.
Then, we proceed to installing the shelves. We proceed according to the same scheme as with the partition. There will be 7 shelves, they need to be evenly distributed.
We fix the remaining shelf in the right half of the building. We will attach a hanger to it. Usually, the barbell is placed according to the height of the owners, to make it more convenient to place clothes.
Let's install the part at 180 cm from the floor (for people of average height). First we attach the shelf, then we install the hanger to it with self-tapping screws.
It's time for chipboard strips. We install them perpendicular to the facade using self-tapping screws. Next, measure the distance between the loops.
Now we will make the doors: we fasten the parts together with eccentrics and close the edges with tape - a PVC corner. The final touch is to hang the hinges and connect the doors to the sidewalls. We put the handles.
Expert advice
- Professional manufacturers advise: before starting work, make a draft of the future product. This will allow you to avoid making mistakes with the sizes. Every little detail must be taken into account. For example, the width of the material.
- To fill the interior of the closet, you can select special baskets for things, place modern drawers, install nets and organizers for things.
- Choice of material: laminated chipboard is a standard economy class furniture option, it requires covering the edges and does not allow moisture to enter. MDF - made from tightly compressed chips, covered with PVC film, which protects the part from liquids, can be milled and does not require an edge. Plastic (PVC) is the most moisture-resistant option and can be easily cut and processed at home. Any of the materials is suitable for filling the installation.