How to cover a closet with self-adhesive film
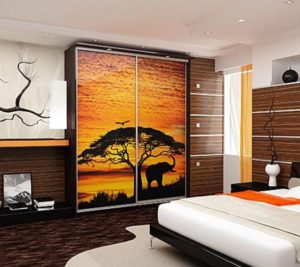 During long-term use, the cabinet may lose its attractive appearance, but remain durable and reliable. Therefore, owners often do not want to part with it. Many people, at one time or another, have a desire to make changes to the interior, change the style, add colors and mood with a minimum of effort and investing a little money. One way to quickly implement these tasks is to change the appearance of the cabinet by covering it with self-adhesive film.
The content of the article
How to choose film for a closet
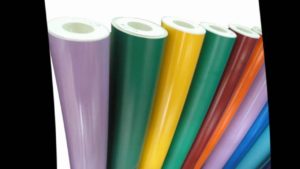 Self-adhesive film can be purchased at hardware or construction stores, or ordered online. The main parameters that you need to pay attention to when choosing:
- Roll width: 45 cm, 67.5 cm and 90 cm. To calculate the required amount of film, measure the width of all parts of the cabinet, and to the widest one, add 10 cm to the ends (5+5 on each side). We measure the height of each part + 10 cm on the doors and determine the length.
- Surface type: glossy - for darkened rooms, matte - for rooms with bright lighting, easy to clean - for kitchens and bathrooms, as well as mirror, transparent, holographic, stained glass.
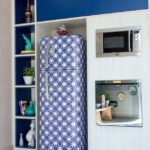
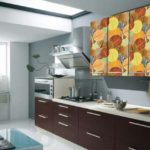
- Color: plain, with a pattern - for children, imitation of natural materials, fabric, ceramics, photo wallpaper - for the implementation of any design solutions.
- Protective layer: from damage - for a children's room, from temperature changes, high humidity - for the kitchen and bathroom, from fading - when the furniture is exposed to direct sunlight.
REFERENCE! For a cabinet measuring 120x200x60 (width*height*depth) you need a film with a width of 67.5 cm (60+10=70) and a length of (200*4)+(10*2)=8.20 m.
How to cover a closet with self-adhesive film
The process of pasting furniture begins with preparing its surface.
Surface preparation
Before starting work, inspect the surface of the cabinet for the following defects and eliminate them:
- Cracks, pits, and chips must be smoothed out using wood putty with a rubber spatula, and sanded with the finest sandpaper (zero grade).
- Clean dirt with any detergent and degrease with alcohol.
- Apply furniture primer to uncoated surfaces for adhesion. After drying, sand it with sandpaper.
IMPORTANT! If possible, you need to remove the doors and lay them on a horizontal surface, unscrew the handles and hinges.
Now that the surface is ready, you should cut the self-adhesive film into pieces of the required size (on the back of the film there is a marking with cells of 1 sq. cm) and begin gluing the cabinet in one of two ways.
ATTENTION! If you are gluing film for the first time, take a small piece and try to glue it on a similar surface to understand how gluing occurs, what is the speed and quality of adhesion.
Dry method
Suitable for small surfaces:
- Separate the film from the backing by 5–10 cm.
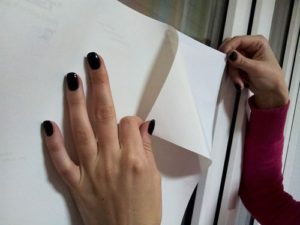
- Apply the sticky edge to the base and rub it in with a dry rag or plastic wallpaper spatula.
- Gradually, peeling off the bottom layer in small sections, we continue to press the film tightly to the surface. We level it from the middle to the edges and try to prevent the formation of air bubbles and creases in the film.
If there are a lot of bubbles, the film has shifted or folds have formed on the surface, you should not worry - you need to peel off a small area and repeat everything again.
Wet method
Used when covering large areas. Stages of work:
- Turn the film over with the adhesive side up.
- Completely remove the backing.
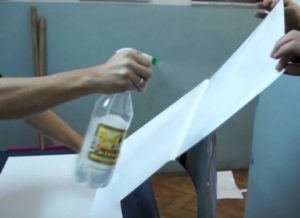
- Using a spray bottle with the finest spray, apply a soap solution to the glue (mix 10 ml of dishwashing detergent with 1 liter of water).
- Place the film with the sticky side on the surface to be pasted and level it from the middle to the edges, expelling air and liquid.
- Leave to dry for 48 hours.
ATTENTION! 12–20 hours after pasting, go over the surface with a roller again.
Possible problems when using self-adhesive film
Small errors during the work process can be easily corrected using available means:
- We pierce the air bubbles on the surface of the film with a thin needle or cut it with a stationery knife. Rub with a soft cloth or plastic spatula.
- We fill the dents that appear with PVA glue using a syringe. Level it with a soft roller.
- In the rounded places and on the folds we make small cuts with a knife and paste in the desired direction.
- Use a hair dryer at maximum power to easily bend the film at the corners and stick it firmly along the edges.
Do not be afraid! Glue with confidence! Everything can be corrected.Covering a cabinet with self-adhesive film is much easier than tinting a car window.