Assembling a crib with a pendulum
 It is necessary to prepare in advance for the arrival of a baby in the house. There are many points to consider, and the main thing is to choose a crib. This is a place where the child will spend a lot of time, it should be safe and comfortable. Today the choice of such furniture is varied. Pendulum cribs are popular among expectant parents.
The content of the article
What is a bed with a pendulum?
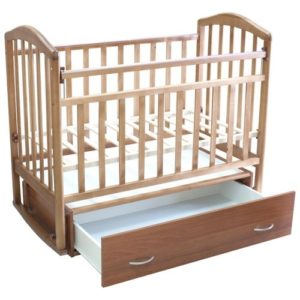 This is a type of children's furniture consisting of a wooden frame and a pendulum mechanism built into it. This type of furniture is ideal for those parents who have decided from birth not to rock their baby in their arms. It is enough to lightly touch the moving part of the structure, and the cradle will begin to rock evenly. It will calm the child and give parents a little rest.
REFERENCE! An important advantage of this type of crib is the presence of a fastening element. It is present in case the cradle should be in a static position.
Types of cribs with a pendulum mechanism
There are three subtypes of pendulum cribs. It all depends on which direction the pendulum will swing it:
- A longitudinal pendulum swings the cradle left and right.This is an excellent option for a newly born baby, as it imitates rocking a baby in the mother’s arms.
- The transverse pendulum moves the cradle in a forward-backward direction. The mechanism of this type of children's furniture does not take up much space and is suitable for small spaces.
- The universal pendulum swings the cradle both lengthwise and crosswise. Typically, such models are equipped with additional side drawers, chests of drawers and a changing table. They are ideal for those cases when you urgently need to change the location of your baby's sleeping place. Depending on this, the direction of movement changes.
IMPORTANT! Before purchasing, be sure to check the availability and quality of each part. Make sure that the distance between the slats is no more than 6 centimeters - the baby’s head should not fit through and get stuck in the hole. Then he will always be safe!
Assembling a crib with a pendulum
The material from which the crib is made must be environmentally friendly and safe for the baby. Therefore, most often manufacturers use solid wood, MDF and chipboard for such purposes.
Children's furniture of the presented type consists of two elements - a body and a pendulum. Before assembling the bed, you should carry out preparatory work:
- Move the components of the crib to the room where it will permanently stand. Thanks to this, you will avoid wasting time and effort moving it after assembly. In addition, there is a possibility that it will not fit into the doorway.
- Remove the packaging from all parts, and place small components in a separate place so as not to lose them.
- To assemble, take: a hex key, a screwdriver and a hammer.
- Carefully read the instructions included with your purchase.
Assembling the body and base
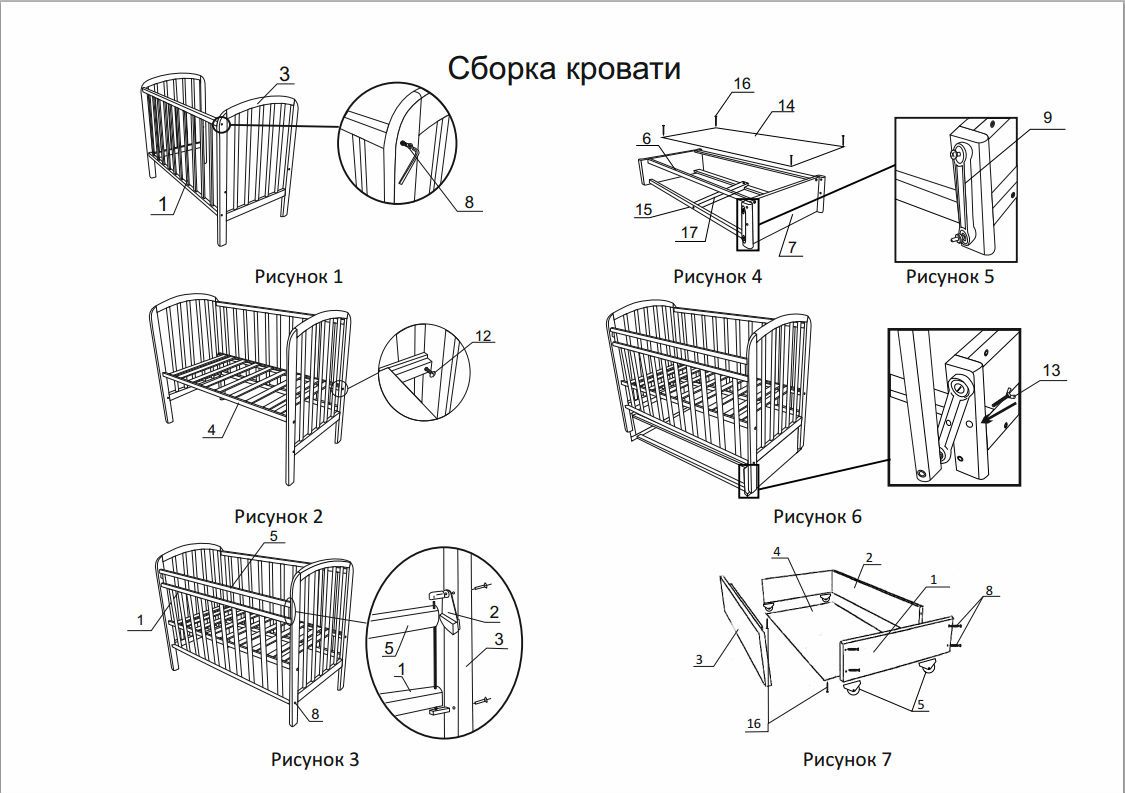
Stages of work:
- We attach the sides to the back wall of the crib. This is done by screwing in a confirmat (“Euroscrew”, always included in the kit) with a hex key. As a rule, there are two holes for attaching frames. At this stage, do not tighten them too much.
- Installing the bottom. The height of its location is adjusted using holes in the sides. Place the bushings in the position you need and tighten the screws connecting the bottom and sides. Fasten the bolts that were not tightened in the first step.
- We are installing the front strip. Let's prepare the lifting mechanisms: place a spring in a plastic cylinder, put a button and secure it. We place these parts in the holes that are located in the bar on its front side. It is necessary to insert pins into the through holes located at the end of the plank. Fixation occurs due to the fact that they form an axis for the button and the cylinder.
- Install the front strip. To do this, slightly unscrew the screws screwed into the base from the front and install the front wall. The result is a design in which the upper part of the stud is put on a fastening element fixed in the sidewall, and its bottom is put on the upper part of the front wall.
- We assemble the base - we screw the planks to the sidewalls using a hex key, and fix the hardboard sheet with nails.
REFERENCE! If the lower part of the structure implies the presence of a drawer, then the runners are installed on the inside of the side of the base. The walls of the box are connected using confirmations, the bottom is fixed, and then the moving elements are attached.
Installing the pendulum mechanism
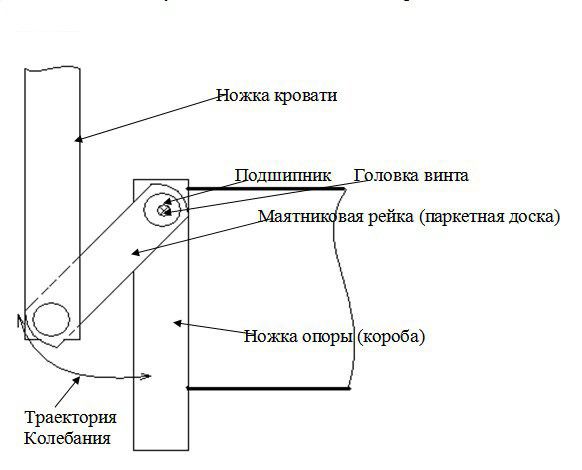
At the heart of the pendulum mechanism is a block. It is an elongated part with bearings inserted into the two outer holes.
- Insert the mounting screw into the bearing. In order for it to fit completely into the hole, insertion of one element into another occurs from the side where the largest
 notches. A spacer tube is placed on the other end of the screw. Screw the screw into the leg and base of the crib into the special holes where the bushing is pre-positioned. Thus, the spacer tube is fixed with one end in the wall of the crib, and the other is attached to the bearing.
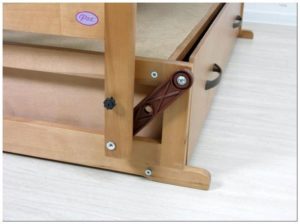
 - Cribs of this type are equipped with a fixing element. The cradle is secured in a stationary state due to the fact that there is a hole on the pendulum mechanism into which a special bolt enters when pressed. Screw it into the hole, which is usually located on the leg of the crib.
IMPORTANT! Check that when rocking the crib, the pendulum moves smoothly and the screw does not unscrew!
The pendulum bed is ready for use! Check all the mechanisms again and carefully secure the confirmations so that your baby always sleeps comfortably and safely.