DIY crib
 Creating comfortable conditions for children from birth becomes possible thanks to the acquisition of various attributes that facilitate the development and upbringing of the child. This is a stroller, walkers, a changing table, and then feeding. The cost of children's household items is high and every time you are faced with the need for another purchase, you seriously think about the possibility of making them yourself. One of these attributes is a crib for a child and you can make it yourself.
The content of the article
Pros of making your own crib
 Buying a new product requires you to incur expenses, and considerable ones at that. The quality of a crib assembled in production does not always meet the needs of the buyer. The activity of the children for whom the product is purchased often causes breakage of the fastening joints of the children's attribute. Making a crib with your own hands will allow you to build a reliable structure from materials that will meet the user’s requirements.
The use of individual sizes will make it possible to use the product up to the child’s independently determined age.The design of the product will have a unique design. If necessary, the crib can be made swinging or equipped with shelves for linen. Buying a finished product does not always satisfy the consumer. Self-production will allow you to realize any wishes of the parents and make the most of the free space in the children's room.
Deciding on the model
Depending on the amount of free space, the age of the child and the wishes of the parents, the type of crib is determined:
- classical;
- rocking chair;
- with drawers;
- two-tier;
- in the form of one of the objects (car, train, butterfly...).
When the child has just been born and the required product is made as a temporary one, then a classic or swinging model is chosen. If the size of the room is small and it is necessary to place shelves for linen along with the bed in the nursery, then preference is given to a crib with drawers. If there are two or more children, it would be correct to make a structure with several tiers. When a child grows up and there is a desire to emphasize individual characteristics, then decorating a child’s sleeping place in the form of an object or animal will allow the baby to feel cozy and comfortable.
Basic elements of a crib
The designs of different models differ in appearance from each other, but the basis of any sleeping place will be:
- vertical support posts;
- frame beams or slats, longitudinal and transverse, depending on the design of the supports;
- bottom with or without slats, depending on the bottom material;
- safety railings (for small children);
- drawers, if provided during the design.
To make all the parts of a children's bed, it would be correct to use planed boards that have been thoroughly sanded. The bottom is made of plywood and, if necessary, reinforced with transverse bars to improve strength. Cylindrical railing balusters are also sanded to ensure a smooth surface.
IMPORTANT! To prevent the child from getting hurt or getting a splinter, after grinding, all parts of the assembled structure are carefully inspected. After this, using sandpaper, chamfer the corner surfaces and make them with minimal rounding (0.5-1 mm)!
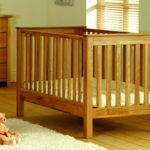
Simple DIY crib
From the moment a child is born, there is a need to determine the location of an individual place to sleep. It is not difficult to make a crib of a simple rectangular design, and the ability to adjust the height of the bottom will allow you to pay due attention to the baby in the first months of life.
For production you will need:
- processed wooden slats 60x25 mm (or similar size) - for the frame of vertical posts;
- polished bars 30x40 mm - for the frame of the longitudinal railings;
- wooden rods with a diameter of 15–20 mm (future balusters);
- a sheet of plywood, 10 mm thick, to cover the bottom.
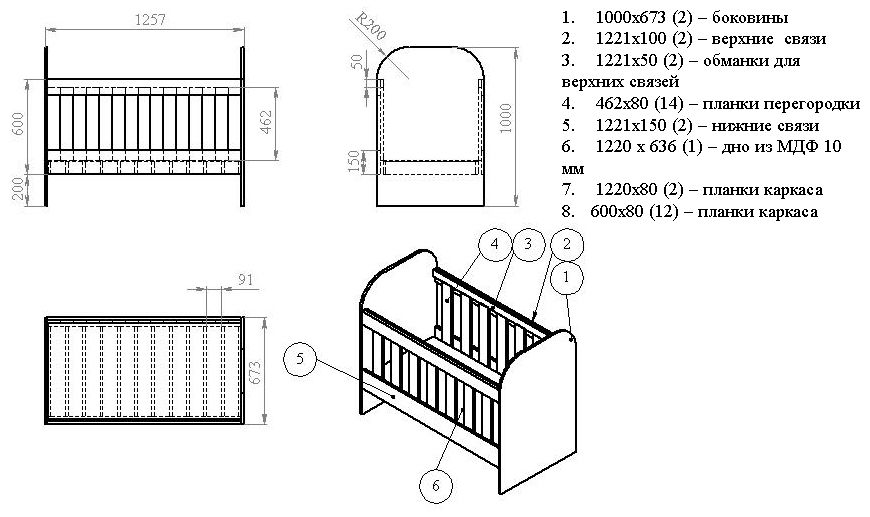
Everyone chooses the dimensions of the finished wooden crib, and therefore the components, independently. The most commonly used sizes are recommended:
- height – 800–900 mm;
- length – 1250–1350 mm;
- width – 650–700 mm;
- railing height – 450–600 mm;
- the distance between the balusters is 100–140 mm.
Before starting work, it is advisable to make a sketch of the children's sleeping place and detail the component elements with the dimensions and required quantity of each profile. After this, prepare the necessary carpentry tools and begin manufacturing.
ATTENTION! The bottom is made of a sheet of plywood, 10 mm thick. But excess child energy requires the use of increased material thickness or the manufacture of a bottom frame!
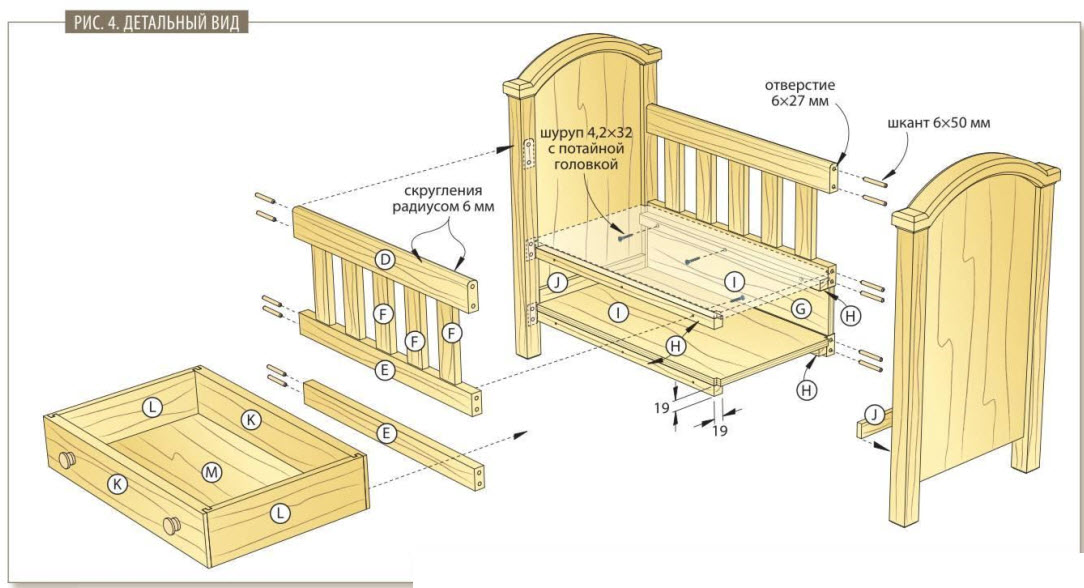
Manufacturing stages:
- First of all, cut off the required number of blanks of the required length, each of the profiles.
- Start assembling the side posts. Holes are drilled in the transverse slats of the sidewalls for installing balusters, then they are inserted, having previously been glued. After this, they are connected to vertical support posts. The fastening of crossbars with rods to the support can be done in the form of a tongue-and-groove system or by means of confirmants.
- When making the bottom frame, any of the timber profiles are used, and for rigidity they are reinforced with several transverse slats. The connections of the frame bars are made using confirmants or self-tapping screws.
- A sheet of plywood cut to size is placed on the prepared frame and attached to it.
- The bottom is installed between the support posts at a height of at least 200 mm; if the child is very small, then it is raised by 400–500 mm.
- After this, the balusters are inserted into the longitudinal frame slats and the side railings are installed.
- Upon completion of assembly, the finished structure is coated with varnish or paint in several layers, allowed to dry for two to three days, until the smell from the applied dye is eliminated.
IMPORTANT! The wooden blanks used must have a moisture content of no more than 25%! The use of raw timber will affect the shape of the assembled structure!
For ease of use of the crib, one of the longitudinal frames is removable or adjustable in height. This is taken into account when assembling the bed.Removing or adjusting the level of the railing is achieved through the use of special fasteners that provide the necessary functionality of this element. Changing the height can be achieved by dividing the frame into two parts or using an additional rail. Removing and installing the top element will allow you to change the height, depending on your needs.
Making a crib with drawers
If it is necessary to construct retractable shelves, measure the dimensions of the free space under the bottom of the already assembled structure, as well as between the side support posts and the walls or furniture located nearby. For the lower cavity, a horizontal cabinet is made, equipped with two or three drawers in one row in height. And for free room space, they make a cabinet with drawers, the height of which reaches the level of the railing, and if there is an increased need for shelves, a larger one.
Initial planning for making a wooden bed with drawers will allow you to make better use of the usable space. Such structures are made with support posts made of solid material, which makes it possible to attach guide slides to them.
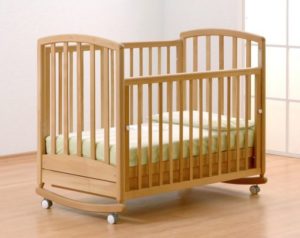
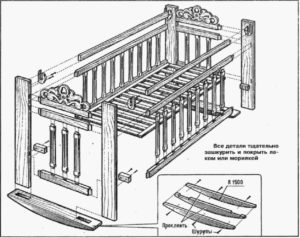
How to make a rocking bed for newborns
The production of a swing structure differs from the usual one by the presence of a supporting transverse arc between the vertical legs of the bed, which are rigidly connected to each other. It is made larger than the width of the product, and the outer radius of the arcuate partition has a value twice the height of the berth. For example, with a height of 800 mm – 1500–1700 mm.
The outer edges of the runners are curved in the opposite direction or I install additional bars.This allows you to limit the angle of the bed and avoid tipping over, which is a very important point, especially when the child is left alone.
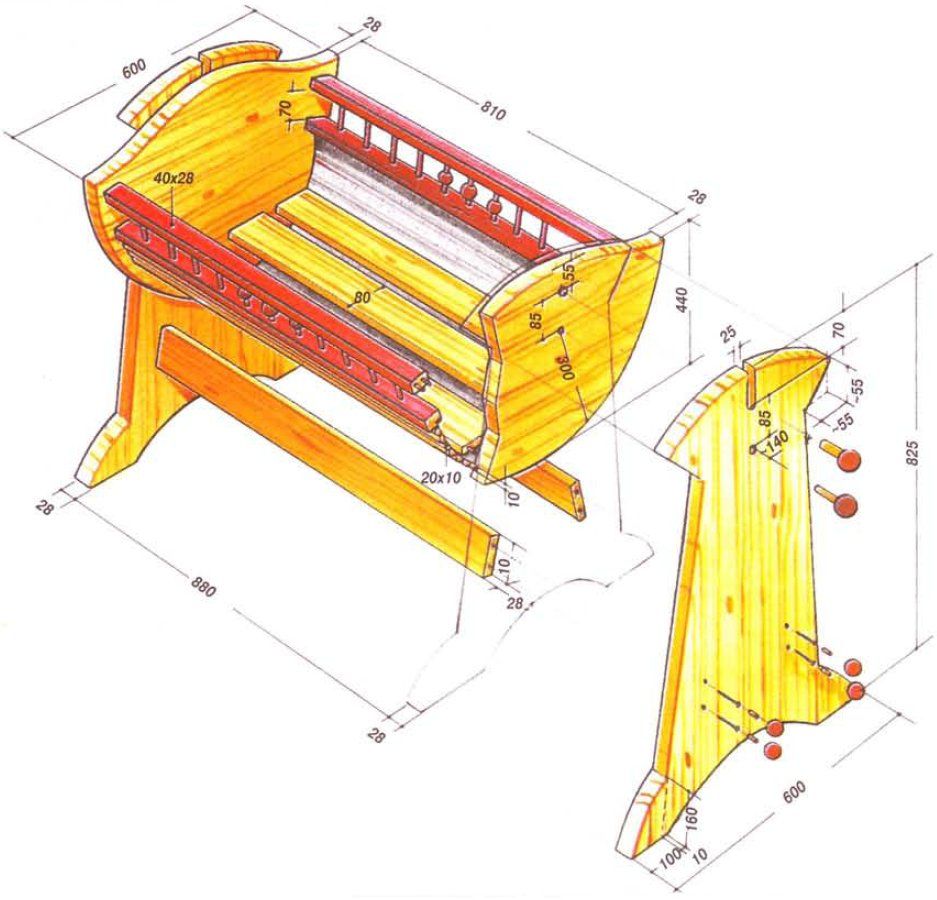
A rocking bed can be made in another way that uses the principle of a cradle. To do this, the end walls are made of two planes: one of them is supporting, and the other limits the sleeping area. A groove is made in the support post, and a rod of the appropriate diameter, but not less than 50 mm, is inserted into the end part of the cradle. The sleeping place is suspended on rods with a horizontal axis and swings freely in different directions.
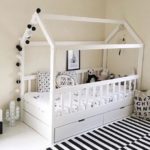
An original crib-car for older children
As children grow older, the need for a small sleeping place disappears, and a full-sized bed is still very large for a child. Making a crib machine will solve the issue of comfortable rest for teenagers who have reached the age of 3.
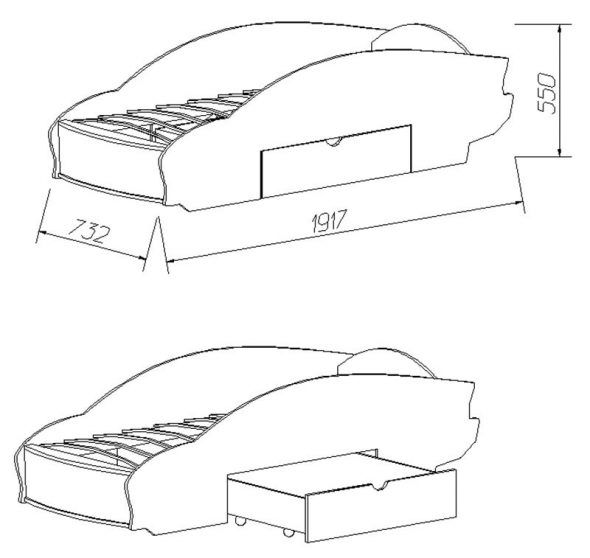
Like a simple design, the machine will require the manufacture of support posts, a bottom and longitudinal frame elements. The cross beams are made in the form of the end parts of a car: the front bumper is at the feet, and the rear part, with an elevation, is at the head of the car. The side components are cut out in the form of the silhouette of the car model the child likes. All elements are collected into a single product, then painted with bright colors and, after drying, used with pleasure.
ATTENTION! The inner cavity of the bed can be used to store linen! To do this, the bottom of the product is equipped with a lifting mechanism, and a little higher than the floor, the inside is sewn up with fiberboard or plywood.
Making your own children's bed will allow you to make maximum use of the interior space of the room, ensure reliable sleep for the child and, what is very important, will bring moral satisfaction to all family members.