DIY loft bed
 Perhaps the most unusual approach to decorating a bedroom and creating a cozy place to relax would be to purchase a loft bed. It is no coincidence that the bed received this name; its design involves a second tier, which can be climbed using a special ladder. This option is perfect for a small room.
The two-tier model saves space and pleases household members with its unusual appearance. Such furniture will be especially interesting for young children who constantly love to play and have fun. The bed will become a kind of playground and attraction for them. But usually, prices in stores are very high and not everyone can afford this luxury. Therefore, we offer the option of making a bed yourself using available materials at home.
The content of the article
Types of Loft Bed Designs
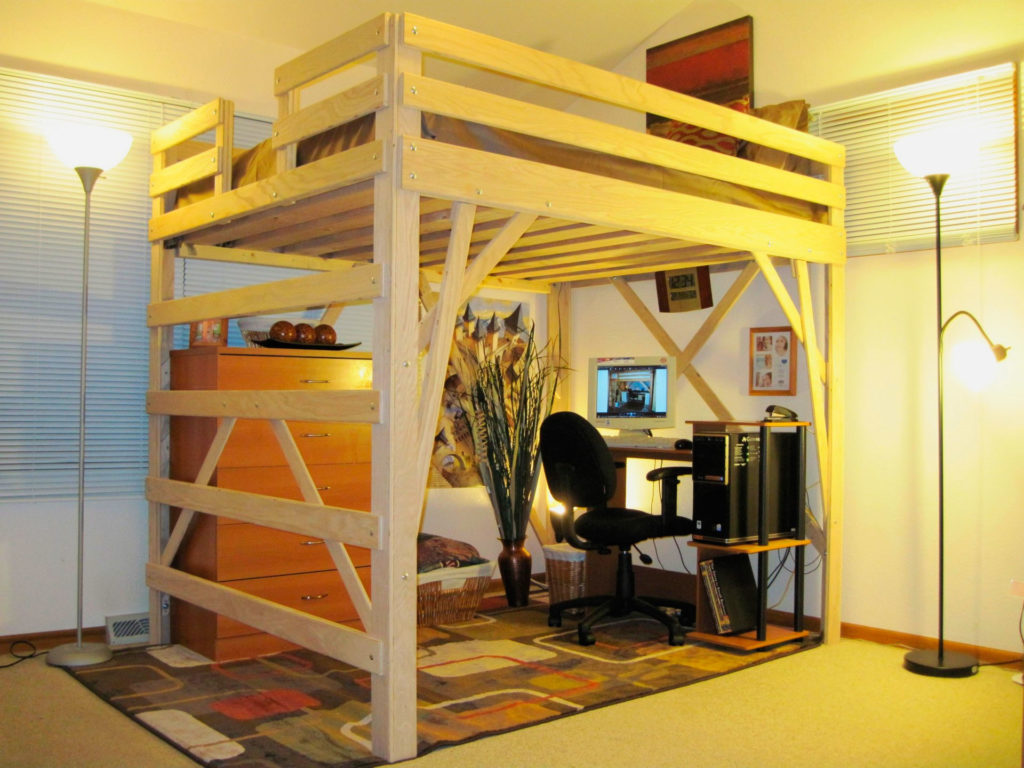
Basically, the point of this design is to install the bed frame on the second tier using supports or fasteners, and equip a work area below. Typically, the height at which the bed is installed is approximately equal to human height and is 1.8 - 2 meters. Depending on the height of the ceilings in the house, the height of the person for whom the bed is being made and personal preferences, the height can be changed and selected individually.
There are three types of installation of this design. Each type has its own advantages and is convenient in certain situations. The choice of one or another fastening method depends on the parameters of the apartment.
Main types of loft bed installation:
- Using a classic support frame system. For this option, you will need to create powerful support structures that will support the weight of the bed and the person and will not break. The convenience of this method is the ability to quickly move. Since the case is not attached to the walls or ceiling, it can easily be moved to another location without disassembling it.
- The use of two support beams and fixation to the wall using special fasteners. Unlike the previous version, this option is more stable, since one side is firmly fixed. This creates safe conditions for games, but makes it impossible for the structure to move freely around the room.
- The most interesting and daring design solution is a bed without supports. This method involves fixing the housing to the ceiling and walls using fasteners equipped for this. This option is suitable only for those houses that have thick and strong load-bearing walls.
IMPORTANT! Be careful and calculate everything carefully. You can do any of these methods yourself, the choice is yours. The main thing is to ensure safety. The third option is not the simplest and its design carries a certain risk. Therefore, we recommend focusing on the first two models.
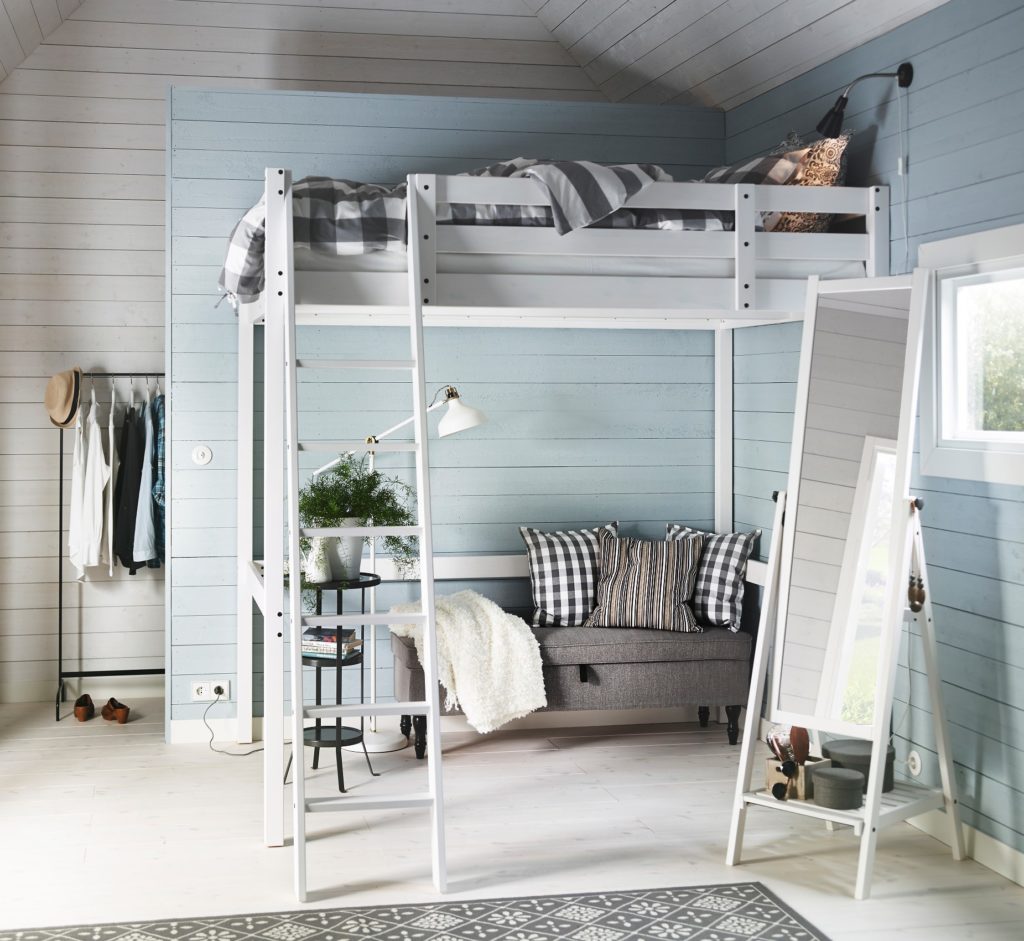
Another important point will be the creation of a staircase that will be attached to the main body.This detail also has its own methods of execution. If you have enough free space and require a reliable and safe design, then use a staircase with a slope. If there is not much space, then the direct option is also suitable. However, due to the lack of an angle, this view may not be very convenient. This problem can be solved by using wide treads with a special rubber pad for better grip.
Materials for making a loft bed
In order to complete all the work and create a truly good and reliable thing, you will need high-quality materials. Choose carefully, make sure there are no defects or chips in the wood species.
Finding everything you need is not so difficult. Here is a list of what you will need:
- The beam has a cross-section of 10×10 cm. You can even take more, this will make the frame more powerful and safer. Keep in mind that each corner will require approximately 2-2.3 m!
- Boards for covering furniture and for creating stair steps.
- Hammer and nails.
- Hand saw.
- Self-tapping screws.
- Sandpaper or wood sander.
- Varnish, impregnation and paint for decoration.
- Level for precise installation.
- Measuring tape and carpenter's pencil.
Before you start, make sure you have enough material. It is best to take bars and boards with a reserve. During work there may be chips or errors in calculations, so there should always be a reserve.
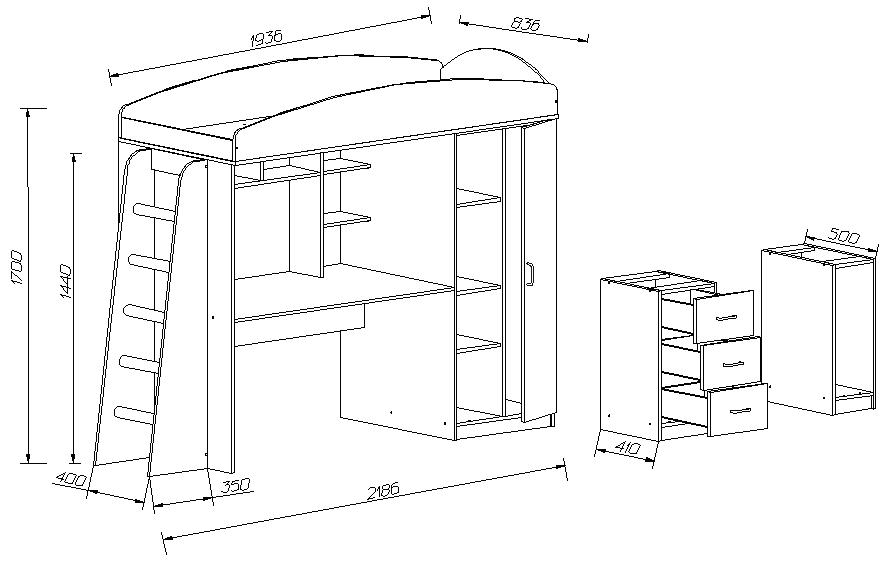
DIY attic bed: drawings and diagrams, instructions
Not everyone can boast of excellent skills in construction and repair, so we will look at the simplest method of making a structure that anyone can do. We will tell you how to make supports and install the second tier.
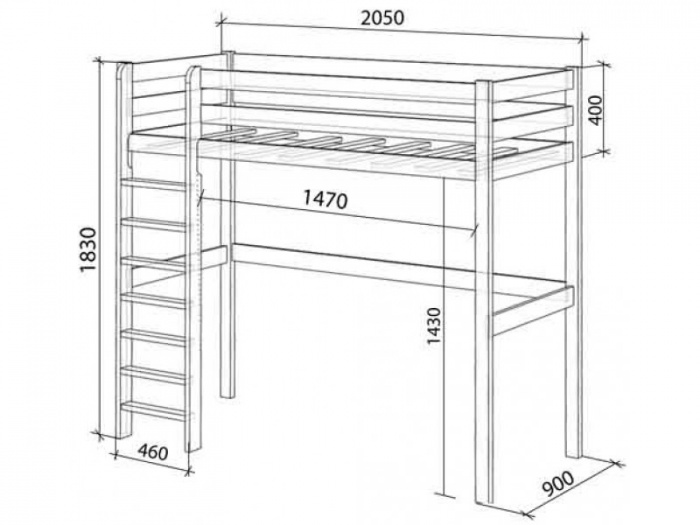
The classic model that we talked about above should be mounted on four support points. This method is the most convenient because it does not require special equipment and does not take much time and effort. The combination of price and quality definitely deserves attention. The most important point will be the creation of a basic drawing on which the work will be carried out.
- Choose a location for the future product. It is important that the dimensions of the bed itself fit into the location you choose, since even though the frame will be at a height, the beam that serves as a support will still take up space.
- On the diagram, indicate the lengths of all sides of your loft bed. It turns out to be a rectangle.
- Four beams should be installed on each corner of this rectangle. Choose the optimal height and reflect this in the diagram.
- For a more reliable frame, use additional stiffening ribs and cover it with boards or bars of smaller cross-section.
- Now add a staircase to the plan. The most convenient option would be one without an angle of inclination.
IMPORTANT! You should take measurements of the room to choose the optimal combination of heights. The bed should not interfere with the people below. But you shouldn’t make it too high either; a person should climb it calmly and sleep comfortably without hitting the ceiling.
Rules for creating an attic bed
After creating the drawing, you can start working. Check your diagram again, make sure that everything in it meets the requirements and your desires. If everything is fine, then we begin to perform the steps in order:
- Make a frame from beams. To do this, connect them together using boards around the perimeter. The upper part of the beam should protrude slightly above the bed.
- To strengthen the product, it is necessary to make additional supports in the form of crosses on all sides. To do this, saw off beams from a beam of smaller cross-section at an angle of 45 degrees and pull adjacent supports together.
- After creating the base, you can start covering. Cover the bottom with boards. It is possible with a short interval.
- The upper protruding parts of the timber also need to be chipped with boards or slats. This will serve as a railing and natural barrier for the bed.
- Finally, you need to make a staircase. Attach two bars to the side. The width between them should be sufficient to climb freely. And install the required number of steps using self-tapping screws.
The bed is ready, you can enjoy your well-deserved rest. This version of the design is very interesting and beautiful. In addition, constant light load when lifting will have a beneficial effect on health.