DIY canopy over the bed
 There are many solutions to create a comfortable and cozy atmosphere in the bedroom. The simplest option is to install a canopy. You can buy a ready-made canopy, but a home-made accessory looks much more attractive. Most often, a canopy is used in a children's room above the bed.
The content of the article
How to make a canopy over a bed
A canopy is an elegant accessory used to create a cozy environment and ensure healthy sleep. At first, curtains were used as an element of luxury over the sleeping bed of the Turkish sultans. But it was not only installed in Turkey. In Rus', fabric was attached over children's cribs to protect them from external irritants during sleep.
The main advantage of the canopy is the isolation of a person during night rest. The canopy protects the comfort zone from direct sunlight, mosquitoes, and cold drafts. It maintains the temperature and creates a romantic atmosphere.
The canopy has only one drawback - it is a material that has a predisposition to collecting dust. To make washing easier, you need to choose fabrics with a light texture.
What will it take?
First you need to stock up on all the required materials and tools:
- cornice (wooden or metal);
- fabric of the required length (taking into account the size of the bed) and a width of approximately 2.1 m;
- fastening (screws and anchors);
- screwdriver;
- threads, needles (sewing machine).
Important! In order to make waves on fabric, you need to purchase twice as much material as the size of the bed.
What fabric to choose for a canopy
Along with the many advantages that an elegantly designed canopy has, there is a serious point that stands against this curtain - the possibility of quickly becoming dusty and impairing air circulation.
Therefore, certain requirements must be met for the material used to make the canopy:
- Loose texture.
- Matter must certainly be only natural.
- It is desirable that the material for the canopy be light in color or in the same color scheme as the predominant colors in the room.
You need to choose a sufficient amount of material, but avoid the formation of multi-layers.
For a high-quality canopy that can only bring benefits, the following types of materials are suitable:
- batiste;
- silk;
- tulle;
- cotton;
- satin
Attention! Clean the finished canopy daily. And if possible, make yourself another set to replace the curtains.
Methods for attaching a canopy
Making a canopy, as a rule, does not take much time and does not require special skills. Every woman who has basic skills in using a sewing machine can handle this. The only thing that can cause certain difficulties is the process of attaching the frame.
Methods of attaching the canopy:
- Arc-shaped fastener. With this fastening method, a semicircle is made from pipes, its ends rest against the wall. The canopy is attached to the frame according to the principle of curtains.
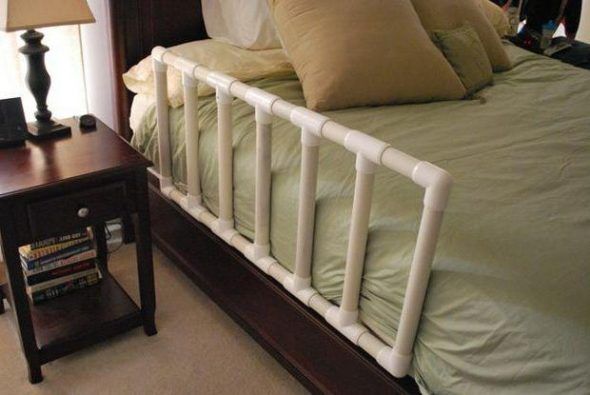
- Along the contour of the bed. Racks are mounted vertically in the corners.A horizontal bar is also installed directly above the sleeping bed, onto which the material is fixed.
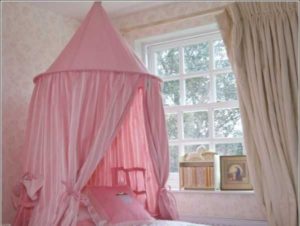
- Crown. A round pipe is attached to the ceiling - a canopy is pulled over it.
- Fastening on a straight pipe. For production you need one pipe, which is fixed in the center of the room, and a canopy is thrown over the cornice.
It is advisable to select the type of fastener that is most appropriate in the room. There is no need to chase fashion: if the room is small, it is best to choose an arched cornice. If the bedroom is spacious, then you can make a cornice around the perimeter.
Useful tips:
- Making a canopy is a simple procedure. Cut out the fabric according to the required sketch, sew loops on top for fastening. If a “shortened” canopy is used, then it must be 15-25 cm lower than the mattress.
- The method of fastening the frame is selected taking into account the style of the room and the type of canopy. For example: For a bed with supports, it is best to use the traditional option. This canopy looks great on beds that are located in the middle of the room. A canopy in the form of a dome requires a frame fixed above the sleeping bed. Semicircular designs look ideal on beds that are located in the corner.
- Instead of solid loops, ribbons can be attached to the canopy to match the color of the material. This technique, in addition to additional decor, will make it possible to quickly remove the curtain for washing.
- If you want to install a frame around the perimeter, then choose a profile cornice for this purpose. It is durable and elastic. The color of the cornice can be chosen to match the color of the main material.
Canopy yourself: step-by-step instructions
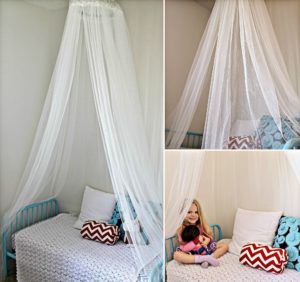
The simplest system for fastening canopies is hanging. The curtain is hung from the ceiling cornice.
Build process:
- On the surface of the ceiling above the sleeping place, you need to make markings. To do this, you will need to measure the length of each cornice. Points for future fasteners are marked on the ceiling, which must be in pairs and parallel to each other. The distance between the anchors should be approximately 40-60 cm; taking into account the width of the bed, you can use the average value.
- Holes are made at the marked points and mounting anchors are installed.
- You need to tie a ribbon to the prepared fasteners so that each part forms a loop.
- The size of the hinges can be adjusted to suit the height from floor to ceiling. For example, if the room is 2.4 m high, then loops 30 cm long will be enough. If the ceilings are higher, then the loops are made longer.
- Next, the hemmed material is spread on the floor. This must be one piece of wide fabric.
- In the middle of the cut, you need to mark a piece with a width that is equal to the length between the rows of fasteners. To this size you need to add 20-30 cm for the hanging of the curtain.
- You need to sew the material along the marked places, creating a passage for threading the cornice through it.
- The canopy threaded through the frame must be hung from the loops. On the sides the cornice is fixed with plugs so that the canopy does not slide down during operation.
- Arrange the hanging canopy beautifully along the edges of the bed.
Using the same hanging system, you can make a round frame. A hula hoop is perfect for these purposes.
There is another simple option for organizing a canopy - hanging the material on a frame with decorative stands at the base. The manufacturing process is a little more complicated, but the result is worth it.
Build process:
- In fact, the manufacture of this canopy consists of installing a frame frame over the sleeping bed, which can be made of plastic, metal or wood. The wooden version is most often used.
- All frame elements (posts and crossbars) must be connected to each other using tongue/groove fasteners, strengthening the fastening with wood glue and screws.
- The prepared frame must be treated with 2-3 layers of varnish. If the bed is made of dark wood, the wood can be coated with stain or manganese. Then dry and varnish.
- It is necessary to mount the frame indoors so that the posts touch the corners of the bed.
- We drape the frame with the selected material, throwing the fabric over the crossbars. You can divide the material into 4 sections and tie them beautifully on each frame post.
- If the bed already has posts and you want to make a frame, you can stretch decorative ribbons and throw drapery material over them. The hanging parts need to be wrapped nicely around each post.
A self-made canopy is an original design solution that allows you to update your bedroom design at low cost and add romantic accents to the atmosphere of the room. A little effort, materials and imagination can help make your bedroom interior original and radically change your night's resting place.