How to make a sofa for dolls with your own hands
 You can buy a sofa for dolls at a toy store or make it yourself. It will take 1-2 hours to make. You can create a sofa together with your children. Already 4-5 year old kids will be happy to participate in this process, helping to outline and glue the parts of the sofa. In addition, ready-made doll furniture will serve as a toy. It can be placed in a dollhouse or a specially designated place for games. And if you choose beautiful upholstery for the sofa and make original packaging, you will get an original gift for your friend’s birthday.
The content of the article
How to make a sofa for dolls with your own hands
When starting to create a sofa, you should immediately prepare the necessary materials. For this purpose you can use:
- various cardboard boxes;
- juice or milk cartons;
- Styrofoam;
- plywood sheets;
- plastic;
- plexiglass;
- wooden boards;
- remnants of parquet or laminate.
as well as other household and construction materials.
You can use synthetic padding as a filler for upholstery. You can buy it at a fabric store or flog it from an old jacket. Thin foam rubber or material used for packaging electrical appliances is also suitable. Even ordinary cotton wool can be used as a filler when creating a doll sofa.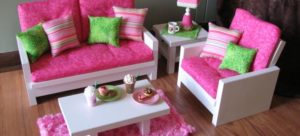
For upholstery, you can buy about 30 cm of fabric, but you can also use fabric from old things.It is desirable that it does not stretch and is dense. It is convenient to use old denim trousers for such furniture. Velor upholstery will look good. You can take it from sports pants that are already too small. Lace, braid, buttons, rhinestones and other elements are useful as decoration.
What tools will you need?
In order not to be distracted by searching for the right tool when creating a sofa for dolls, you must first purchase or prepare the following tools:
- scissors;
- pencil or pen;
- ruler at 30-50 cm;
- stationery knife;
- scotch;
- marker;
- glue.
Important! It is better to use a hot glue gun or Super Moment glue. But if small children are involved in the process, then you should be very careful and explain to them about the dangers during work.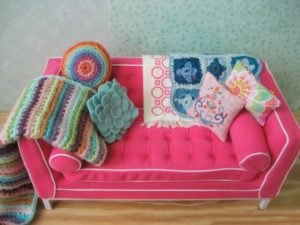
How to take measurements correctly
In order for the sofa to be the right size, you should take the doll for which it will be made and outline its contours on a sheet of paper. To do this, place it on a sheet and draw it around with a pencil. Then they measure 2-3 cm upward from the doll’s head, the side side is also increased by 2-3 cm and a rectangle is drawn. The length and width of the resulting rectangle will be the dimensions of the sofa bed.
The height of the sofa can be calculated. To do this, the resulting length of the berth must be divided by 4. The height of the armrests from the base of the sofa should be approximately 1.5 times the height of the seat. The height of the back of the sofa can be any, but it is approximately 2 seat heights.
For example, if the doll has a height of 20 cm and a width of 6 cm, then, accordingly:
- the length of the bed will be - 20 + 2 = 24 cm;
- width of the bed - 6 + 2 = 8 cm;
- seat height - 24: 4 = 6 cm;
- the height of the backrest is 6+6=12 cm, and its width is 1.5 cm greater than the width of the seat - 24+1.5=25.5 cm.
- the height of the armrests is 6 * 1.5 = 9 cm, and the width is 0.5 cm less than the width of the sofa - 8-0.5 = 7.5 cm.
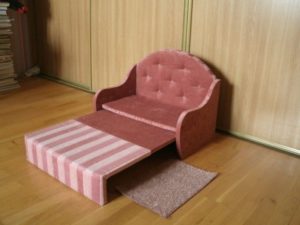
Sofa for dolls: step-by-step instructions
You should start making a sofa by creating a pattern. To do this, on a sheet of paper, using a marker, draw the contours of future parts according to the above calculated dimensions. The edges of the back and armrests need to be rounded. To make the rounding the same on all parts, apply a round object to the desired edges - a coin or a cap from a plastic bottle and trace it with a pencil.
The following parts are required for the sofa:
- Bed part 2 pieces (one is suitable for the bottom of the box).
- Back.
- Armrests - 2 pcs.
- The sides of the box (4 parts, 2 long for the front and back of the sofa and 2 short for the sides of the box).

Then take cardboard and draw all the details on it. Moreover, the back and armrests should be cut out in 2 copies.
To make the structure denser, you need to cut out each part 2-3 times, and then glue them together.
At the next stage, you should glue the resulting parts with foam rubber or synthetic padding. While the parts are drying, you need to start cutting out the upholstery. Here you can show your imagination. There are many upholstery options you can come up with.
The fabric must be pre-washed and ironed. Patterns are laid out on the fabric prepared in this way. In this case, you need to monitor the direction of the grain threads on the fabric. If you do not follow this, the cut parts may have a different appearance.
First, you should draw a pencil around the pattern on the fabric and give a fold allowance of approximately 0.8-1 cm.On the rounded parts of the fabric left for allowances, triangles are cut out so that there are no large creases.
Then each cardboard piece should be covered with cut-out fabric. To do this, the fabric parts are laid out with the wrong side up, and the part is placed on top. Using heated glue from a gun, a strip is squeezed out onto the edge of the cardboard piece, and then the upholstery is glued by folding the fabric left for allowance.
Important! There is no need to immediately apply glue to the entire perimeter of the cardboard parts. This should be done gradually, lubricating approximately 5 cm at a time.
The back and armrests, cut out in duplicate and covered with fabric on one side, are glued together. On top of the seams of the glued finished parts of the backrest and armrests, so that the joints are not visible, you can glue a suitable braid or strip of lace.
After the parts have dried, you need to start gluing the bed. To do this, the edges of the parts are coated with Super-Moment glue or a glue gun, and glued one by one to the structure being created. Before gluing the bottom of the box intended for sleeping place, it can be filled with crumpled sheets of paper. This will give the structure rigidity and stability. After this, you can seal the bottom of the box.
After the glued parts of the box have dried, you need to glue the back of the sofa. To do this, apply glue along the contour of the back side of the box and apply it to the back of the sofa. After this, you can glue the armrests on the sides in the same way.
Such a sofa for Barbie can also be decorated with small pillows made of sponges in the form of rectangles, circles or hearts from the same fabric as the upholstery of the sofa or from a contrasting fabric. They can be decorated with embroidery, fringe or lace inserts.The inside of a sewn pillow can be filled with cotton wool, padding polyester or foam rubber cut into pieces.