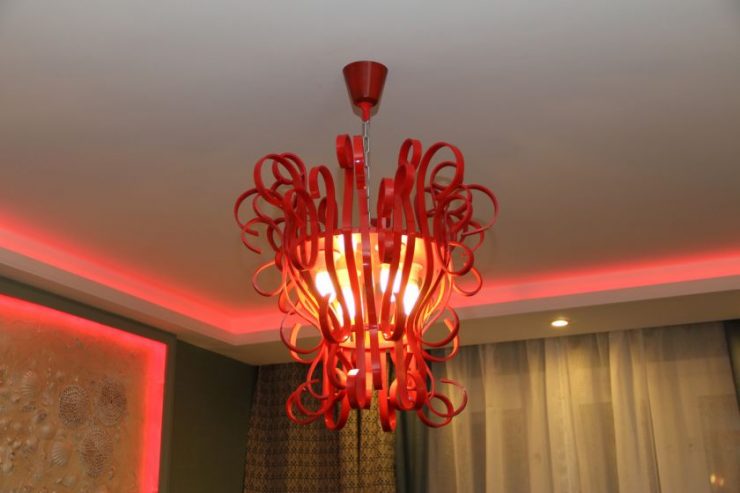
What to make a chandelier for the hall with your own hands
If you apply a little imagination and try, then any, even the most boring, room can be transformed beyond recognition. This can be achieved by using original interior items. You can make them with your own hands or order them from a master.
These can be various tables, photo frames, lamps and many other interesting things. It is noteworthy that to create such things you do not need to spend expensive materials, buy special tools or generally have professional experience. The main thing here is rich imagination.
Anything that your eyes fall on and your hands can reach can serve as working material.
Relying on your imagination and using your own hands, you can make many different lamps and chandeliers that will decorate any room and fit into the interior.
The content of the article
Choosing materials and techniques for creating a chandelier with your own hands
Most often, to make an original chandelier, materials are used that are available in large quantities and are located directly at home or near it:
- colored paper or cardboard;
- multi-colored threads and fabrics;
- plastic dishes and bottles;
- various unusual branches, sticks and other wood;
- old CDs;
- colored glass or film, as well as similar things.
Manufacturing technique used
To create an unusual lighting device that no one else will have, it is better to choose a well-known technique:
- it can be origami, or you can use papier-mâché;
- you can use wood carving or embossing;
- wickerwork looks good;
- make a design in the form of macrame or crochet;
- Or you can make a mix of similar shaped objects.
In any case, when choosing one or another method to implement your idea, you need to build on what material you managed to find.
Having learned what materials can be used to create your own masterpiece, as well as what techniques exist for this, you can begin to create this very masterpiece.
How to make your own chandelier for the hall
A chandelier in a room is not just a source of light. We can say that this detail is the main thing that makes the room cozy and atmospheric. Especially if it was created through your own efforts. This demonstrates the taste and skill of the owner, and in addition, shows his imagination and ingenuity.
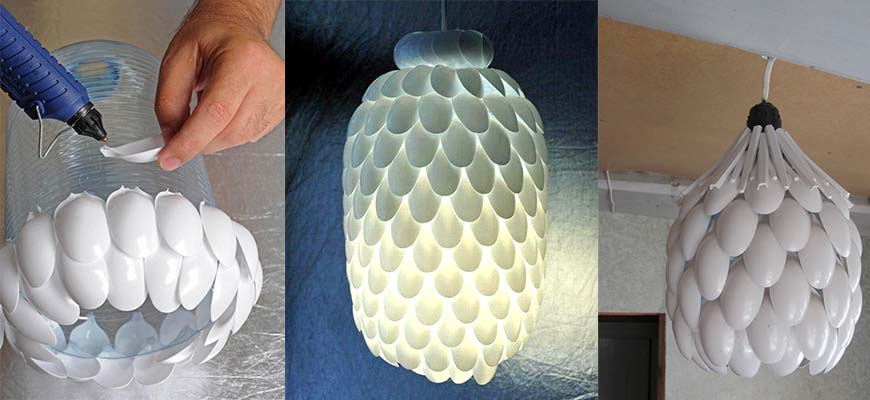
Plastic spoons as chandelier decoration
What could be simpler and easier to find than disposable plastic spoons? They are suitable not only for their intended purpose. It is quite possible to make a chandelier for the hall from them. The advantage of plastic cutlery is that they cost little, there is a large selection of colors, and they can be used for a long time. To make a chandelier from this material, you don’t need to put in a lot of effort or spend a lot of free time.
You need to prepare:
- five liter plastic bottle;
- spoons made of the same material (their number depends on the size of the bottle);
- glue for working with plastic;
- socket from an unused chandelier;
- knife with good sharpening.
Technology:
- The first step is to prepare the bottle so that you can work with it further. Clean the label and other stickers, cut off the bottom part, and get rid of any remaining water.
- We take spoons - it’s better if they come only from the set and use a knife to carefully cut off the handles. This part of the product will not be needed. We are only interested in 2–3 centimeters above the “scoop”.
- We glue our modified spoons onto the bottle. Lubricate the tail of the device with glue and press it to the bottle. Moreover, we glue the convex part of the spoon outward. The spoons should hide the entire bottle; it is better to glue them in a checkerboard pattern, moving them closer to each other.
- We wait until our bottle dries and the spoons will stick to it well, then we place a cartridge from a used old chandelier inside and secure it.
- An element of a decorative bowl can be created using the same spoons. You just need to cover the neck of the bottle with them.
- We hang our newly created chandelier and connect the wiring. Let's test and enjoy the result!
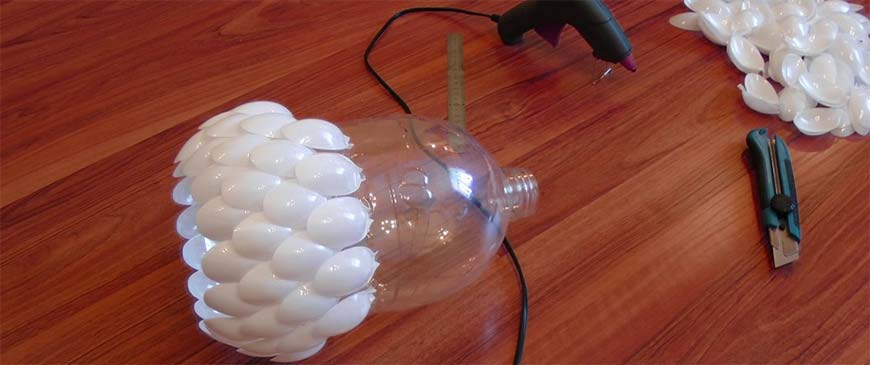
Reference. You can paint spoons in a variety of colors. This will give more originality to the design.
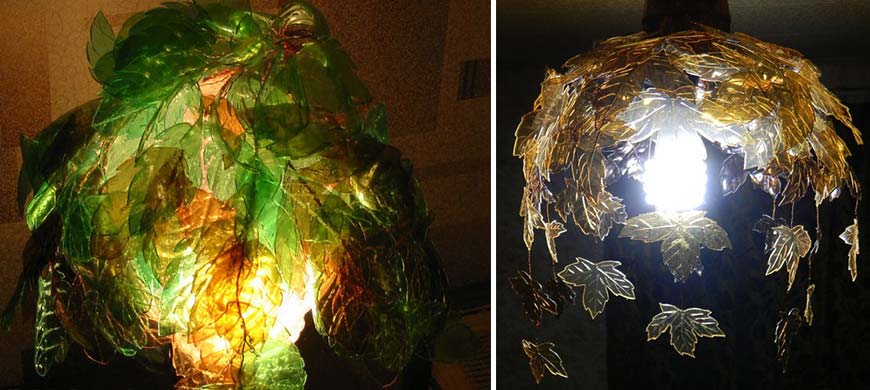
Leaves from plastic bottles for chandeliers
A good option for using empty plastic bottles would be a chandelier decorated in the shape of leaves. Thanks to the abundance of their colors, you can create a wide variety of options.
Technology:
- From the bottles we cut out the leaf-shaped blanks we need.
- We give the blanks their final shape.
- Take a soldering iron and melt the cut areas of the leaves a little. This will make them more believable.
- Using a soldering iron, you can form a reliable copy of a living leaf from an ordinary piece of plastic. The main thing is to do everything carefully so as not to burn the workpiece. By drawing the veins and fusing the edges a little, we will give the plastic leaves a finished look.
- After heating the needle over the fire, we make holes in the base of each workpiece. These holes are needed to secure them.
- We make branches from thin wire. We form a frame from larger wire onto which we attach everything else.
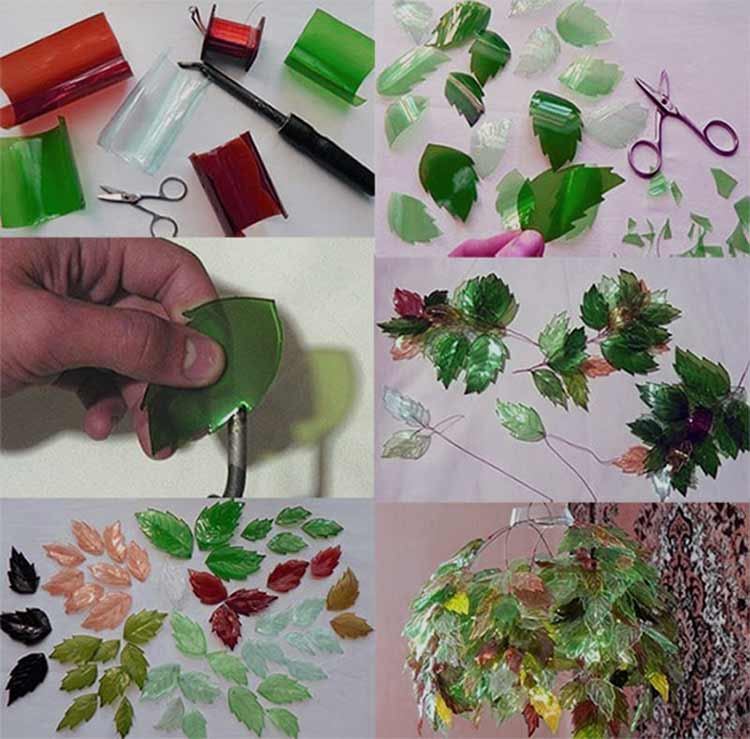
A good solution would be to complement the chandelier with similar shades for a floor lamp or table lamp. This will allow you to decorate the room in the same style, which will look just great!
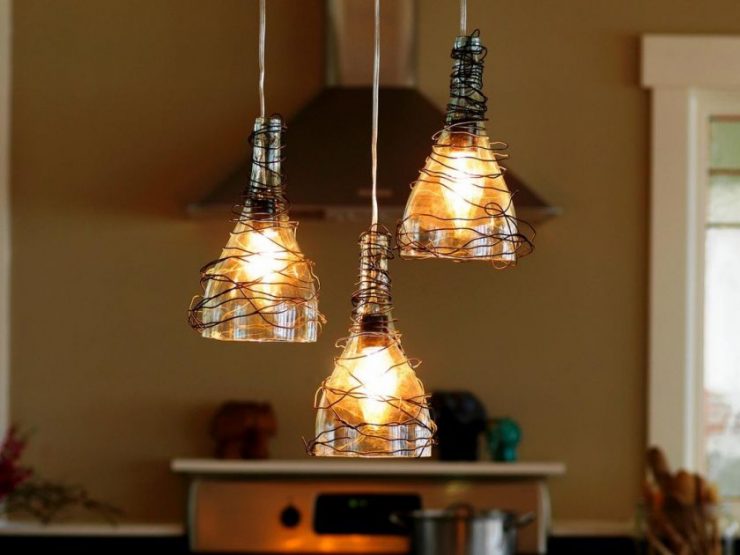
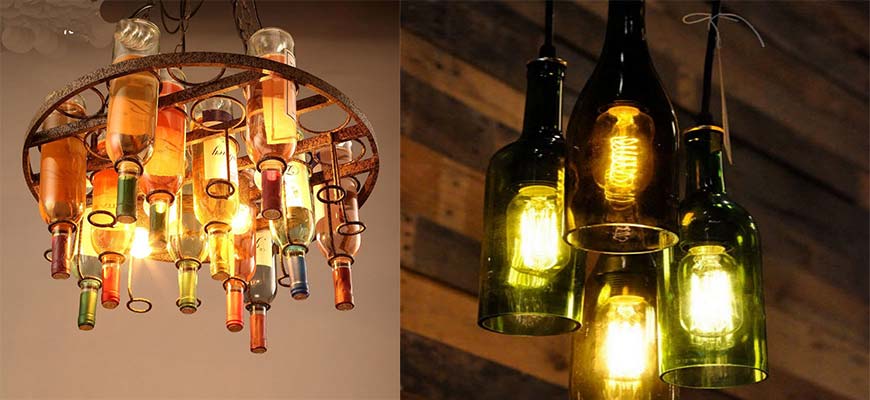
Wine bottles are in use!
Don't rush to throw away empty wine bottles. They will make a gorgeous chandelier! True, you will have to “sweat” a little on its creation, since it will be somewhat more difficult than in previous versions. It will be quite difficult to make such a chandelier - the work requires accuracy and attentiveness. But the end result is worth it.
Materials used:
- empty wine bottles;
- glass cutter;
- sandpaper;
- socket from an old lamp;
- electrical wire;
- frame made of wood or metal.
Technology:
- We prepare the bottles for later use. We draw a line at the required height along the entire circumference. This mark is needed to cut off the bottom part.
- Using sandpaper, we sand the cut line to prevent the possibility of injury.
- We pass the wire through the neck and connect the cartridge to it.
- We mount the bottles on the frame.
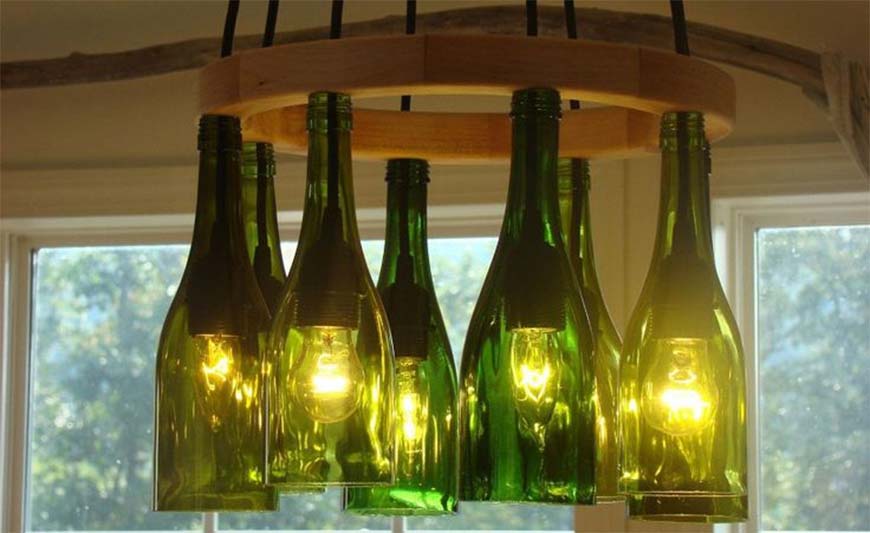
It would be nice to decorate the bottles. However, even without decoration, a chandelier of this type looks unusual and original.
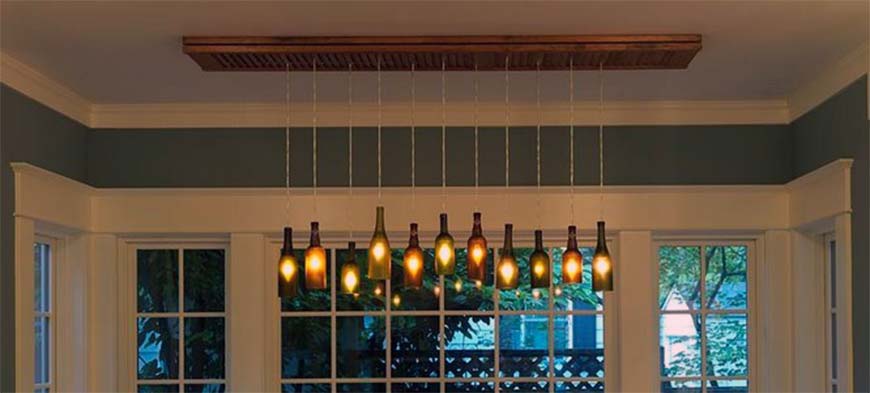
You can attach as many bottles to the frame as you want.It could be just one bottle, or you could use three or even more.
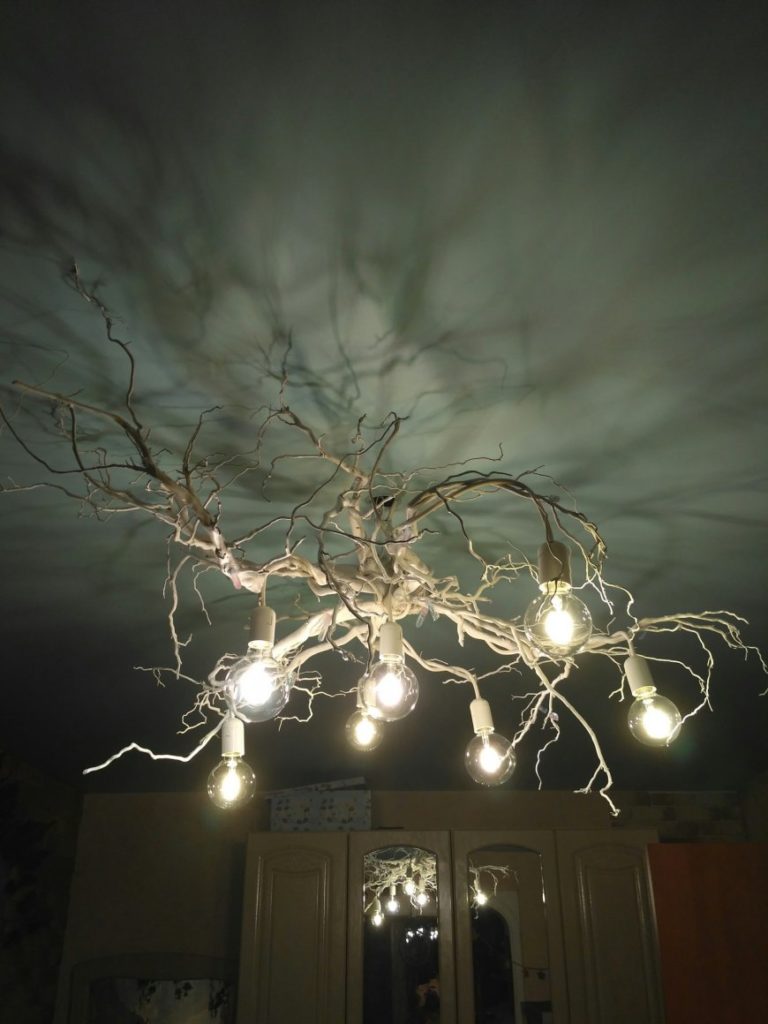
Chandelier from the forest
Most often, various types of homemade lighting devices are made from wood.
To create such a chandelier you will need:
- wooden planks (forty millimeters wide);
- several liter glass jars;
- wood varnish;
- sandpaper;
- wood screws.
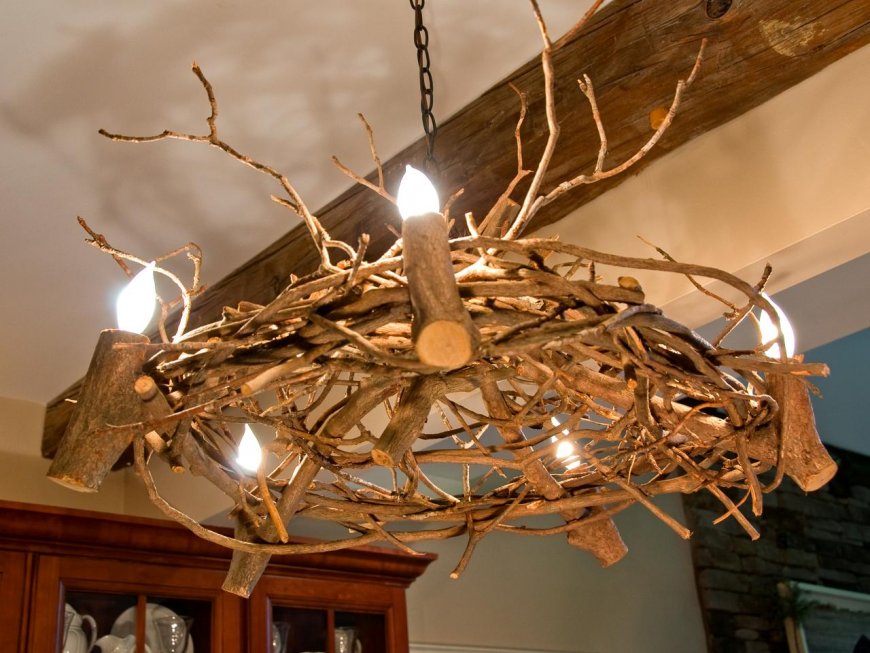
Technology:
- All planks must be sanded using sandpaper.
- On the back side of them, make grooves where we will lay the wiring, and we also need to make holes for the lampshades.
- Apply varnish to the planks.
- Secure the shades and screw in the lamps.
We use liter glass jars as lampshades, which we pre-paint with white paint.