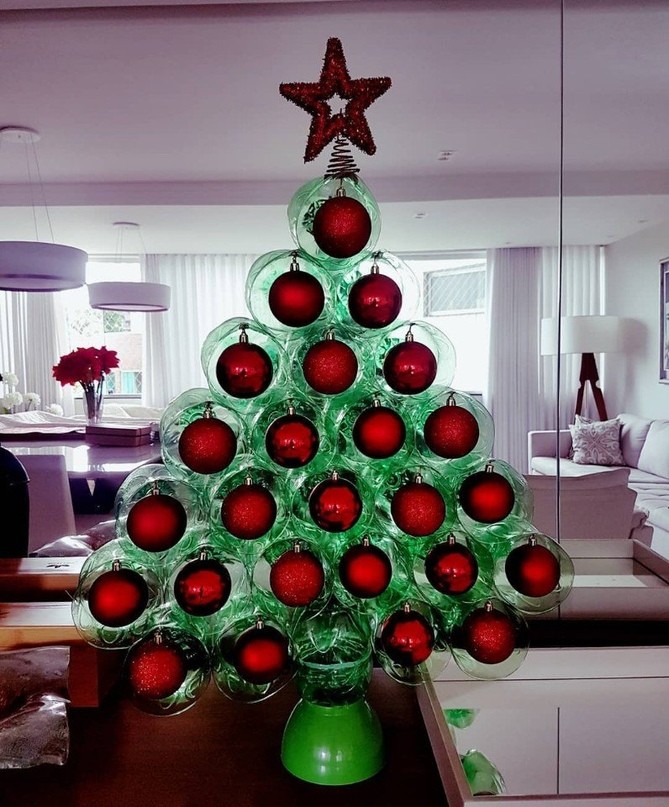
Christmas tree made from plastic bottles
Plastic bottles are not trash that needs to be disposed of. Give them a second life, because you can easily make many crafts from a soda or milk container. For example, a festive tree that will be an ideal decoration for a table or windowsill.
The content of the article
DIY Christmas tree made from plastic bottles
Many housewives show miracles of imagination and, in addition to the usual snowflakes on the windows, make original New Year's trees from scrap materials. Green plastic bottles are an ideal basis for making the main symbol of the holiday.
Making crafts does not require special skill or professional skills. Everything is extremely simple.
Required materials and tools
In order for the Christmas tree to turn out to be of high quality and beautiful, you will have to arm yourself with a certain set of tools, as well as raw materials for the production of the product. With their help, you need to cut the elements and fasten them together.
We will need:
- scissors;
- sharp knife;
- thick paper or cardboard size A4;
- narrow, transparent and double-sided tape;
- glue Moment;
- candle;
- decorative elements.
The main material is plastic bottles with a volume of 1.5 or 2 liters. You can use green, blue or silver base color.
Step-by-step guide to making a Christmas tree from plastic bottles
A little imagination, dexterity and inspiration is all that is required to create a beautiful, fluffy Christmas tree with your own hands. Not only will you get an attractive table decoration, but you will also extend the life of the plastic bottle by reusing it.
First option

The more containers you collect, the taller the artificial tree will be. Next we proceed according to the scheme:
- We divide each bottle into three parts, the neck and bottom should be separate.
- The lower part is used as a base. To ensure stability from the inside, it is glued with plasticine or decorated on top with real stones.
- We make the barrel from thick paper, rolling it into a tube and inserting it into the separated neck.
- We cut the main part of the container lengthwise and separate three equal rectangles.
- We decorate each resulting strip of plastic with fringe, not reaching the edge by about 1 cm.
- Make the details a little shorter than the previous ones.
- We begin to wrap the “trunk” of the future tree with blanks. First with a long fringe, then with a short one.
- If the tube is too tall, simply trim off the excess.
- Use decorative elements as a top.
- Decorate your artificial Christmas tree as you wish.
It's fun to make crafts with children. They are always happy with the result.
Second way
In this case it works a little differently. The bottom of all bottles is cut off, one of which is left for the base and is also glued with beautiful stones. We cut the upper part of the bottle with a wide fringe, not reaching the edge of the neck.
The width of each strip is about 2 cm.
Next, we make parallel cuts and bend them, like needles on a tree in a chaotic order. We arrange each piece this way. The result is a fluffy fringe.Next, we begin to string the cut necks of plastic bottles with “twigs” onto the tube prepared in advance. There is no need to glue anything, we just fit them tightly together.
Secure the top with a lid to prevent the structure from falling off the base. And keep in mind: such a tree will be heavier.
All that remains is to decorate the green beauty and enjoy the festive atmosphere that you created with your own hands from scrap materials.