DIY napkin numbers
Decorating a room for a birthday is a responsible undertaking. I want to make the holiday unforgettable, but at the same time not empty my own pockets in an attempt to keep up with the latest trends. After all, a lot can be done at home, including figures with decor from ordinary paper napkins. The process takes little time, does not require significant expenses, and after the name day celebration it can be sold.
The content of the article
How to make a three-dimensional figure from napkins with your own hands
The interior decoration looks original and unusual. Due to its volume, it can be installed on a cabinet, placed on the floor or even hung on the wall. Indeed, despite its large size and volume, it is quite light.
The costs of purchasing work equipment and consumables are minimal. Everything is done according to the scheme, extremely easy.
Required materials and tools
Take a look around and evaluate what you have in your home to create your own “masterpiece.” You will need a standard set of office supplies:
- thick cardboard, preferably large boxes from household appliances;
- pencil or pen;
- sharp stationery knife and scissors;
- masking tape;
- PVA glue;
- stapler
In addition, you will need a large amount of paper napkins. It is better to take a variety and in an assortment of colors: this way the figure will be bright and noticeable.
General recommendations
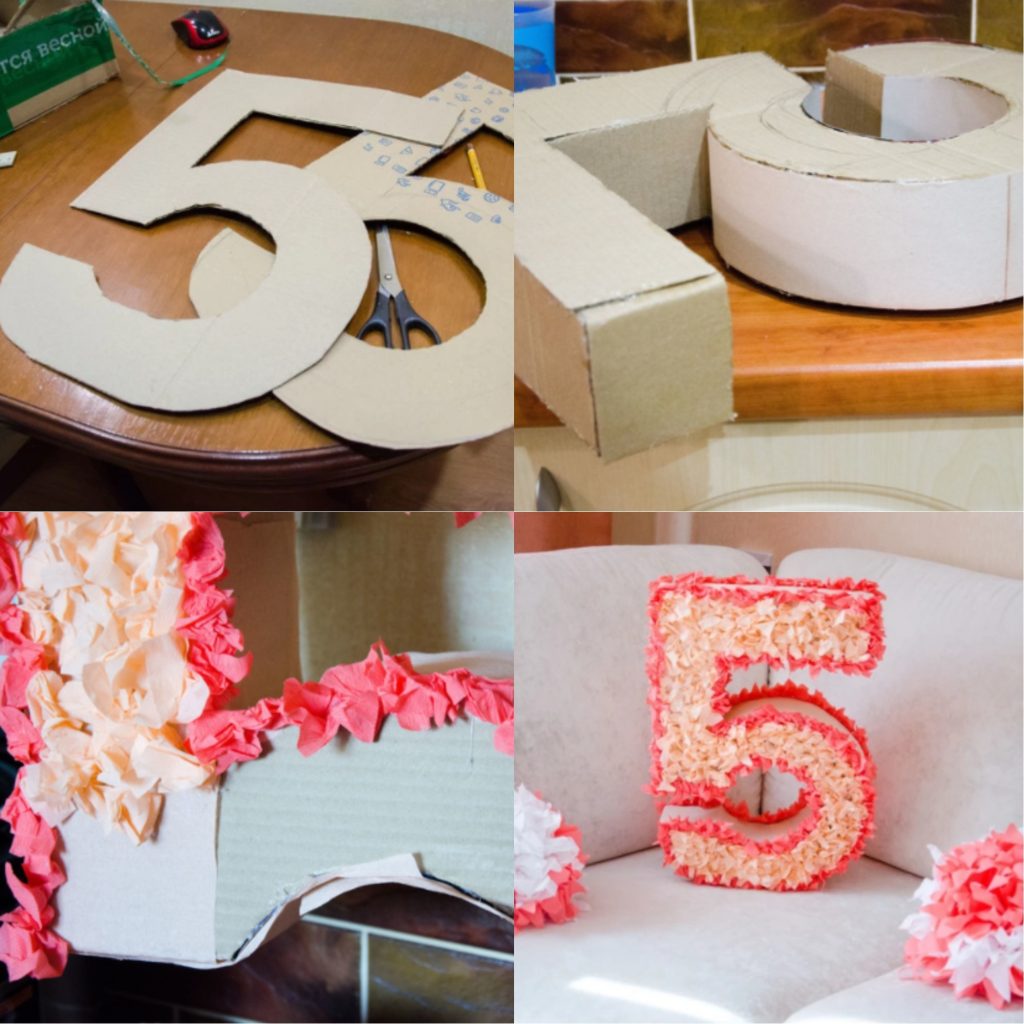
To make it smooth and voluminous, you need to carefully cut out the number from thick cardboard, making room for gluing the two sides to each other. To do this, use a pencil and a ruler to draw a diagram.
You can download ready-made templates on the Internet and transfer them to prepared cardboard. It's much faster and more convenient.
The second figure is outlined in accordance with the first one already cut out. This way the edges will be smooth and there will be no skew. The base of the figure is flat, dimensions - 25*10 cm. To make it stable, make a double bottom.
Sidewalls - narrow rectangular stripes. In the case of complex numbers with curves, several short sides are made, which are then glued with masking tape or Moment glue.
Next, they begin to assemble the base. This is easier to do with the use of a quick-setting composition or hot melt adhesive. It holds much better and hardens in seconds. Don't use tape. Maximum - you can use masking tape, since it has a porous structure and the napkins will adhere well to it.
Step by step guide
To make a figure, you first need to acquire templates or draw sketches. Then they are transferred to cardboard and the future base is cut out. There is one for each number.
Frame making
The design technology is similar, but still has its own nuances.
- Zero. It's easy to make, despite its shape. Cut out two identical ovals and several even rectangular strips. Then install the central part, gluing it to the inside of one workpiece. Then attach the second one from above and close the side holes with rectangular inserts. After everything is dry, we start decorating with napkins.
- One.You will have to draw and cut two blanks, measure the long side part and make a rectangle of cardboard to size. Glue it. We proceed in the same way with the short part, decorating the sides. Next comes the base and completing the process with small square patches.
- Two. With this figure everything is more complicated, since it has bends. We also cut out the blanks and connect them using rectangles. They need to be folded into the correct shape to achieve smooth transitions. We connect the inner edges with the outer ones, and it’s easier to make the “tail” even. If necessary, trim with a stationery knife.
- Three. One of the most complex figures. The templates are first connected to each other by gluing them to each other on small pieces of cardboard. Then they cut out long rectangular strips and cover the sides with them, gluing them with masking tape. The ends are covered with short patches.
- Four. It is done by analogy with the number one. Accuracy of measurements is important here in order to cut out rectangles. The master encounters difficulty when designing the internal triangle. Pieces of cardboard are glued with masking tape and fitted tightly to each other.
- Five. Closing the ends begins from the top, measuring the distance and preparing the corresponding rectangles. Then the short straight part at the base of the figure is shaped in the same way. Long thin strips are used to process the ends of the semicircular part.
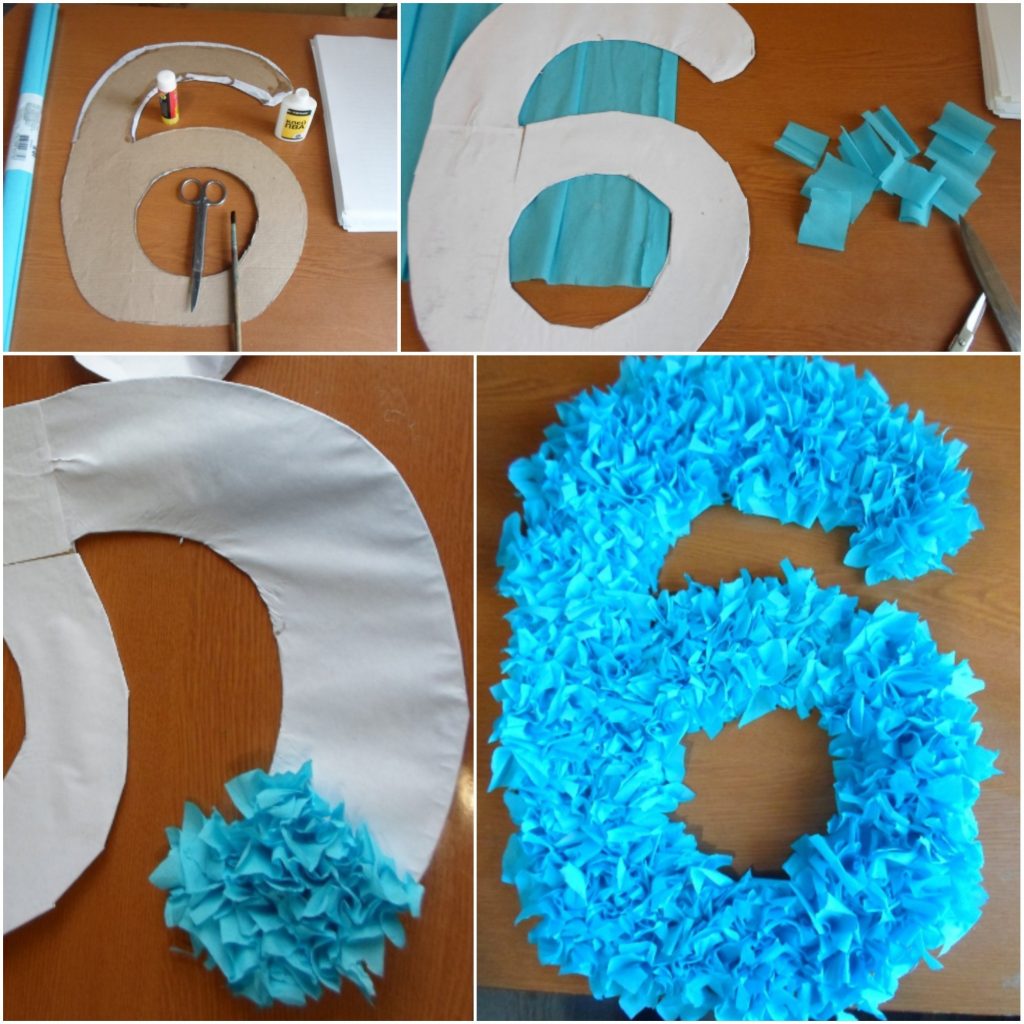
- Six and nine. The template is transferred to cardboard and blanks are cut out. Then the inner and outer circles are decorated using long rectangular stripes. It is better to fasten the edges with hot glue and additional masking tape. This way the seams will be secure. To make the number nine, proceed in the same way, but by turning the template 180 degrees.
- Seven.This is a simple number, the creation process of which only requires precise measurements. Cut several long strips of cardboard, as well as a couple of pieces to cover the ends. Carefully glue all this onto the sides of the figure with glue and tape.
- Eight. The blanks are fastened together and the ends are covered with long rectangles. On the outside, one or more strips of cardboard are used. We glue the inside with small pieces or a clearly defined piece, which is secured with tape.
The process of creating a figure is very creative and interesting. You can involve children in making crafts.
Decoration with napkins
We recommend buying the cheapest paper products. They crumple perfectly, come in different colors and look good in number decor. If orders arrive regularly, it is easier and cheaper to purchase materials in bulk and in different shades.
A figure decorated with multi-colored napkins looks brighter and more attractive.
There are three techniques that are used to create decorations for numbers:
- Chrysanthemum. Each napkin is cut into four identical squares. Stack them on top of each other and fasten them with a stapler or stitch them with thread. The edges of the workpiece are rounded and begin to bend in the central part towards the top, obtaining a three-dimensional flower.
- Carnation. Taking a napkin folded in four, secure the center with a stapler. Next, cut the petals using sharp scissors to form a flower.
- Rose. The napkin is folded four times diagonally. Then a bud is rolled from the strip, securing one side with thread. The second is straightened, resulting in a beautiful flower.
Flowers prepared in advance are attached to a cardboard blank using hot-melt adhesive. This way they will last the entire holiday and even longer.