How to make a budget renovation in a Khrushchev-era kitchen of 6 sq.m.
My husband and I live in a small Khrushchev apartment building. Of course, the option is so-so, but after we lived in rented apartments for several years, getting this housing was happiness for us. The family didn’t have much money after buying a secondary home. And if we decided to wait with the rooms, then I wanted to cook in comfort. Therefore, it was decided to first renovate the kitchen.
Along with the apartment we received kitchen furniture and a stove. A microwave, washing machine and small household appliances were acquired through backbreaking labor while wandering around rented apartments.
The content of the article
What happened
After examining the field of activity, we decided to draw up a plan for repairing and arranging furniture. The former owners, we must give them their due, tried to make the kitchen “candy”, that is, the kitchen set was made to order and was optimally located - in the corner opposite the window.
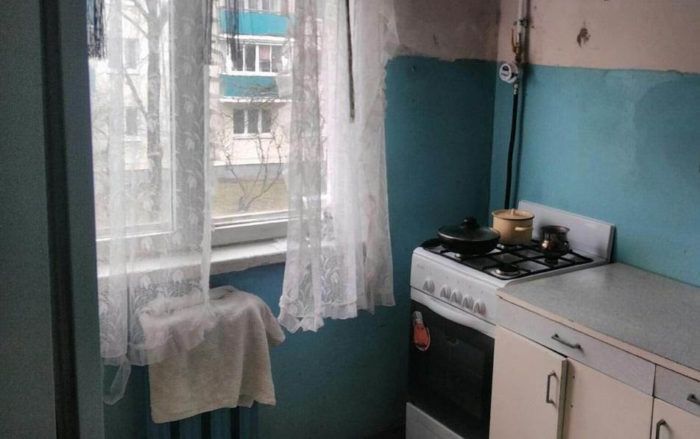
The gas stove and sink were located in the places provided for them by the designers, i.e. plumbing in the corner, and at a distance from it there is a stove. It was possible, of course, to replace the stove with a hob or even buy an electric or induction one and install it in any other place. But we decided not to do this. Firstly, upon inspection it turned out that the stove was in good condition (I was especially interested in the oven), and secondly, we did not have extra money to buy household appliances.
Between the stove and the sink there was a cabinet with a convenient countertop.A refrigerator and cabinets were installed on the perpendicular wall adjacent to the bathroom (if you’ve ever visited a Khrushchev building, you know exactly how everything is located there) and is located opposite the window. There were also cabinets on top and a hood above the stove.
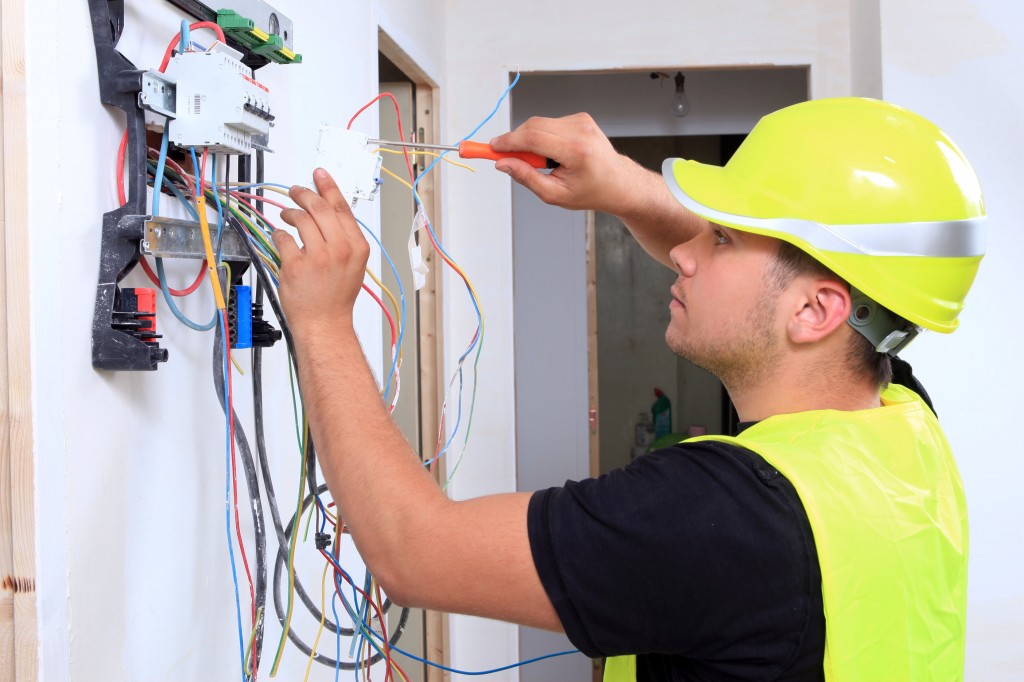
There was only one socket, though it was double. And it was on the wall adjacent to the window. And this state of affairs did not suit me at all. The previous owners used an extension cord, but I wanted a “modern” and functional kitchen, and not get tangled up in wires. It was decided to call an electrician and redo the wiring.
The walls in the kitchen were covered with wallpaper, and a ceramic tile apron was laid over the stove and sink. The floor is linoleum, the ceiling is bleached. Light was provided by three sources - a built-in lamp in the hood, a chandelier whose length can be changed (well, you've probably seen these), and a sconce on the wall. The picture was completed by a regular rectangular table in the corner and two stools.
What happened
After examining the field of activity and assessing our capabilities, we decided:
- Leave the stove with hood and sink in their places and do not change them. The items are in decent condition, why waste money when there is not too much of it anyway.
- Call an electrician to move the socket to the wall adjacent to the bathroom. It was there that it was decided to put a microwave, kettle and refrigerator.
- Leave the sconce (it looked too cute), and instead of a chandelier, install built-in lamps in the suspended ceiling.
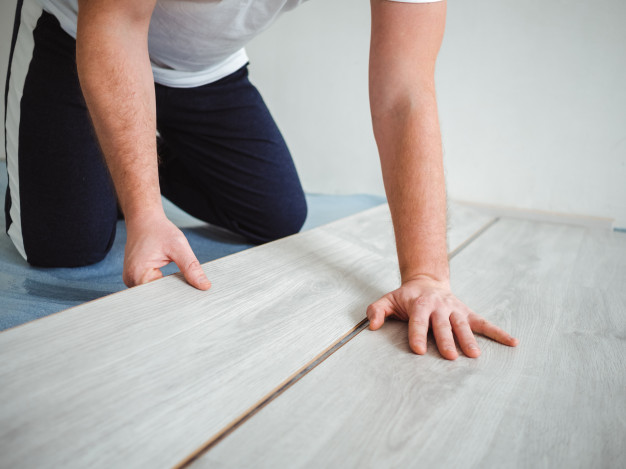
- It was decided to remove the linoleum from the floor and lay laminate. Firstly, it is more beautiful, and secondly, it is more practical.
- Do not change the kitchen set and the location of the cabinets, but update the facades. For this we needed self-adhesive film in two colors.
- They also decided not to change the tile backsplash.In principle, I like the tile, but its color was not suitable for our concept. Therefore, it was decided to simply paint it.
When everything was decided, we drew up an estimate:
- electrician services – 6000 RUR;
- 4 tubes of wallpaper – 1200 RUR;
- self-adhesive film width 50 cm x 5 m – 900 RUR;
- self-adhesive film width 25 cm x 5 m – 500 RUR;
- acrylic varnish for interior work 2 l – 300 RUR;
- acrylic paint 1 l – 150 RUR;
- primer 2 l – 200 rub.
- consumables and tools – 2000 rubles;
- lamps and light bulbs 5 pcs – 1000 rubles;
- suspended ceiling 6 sq.m. – 9000 rub;
- laminate 6 sq.m. – 3600 rub.
The total cost was about 25,000 rubles. We still had 5000 in reserve in case of unforeseen expenses.

Repair progress
To begin with, we cleared the kitchen of everything unnecessary, including furniture. They only left the sink and gas stove, which were not particularly intrusive. They removed the wallpaper from the walls and called in an electrician. He moved us an outlet (we had to cut a hole in the wall) and brought leads to the ceiling for 6 built-in lamps. By the way, I didn’t charge 6,000 for this, as we had planned and found out from their company, but 7,500. So the “spare” 5,000 came in handy for us.
Then they invited craftsmen to install the stretch ceiling. And then we were pleased. We placed an order during their seasonal promotion, and they gave us a 10% discount. In addition, we estimated prices approximately. In general, 1500 returned to the box, since the ceiling also cost us only 7500 rubles.
And then they began to act on their own. The first thing we did was paint the tiles. To do this, it was degreased with an alcohol solution, primed in 2 layers and covered with acrylic paint in 3 layers. I chose white as the most neutral color.Each layer of paint was allowed to dry (and it dries within an hour) and covered with acrylic varnish for interior work, also in 2 layers.
The walls were cleaned of wallpaper residues using water and a spatula. They simply wet the wall with a spray bottle and then scraped it off with a small spatula. Well, I’ll tell you, we suffered. The former owners apparently did not bother to remove the old covering, and therefore there were several layers on the walls. And everything would have been fine, only the first layers were glued on with paste. If anyone doesn’t know, use a solution of flour and water.
The floor covering was dismantled, i.e. linoleum. We decided to start with laminate. The floor was a flat surface, so there was no need to do any special preparatory work. But the stove had to be removed for a while. We chose a castle laminate in a light gray color (like silver, it looks great). My husband put him to bed in one day.
An unpleasant surprise was that the wall behind the stove was not finished at all. Then I had to wash it and prime it. We decided to just paint it with acrylic. Paint and varnish were applied in 2 layers. Then we simply covered the walls with selected wallpaper - white with silver streaks.
The two of us “fought” with the furniture. We removed all the doors, I washed and degreased them. We cut the film to size and carefully glued it to the furniture. I'll tell you three secrets:
- If a bubble forms on the film, do not tear it off. You will only stretch the coating. Glue further, and then pierce the bubble with a thin needle to release the air.
- You will never cut the corners of the film perfectly, but to prevent them from puffing up, carefully burn them with a lighter.
- To ensure that the film takes the shape of the surface and fits perfectly to it, “steam” it with an iron with high-temperature steam.
We also changed the furniture fittings.We had to dig into our “stash” and spent the remaining money on a kitchen sofa and folding table from Ikea.
In general, our renovation cost 30,000 rubles, but now our kitchenette sparkles with newness. It is bright, spacious, you want to stay here as long as possible. And there is still room, hallway and bathroom renovation ahead!


It could have been done cheaper. You should at least take a photo, otherwise the text is incomprehensible.