Do-it-yourself boiler
With rising fuel prices, people are increasingly becoming interested in alternative cheap energy sources. One of these resources is waste oils and other petroleum products, which are recycled in large quantities by modern society. Instead of spending money on recycling, bright minds came up with a way to use them as fuel. The design of heating boilers during mining is based on this idea.
The content of the article
Boiler design during development
 There are several main types of waste oil boilers; they differ in the method of fuel combustion, the number of thermal circuits and the degree of automation of the device. Regardless of this, the design of all devices, both industrially produced and made by hand, is identical and is based on the same physical principles.
How the device works
 Let's look at the basic principle of operation using the example of a boiler of the most common type - with a drop supply of oil into the combustion bowl and forced air injection. The design of these boilers is very reliable, has proven its effectiveness in practice, and, most importantly, it is easy to repeat with your own hands.
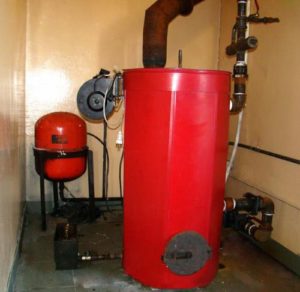
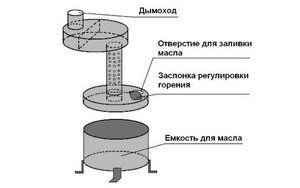
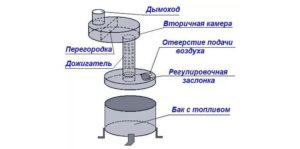
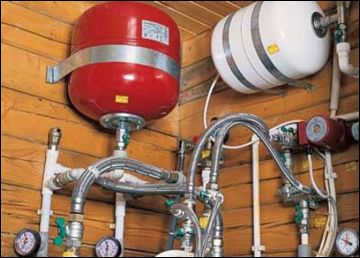
The main element of the device is a combustion bowl, into which used oil is fed drop by drop by gravity and an air flow is forced. The oil, falling on a hot bowl, instantly evaporates, the resulting vapors, together with the flow of forced air, are fed into the combustion chamber, where they are burned at a high temperature, releasing a large amount of heat. The released heat heats the coolant in the boiler, which provides space heating. The resulting combustion products are discharged through the chimney.
The main thing to note is that for normal operation of the boiler, a large amount of fresh air and high temperature in the combustion chamber are necessary, ensuring complete combustion of used oil without the release of harmful substances.
ADVICE! You should not take air into the combustion chamber from the room. The most rational way to do it is from the street, providing preheating of the supplied air.
Boiler creation diagram
 Before you start creating a boiler for testing with your own hands, you need to clearly determine which type of boiler is most suitable for you. This primarily depends on the tasks that you plan to assign to the heating device you are creating. So, to heat a small garage, a direct heating boiler, without a water heat exchanger and a complex performance control system, is quite sufficient.
If you plan to use a waste oil boiler as a heat source to heat several rooms or a greenhouse, then the boiler will already have a water heat exchanger. The most advanced design will be able to simultaneously solve the problems of heating and hot water production.In this article we will look at the production of the most common heating equipment with one coolant liquid circuit.
Preparation of tools and materials
 The boiler manufacturing process begins with the preparation of the necessary materials and tools.
For production you will need the following tools:
- Welding machine;
- Angle grinder;
- Drill;
- Set of hand tools (hammer, pliers, files, etc.)
From materials and equipment:
- Forced air fan (usually used in automobile snails);
- Pipe with a diameter of 110-120 mm;
- Pipes with a diameter of 32 mm (wall thickness from 3.5 mm);
- Stainless steel pipe with a diameter of 8-10 mm;
- Connections for connecting the water circuit;
- Old oxygen cylinder 10 liters;
- Old 50 liter propane tank;
- Sheet metal 3 and 4 mm;
- Asbestos cord.
IMPORTANT! Making a boiler with your own hands involves a large amount of welding work. Welding seams must be of high quality and ensure the tightness of the device. If you are not confident in your abilities, invite an experienced welder to help.
Assembling the device yourself
 We assemble the device in accordance with the diagram given in the first part of the article.
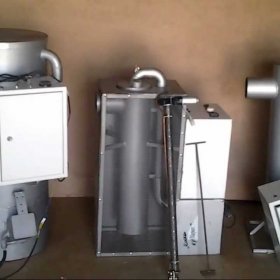
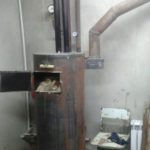
First of all, we make the body of the device, for which we need the cylindrical part of a propane cylinder. Using an angle grinder, separate the bottom and top spherical part from the cylinder (the cut off parts, we will need them later).
IMPORTANT! When working with gas cylinders, do not forget about safety. Before you start doing anything with them, keep them filled with water for 24 hours.
We begin to manufacture the combustion chamber and heat exchanger.We use the body of an oxygen cylinder as a combustion chamber; for flame pipes we use a pipe with a diameter of 32 mm. Cut the component parts into approximately 70 cm pieces and weld the heat exchanger using a 4 mm thick sheet of metal as a base. As a result, you should have a design like the one in the figure below.
Insert the finished heat exchanger into the boiler body and connect the component parts by welding, then weld the fittings on the side for connection to the water circuit and a 110 mm pipe as a chimney. Weld the lower part to the body, having previously made an inspection hatch with a cover in it.
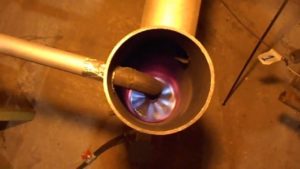
The time has come to make an afterburner - it is a pipe with a diameter of 32 mm with drilled holes with a diameter of 3-5 mm through which air is pumped into the combustion chamber using a fan; inside it there is a tube with a diameter of 8-10 mm for supplying oil. The upper part of the propane cylinder is attached to the afterburner.
All that remains is to assemble all the parts together, seal the joints with asbestos cord and attach the fan. The result should be a design like the one in the figure.
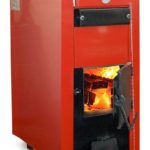
After which you can fill the system with water, make sure it is tight and perform a test run.
Subject to safety requirements and proper operation, a self-made boiler will serve you for many years.

Where can I get work off?