DIY electric drill repair: how to disassemble the tool?
It is quite possible to repair a drill yourself if you accurately determine the cause. The device often wears out bearings, rotor brushes and other mechanical elements. There may also be problems with the electric motor. This material describes how to perform diagnostics at home and solve the main problems.
The content of the article
Main causes of malfunctions
In order to properly repair an electric drill, it is necessary to establish the causes of the breakdown. And for this you should familiarize yourself with its device. The device is powered by an electric motor, which transmits torque to the gearbox, and then to the chuck, which firmly holds the drill. Therefore, the main risks are associated with failure of the motor itself, the electrical system, as well as abrasion of mechanical elements.
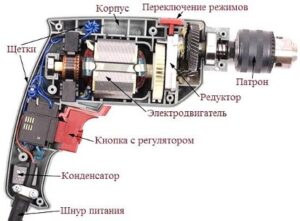
Accordingly, the main causes of malfunctions are:
- inoperative electric motor due to a malfunction of the stator or armature;
- problems with brushes (wear);
- bearing failure;
- breakdown of the button that regulates the speed;
- oxidation of contacts at the start button;
- breakdown of the chuck that clamps the drill due to wear of the jaws.
To carry out repairs, you must unplug the tool and, if necessary, learn how to disassemble the drill.Next, diagnostics are carried out to accurately determine the cause, after which they begin to eliminate the malfunction.
What is needed for diagnosis and how to carry it out
To repair a drill with your own hands, you will need the following materials and tools:
- multimeter (you can also use a voltmeter);
- apparatus for measuring short circuit in armature;
- Screwdriver Set;
- emery for cleaning contacts.
You will also need spare parts. Most often, brushes, buttons, and bearings wear out. Surely the drill will need to be disassembled - then it is better to immediately replace the lubricant in the gearbox. This will reduce the load on the engine. When replacing components, it is important to use original parts. For example, if you put a regular toggle switch instead of a start button, this can lead to damage.
To carry out a correct diagnosis, proceed as follows:
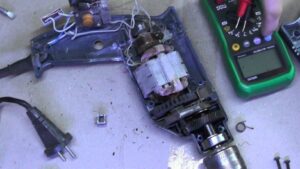
- If the drill does not turn on, the reasons may be related to the power cord. You need to disassemble the case, find the cable contacts and check them with a multimeter.
- Next, connect to another terminal of the cord and the plug connector. Bend the cable several times along its entire length. If the contact disappears or is absent altogether, then there is a break inside the insulation. If the damage is near the edge, the cable can be cut and reconnected. But if it is in the middle, it is easier to install a new cord.
- If the cord is working properly, you need to check the switch. To do this, connect a multimeter to the terminals and carry out a test. If the contacts are oxidized, you need to disassemble the housing and clean them with emery.
- It also happens that there is an additional contact between the motor and the switch - if present, it also needs to be diagnosed.
- Check the wires, moving towards the brushes in the direction from the off button. If they work normally, it is recommended to diagnose the unit. You need to make sure that the brushes are pressed tightly against the armature and that the carbon elements are not worn out. If necessary, replace spare parts.
- If the stator or armature windings are broken, they are replaced with new ones. In this case, you need to make several resistance measurements. If they differ by more than 5%, the faulty windings are rewound.
Electrical system repair
Often you need to repair an electric drill yourself, using available tools. Very often the causes of breakdowns are associated with the electric motor. It is quite easy to verify this. If the chuck turns easily, but the engine does not start, then there is definitely a problem with the electrical system. They are also indicated by malfunctions on the rotation reverse side or speed control (number of revolutions).
During repairs, proceed as follows:
- If the drill does not work, the reasons may be related to the cord. It is disconnected from the network and examined using a multimeter. You can also use a battery and a light bulb assembled in one circuit. They determine the location of the break and make repairs or complete replacement.
- If the problem is with the start button, it is easier to replace it. In this case, only the original part should be used.
- It is recommended to inspect the rotor brushes. If they have decreased due to abrasion of the lower part by 40% or more, you need to install new ones.
- If the device does not start, but the cord is working, you need to check the capacitor for the drill. It is examined with a multimeter and, if necessary, a new one is installed.
- Next, check the rotor; if there is scale or charring, clean the contacts with emery.Check the winding and rewind if necessary.
- If overheating, be sure to inspect the stator. Very often the varnish melts and an interturn short circuit occurs. The element is checked with a multimeter, rewinded, and if necessary, new varnish is applied.
Troubleshooting mechanical problems
Other ways to fix a drill involve repairing mechanical defects. If the cartridge does not turn, but the engine is running, then there is a violation in the shaft speed. They are connected to bearings or gearboxes. There is no need to repair them - it’s easier to replace them with new ones.
Often problems are related to the cartridge. It consists of several elements, each of which can fail.
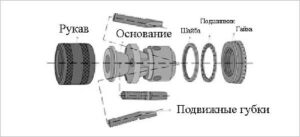
For disassembly, you can use a hammer or hammer drill. The last method is more convenient - you need to do this:
- Spread the cams so that they are completely in the body.
- A metal insert of the appropriate diameter is attached to the hammer drill (it should easily fit into the hole in the drill chuck).
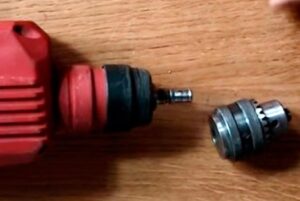
- Place the cartridge against a reliable support, placing a lining for shock absorption.
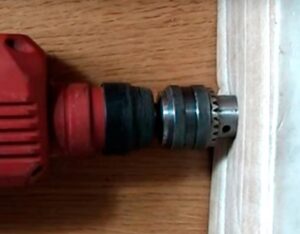
- The hammer drill is started, after which the sleeve quickly leaves the cartridge.
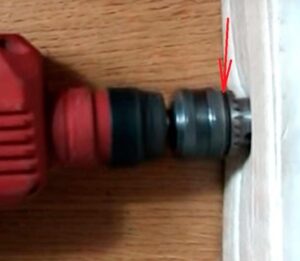
- Then the cams are removed and the mechanism is inspected. If necessary, install new parts. In this sense, repairing a Soviet-made electric drill and modern models is no different.
Thus, the reasons why a drill does not work may be related to the electrical system or various mechanisms. Before repairs, they must be accurately identified, and then parts must be replaced or the malfunction eliminated. If you are not sure, it is better to use after-sales service.

