How to sharpen a hacksaw yourself
Today, most tools do not require much physical strength. Everything we have is electric - a drill, a plane, a saw, a grinder... But sometimes we can’t do without hand artillery. Or there is no light, the wire does not reach - but who knows? That’s when we remember that the hacksaw needed to be sharpened. Many people don't even know how to do it. We’ll talk about this fascinating process.

The content of the article
To sharpen or not to sharpen?
Let's immediately decide on our options. If you don’t want to tinker, you can have the tool sharpened and give some money to a specialist. It's possible the best of the options.
Second - You can buy a new hacksaw. The problem will be solved, but not for long - the instrument requires maintenance in any case. By the way, not all hacksaws can be sharpened - with a hardened tooth, they can be said to be disposable. Visually, hardened steel is dark with a bluish tint. And no amount of grinders, miracle files or drills with diamond attachments will help sharpen it. Go to the store right away without wasting time and energy.
AND third option - Try sharpening a hacksaw yourself. Now let’s determine what the signs are that it’s time to sharpen it.
When to start sharpening?
As the hacksaw becomes dull, the following appear: signs of wear:
- change in sound during operation;
- uneven cut with torn edges;
- increasing cutting time;
- blade getting stuck in wood;
- problems with maintaining the cutting direction;
- unevenness and difficulty of the sawing process;
- change in color of hacksaw teeth.
Not all of the listed “symptoms” will necessarily appear, but you shouldn’t wait for them to appear.
Sharpening procedure and necessary tools
Before proceeding directly to the process, you should set the saw teeth. This is also a whole science, and we will dwell on it separately. Tools you will need:
- vice or clamp;
- a metal die with slots in it for uniform distribution;
- needle files and files of various shapes and sizes;
- a grinder with a cutting disc, but only for those who know how to use it.
I would like to draw your attention separately: sharpening the teeth of a hacksaw using a grinder is not as easy as it seems. If your health is important to you, leave this idea.
Wiring process
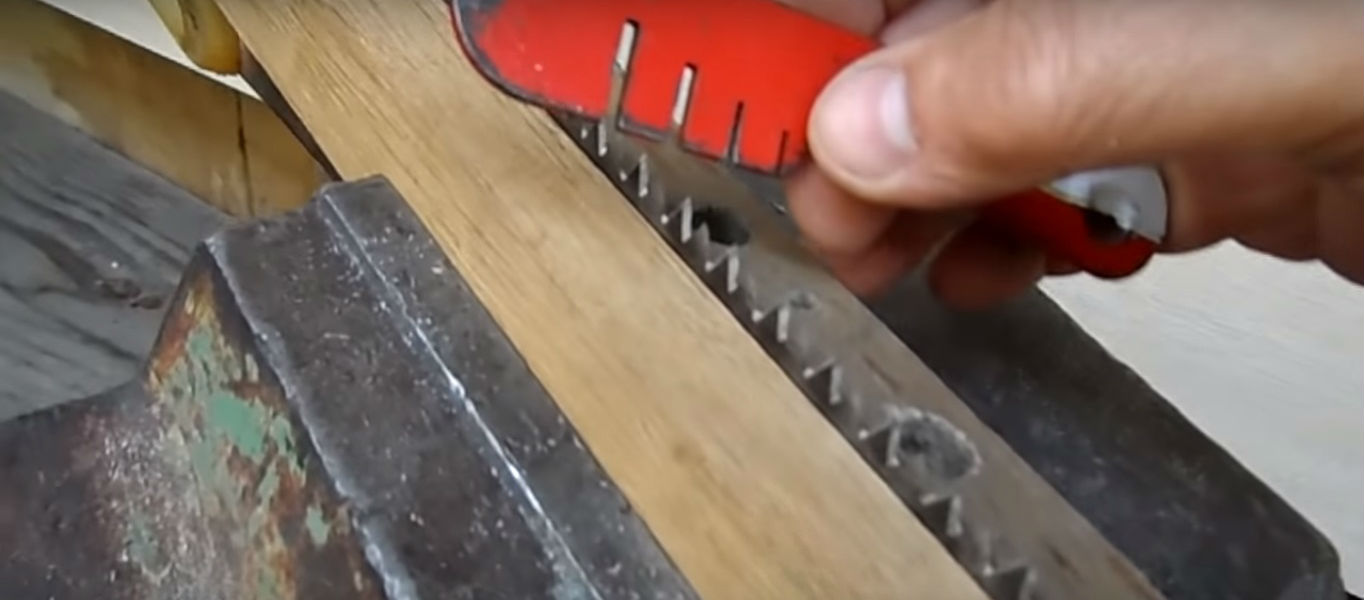
Why is it needed at all? wiring? So that the hacksaw blade does not get stuck in the wood during work. Its width is selected individually, but no more than the canvas itself. Otherwise, the cut will be too wide, which is not always necessary. And the work will be, to put it mildly, a little difficult.
Main condition — along the entire length of the blade, the teeth should be set at the same angle, in a checkerboard pattern. The angle is determined depending on what is primarily intended to be sawed - wet or dry wood. For wet wood, the angle of deflection of the teeth is greater than for dry wood.
Before you start laying, the blade is securely secured in a vice. Then, using a metal die with slots, the teeth are bent in different directions (checkerboard), starting from the middle of the canvas. As a result, all teeth must be at the same height, otherwise the sawing process will be uneven.
You can check the uniformity of the height of the incisors in this way: attach and press them to a sheet of paper lying on a plane. Everything will immediately become clear from the print. The incisors that protrude above the general level are ground down using a flat file.
Important! If someone advises you to spread the teeth with pliers, don't do it. With their help you cannot make the distribution evenly even if you want to.
Sharpening
Depending on the purpose of the saw, a file is selected. So, for transverse hacksaws, a small trihedron is used, and the sharpening angle is made at about 60 degrees. For longitudinal ones, with an angle less than 60 degrees, use a diamond with a fine abrasive, and for universal ones, either a coarse needle file or the same diamond.
When clamping the blade in a vise, it is important not to overdo it, otherwise it will vibrate under the file.
The process itself is carried out in two stages — first sharpen the left sides on all teeth. After this, the hacksaw is turned around, clamped in a vice again, and the file is passed along the right side of the cutters. Effort is applied only when moving away from oneself. There is no need to press hard; try to achieve uniform removal of metal with each movement.
Burrs are carefully removed with fine sandpaper. When sharpening, it is important to maintain the correct shape of the teeth.
Checking the results

Some people recommend looking to see if there are glares on the sharpened surface. Someone else should check by touch. I'll say this - start sawing anything, and you will immediately understand everything by the width and evenness of the cut, the presence of chips, the difficulty of the process itself, and the final result. If everything suits you, it’s sharpened well.
If you still decide to sharpen the saw yourself, first take one that you don’t mind too much. Perhaps as a result of the first experiment she will cut even worse than before.But it doesn’t matter—people learn from mistakes, right?


Well, yes, this is a whole science - they are unlikely to teach it at the institute. Grandfather taught me to pinch it under the armpit and with my thumb to the hand, and to spread it with an axe. It seems to be working out. The teeth are ruined - one is higher than the other - the main thing is that it sharpens and cuts exactly as you direct it.
Everything will come in time. And it’s not that painful - half an hour to do everything about everything.