Replacing the lamp on a projector: diagnostics and replacement steps
Replacement of the lamp on the projector is required after exhaustion of the operating time, for example, 3000 hours. You will also need it if there are scratches, chips and other defects on the surface. How to diagnose and perform the replacement itself is described in detail in this article.
The content of the article
Lamp diagnostics
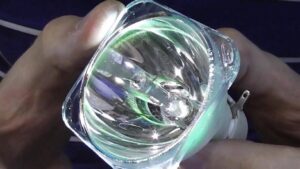
First of all, you need to understand how to check the projector lamp. First you should examine it carefully. On the surface you can see:
- scratches;
- dust particles;
- chips and unevenness.
If there are no defects, just wipe the surface from dust, wipe it dry, and then see how the device works. Moreover, you can touch the lamp itself only with gloves. Even slight contact with fingers leads to contamination of the glass.
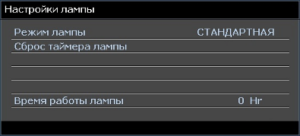
If this does not help, you will probably need to change the lamp in the projector. You can first make sure that there is a time counter. This is a special sensor that many manufacturers install. If, for example, the illuminator resource is 3000 hours, then when this time is reached the projector will stop working.
In this case, proceed as follows:
- Turn on the device.
- Go to the menu.
- Go to system settings.
- Select a subsection with lamp settings.
- Click on reset timer.
Replacing the lamp
After checking, you should figure out how to change the lamp in the projector. To do this, it is important to write down the serial number and purchase the exact same spare part. Then proceed like this:
- Turn off the device and allow the surface to cool completely.
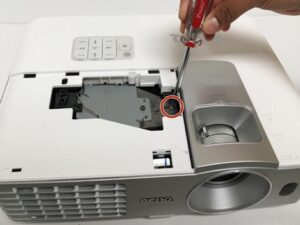
- Using a screwdriver, remove the cover of the compartment in which the lamp is placed.
- Unscrew the bolts holding the module with the illuminator.
- Holding the projector with one hand, carefully pull out this module with the other using the handrail.
- Use a clean rag to wipe the front glass of the new lamp.
- Insert the lamp module into the device and tighten the fasteners with bolts.
- Put the compartment cover back.
- Reset the illuminator operating time counter to zero, as shown above.
- Turn on the projector and check the image quality.
Some models are equipped with a bare bulb. In this case, the instructions on how to replace the lamp in the projector will be as follows:
- Unscrew the screws and remove the old illuminator from the module.
- The surface of the module is cleaned of dust and other dirt particles.
- Dismantle the connectors and wire clamp.
- Install a new lamp and connect the connectors.
- Connect the device’s own cable to the new cable of the installed lamp. For this, a metal sleeve is used.
- Wipe the surface thoroughly.
- Connect the equipment and check the quality of work.
Replacing the lamp is quite simple - all you need is a screwdriver and a clean rag. It is better to work with gloves, and not only turn off the device, but also remove the plug from the socket. If even after installing a new illuminator the image does not improve in quality, you should contact a specialist for professional diagnostics.