How to insert a cartridge into a printer
Reinstalling the cartridge after refilling or purchasing a new one is a procedure that many users are forced to do on their own. This is not a difficult action at all; even a beginner can do it. But inexperienced users have a number of questions about this. Let's look at how to correctly change the cartridge in an inkjet or laser printing device.
The content of the article
Step-by-step instructions on how to insert a cartridge into the device
There are two situations: change or refill the print cassettes. One way or another, you will need to remove them from the printer and then put them in place. Let's consider this for several types of printing equipment.
What is needed to refill the cartridge
In order to refill an empty cartridge, you need to prepare:
- cotton swabs;
- latex gloves;
- cloth napkin;
- refill kit: syringe, ink.
We proceed in the following steps.
- Open the hinged cover and carefully remove the empty cartridge according to the printer instructions.
- Find the filling hole and insert the syringe needle into it, which will respond with a light touch to the sponge located inside.
- Slowly fill the cartridge with ink at intervals that allow the sponge to become saturated.
- When the paint appears in the drainage hole, the syringe can be removed.
The holes are wiped with a cloth. The cartridge is placed on a flat surface (table) to settle for about 5 minutes.
How to install a filled container
You need to carefully take the full tank and place it where it was previously located. Install until it clicks. The next step is to enable the “cleaning cycle” to obtain good print quality. The equipment can then be considered ready for use. This way you can refill the cartridge yourself, saving time and money on a trip to the workshop.
Reinstallation specifics for different types of devices
Now many people have a printer, having turned into a household device. Moreover, printing equipment is capable of working on a wide variety of surfaces. The most common designs are inkjet printers. The reasons are the relatively low cost and the ability to print on various types of paper. Let's look at how cartridges are installed in laser and inkjet printing devices from various manufacturers.
Laser printer.
The reinstallation technology in a laser printer is as follows.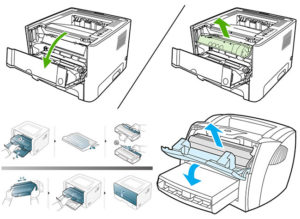
- For free access to internal parts, the equipment must be online. Some models require you to press and hold the Reset button. Then you need to pull the cover towards you. In others it should simply be opened. In this case, the cartridge moves to the middle.
- The holding mechanism must be released to remove the reservoir. To do this, the persistent latch is pressed inward. And in some models they press “Reset”.
- Once the system is unlocked, you can remove the cartridge by pulling it toward you and up. It is shaken, changing to a new one, so that the ink is distributed.After all, they often get stale, which can deteriorate the print quality.
- Unpack the cartridge and remove the protective sticker. The print head located at the bottom should not be touched with your hands.
- We do the installation, ensuring reliable fixation in the right place. Care will prevent you from turning backwards and upside down. The cartridge should move easily along the guides. If this is not the case, reinstall again. After snapping it tightly, you can cover the insides with a lid.
- Let's try to print. Usually the computer asks for permission to check - we agree (ok).
Important! When replacing multiple cartridges, care is required to return them to the correct slots in the carriage.
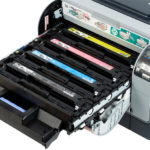
Inkjet and laser printers recharge in the same way in principle. The only difference is in the shape of the tanks and the filler: ink, powder.
HP, Canon, Samsung.
How to insert an ink tank into an HP printer? The products of this brand are varied, and therefore there may be discrepancies in the instructions. You can refer to an example - the DeskJet series, on the basis of which you can repeat the steps.
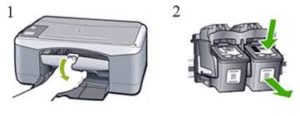
First of all, install the paper (which is recommended by the manual). To do this you need:
- open the cover, trays: for paper and receiving;
- move the top fastening responsible for the width of the sheets;
- load some A4 paper into the tray;
- We fix the width guide pack without force.
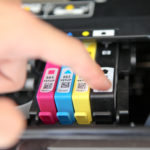
Cartridge installation. It must match the hardware, otherwise the printer will not detect it. We perform the following actions:
- open the side panel (cover) where the holder is located;
- press the old inkwell, remove it, unpack the new one;
- remove the protective film from the contacts and nozzle;
- install the cartridge in place, hearing a click;
- reinstall the remaining ink tanks in the same way, if necessary;
- close the side cover.
The final stage is calibration and printing. The cartridges must be recognized by the equipment. To do this, we align the heads using the program:
- connect the printing unit to the computer, turn it on (control panel - Start menu - Devices and Printers - HP Print Settings);
- if the equipment is not displayed, you should add it to the list;
- find the “Services” tab;
- select the “Cartridge Alignment” tool, start the process, following the instructions.
All that remains is to reconnect the printer so that it prints.
Let's move on to the brand Canon and consider installing ink tanks in this device. The principle is the same in almost all models; the containers are in FINE format. Having purchased a new refilled tank, we perform the following steps.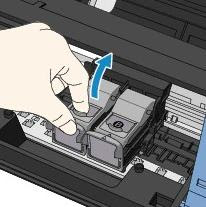
- Removing the container. Turn on the power and start the printer. Then open the cover and paper tray, after which the cartridges will move for replacement. Press the holder down until it clicks. We take out the container.
- Immediately install the new ink tank, unpacking it without shaking it. Place it all the way into the back wall. Raise the locking lever until it clicks.
- Close the tray lid. This will move the cartridge, after which you can print.
- If you need one color, we indicate this through the program. The path is as follows: Control Panel - “Start” - Devices and Printers - Canon - RMB - Printing Settings - “Maintenance” (tab) - “Cartridge Settings”. Next, select the ink tank and click “OK”.
Now we reboot and start printing.
Let's look at how to change a Samsung toner cartridge. The program informs you about the need for this procedure. You need to purchase an inkwell that matches the model and shake it.The container should not be left in the light, but should be held by the handle without touching the working parts. We proceed to the replacement using the following steps.
- Open the lid and take out the old container.
- We unpack the new tank and remove the protective tape.
- Shake up to 6 times to distribute the toner inside.
- We hold the inkwell by the handle and slowly insert it, aligning the protrusions with the grooves of the printer. A click indicates correct placement.
- Close the lid securely.
Attention! If toner gets on your clothing, wash it off with cold water, otherwise the stains will set.
Brother
The toner cartridge in a Brother printer is separated from the image drum. To replace the container, you need to purchase an original (from the dealer) cassette that matches the model of printing equipment. The device indicates the need for replacement and the Toner indicator lights up. Open the cover, remove the photodrum unit and cartridge. The first one is pulled towards itself, after which it is lifted. By pressing the blue latch lever, remove the tank for subsequent disposal. Everything seized is placed on paper.
The insertion is carried out in stages:
- Unpack the new toner cartridge and keep it away from light. It also needs to be shaken to distribute the contents.
- Place the container into the drum without touching the gray areas. Fixation will occur with a click. If everything is correct, the locking lever will rise.
- The blue slider must be moved to clean the internal drum wire.
- Before installing the drum into the device, you must put the blue slider in place.
- Finally, close the front cover.
Now all that remains is to check the operation of the printing equipment.
Useful tips
- You can find out about the need for replacement by program messages, as well as by deteriorating text quality: light stripes, faded display, incompletely printed areas.
- When replacing ink tanks, do not touch the contacts of the containers, otherwise smudges will have a bad effect on the print.
- There are chipped and non-chip cartridges. Namely: those equipped with a chip can report the need for replacement. Those that do not have it are cheaper, but you need to calculate the supply of paint yourself based on the amount of work already done.
- When purchasing a new replacement cassette, it is convenient to use the markings on the old one, which you can write down or photograph to find an analogy.
- The resource of one black ink cartridge is enough for approximately 95 pages (according to the manufacturer - up to 130).
The procedure for replacing printer reservoirs is quite quick. But you need to know how this is done. Otherwise, it is better to turn to professionals.