How to make a printer local

It often happens that there are several computers at home or in the office, but there is only one printing device for all of them. And if you regularly need to make printouts on different PCs, then doing it in such conditions is simply inconvenient. We will tell you about an effective way to solve the problem in our article.
The content of the article
What does local printer mean?
Equipment connected to a specific computer is called local, and it receives print data directly from that PC.
Such a device can operate in two interrelated ways: being connected to one machine and serving a networked computer group.
IMPORTANT. For successful operation, it is advisable to use wired printing machines, which guarantees uninterrupted communication.
How to make a printer local: instructions
To do everything correctly, you need to follow the sequence of steps:
- configure the printing device on the main PC,
- create a local network connection,
- establish communication with the device on other machines.
IMPORTANT. You will need up-to-date drivers for the equipment (from the disk or the manufacturer’s website), taking into account the version and bitness of your OS.
We use the path Control Panel – Devices and Printers. In the new window, using RMB in the menu, select the “Add printer” link.
The system will offer 2 options, click “Add local printer”. Then leave the default port LPT1, click “Next”.
In the list of printing equipment, we indicate the model we need and use the “Install from disk” link. You will be asked for the installation disk; if it is not there, then use the overview and click on the folder with the downloaded drivers. Having specified the required file, go to “Next” and uncheck the “Print test page” checkbox, if any.
ON A NOTE. As a result of the actions taken, the equipment has been identified, but is not ready for operation.
 In the Devices and Printers window, right-click on the new device and activate Printer Properties. Go to the Ports tab, highlight the name of our model and use the “Add port” button. In the list of available standards that opens, select Local Port and then the “New Port” button. We write two characters “\”, the name of the computer, the sign “\” and the name of the printing device. Click "OK". Additionally, in the Access tab, check the “Sharing this printer” option. When finished, reboot the system.
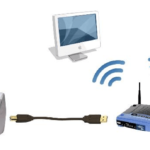
To create a unified group of machines, you will first need to connect them together physically, through wires.
Then on the main PC we use the sections Control Panel – System – Advanced system settings. In the Computer name tab, click the “Change” button. Switch to the “working group” icon and enter a suitable name for the association. Click “OK” and “Apply”. The computer group has been created.
IMPORTANT. We perform the listed manipulations with each PC.
 Go through the sections Control Panel – Network and Sharing Center, use the “Change advanced settings” option. If network discovery is turned off, launch it and select the “Turn on file and printer sharing” icon.
Go to the “Network” section and click “Install Printer”.Use the “Add a network printer” link, the OS will search and provide a list of available devices, select the one we need. Next, the equipment will be installed automatically.
ATTENTION. A group of PCs will be able to work with the device only if the main machine is turned on.
In our article, we told you how to set up printing equipment to work with one computer and with a combination of machines. We hope that the reader has found comprehensive information on these issues.