How to print a book on a printer
 Modern technologies make it possible to quickly and easily print a real book at home. All that is required is the availability of consumables (paper, good quality ink) and appropriate copying equipment. When sending a file for printing, difficulties may arise - you need to convert the text to book format. How to do this - below.
The content of the article
How to print a file in book format on a printer
There are two main methods that will help you print a book yourself. The main feature is that it requires printing text and images on both sides of the sheet. To do this, you need to perform a number of additional actions in a word processor:
- design the cover and background;
- add page numbers and format text;
- send the desired text format for printing.
The first stage of creating a book is setting up the printing device. First, you should install drivers to control the printing process. Today there are 5 ways to download and install drivers. As a result, an icon for the corresponding software should appear on the computer desktop panel.
Printing is done from different formats, mainly Adobe PDF, Microsoft Word. Most often they print from a working Word file - the processor contains all the necessary functions and settings. To print in Word, click the appropriate option in the working window - “Brochure” and “Book” versions are offered. The program itself will perform “mirror” placement of pages when their number is a multiple of 4.
How to Make a Cover in Microsoft Word
To obtain a full-fledged printed product, you need to design a beautiful, informative cover. Go to the “Insert” section on the Word toolbar. There is a “Cover Page” option in the list, you can choose any nice option.
REFERENCE! If you plan to print a business document, the “Conservative” style is recommended; in other cases, you can choose the style to your liking.
Clicking on the desired style opens 2 sheets with tables. Each of them contains 1 column - these are templates for filling with information.
On the first sheet (title) the basic data is placed:
- name of the publishing organization (publishing house, university, company);
- title of the book;
- release date (year) and other details.
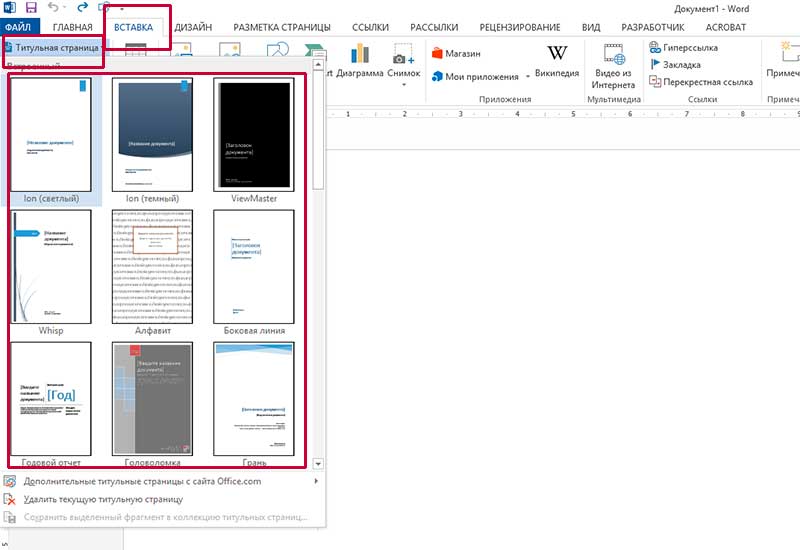
The second sheet (the back of the title) contains the information that is required for the inside - annotation and imprint. If this information is missing, then you can cut out the tooltips from these frames - right-click and cut. The text of the tooltip itself will be removed, but the table will remain and the empty space will provide space between the cover and the rest of the text. If you delete the rows, the table will also disappear, then the article will begin immediately after the title (this is not true in the case of a book).
How to set numbering and formatting
There should be no page numbers on the cover. Therefore, Word offers the “Special Footer” mode for the first page. If you need to remove the numbering on some other pages selectively, then breaking it down into sections will help.
If you place the cursor before the beginning of a chapter, you can open the “Markup / Breaks” tab and select the “Next Page” option. Double-clicking at the top or bottom of the sheet will open the header and footer management option. In this case, a constructor with buttons for moving between sections will be available. You can change the width of the fields if desired.
Links between created sections are created automatically. If you need to work with the headers and footers of the next part of the publication, then use the “Same as in the previous part” button - deactivate it. Remove the “Special footer” checkbox in “Options”. Then you need to press the following buttons:
- "Insert";
- “Page Numbering” and “Bottom”;
- select the “Simple” option with a central location.
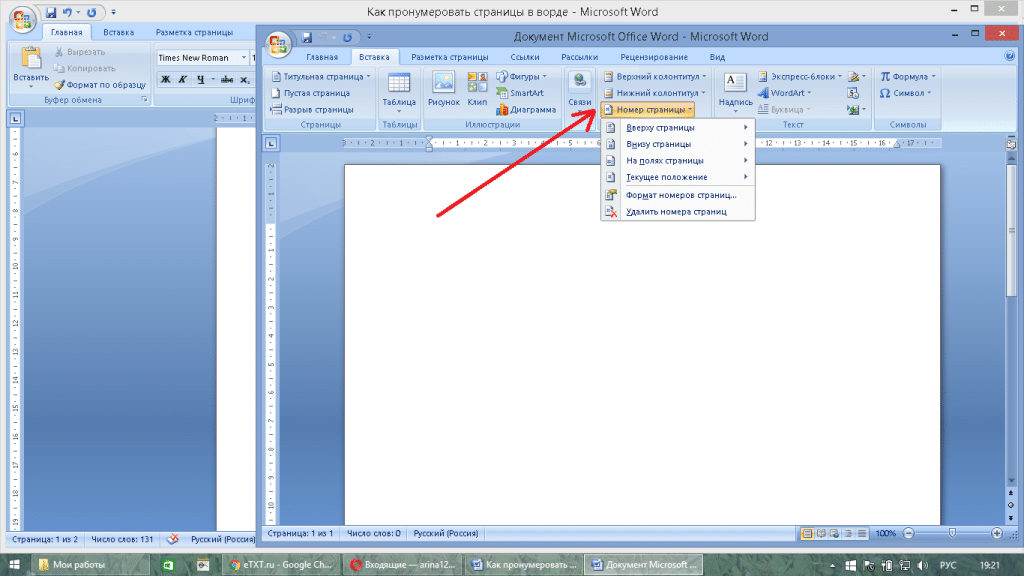
As a result, the second section will begin with numbering and only from the third page. It is important to check the status of the headers and footers in the previous part. If numbering appears on the main cover, the processor has restored connections, and we do not need this. In this case, deactivate the “Same as in the previous section” function and delete the number below.
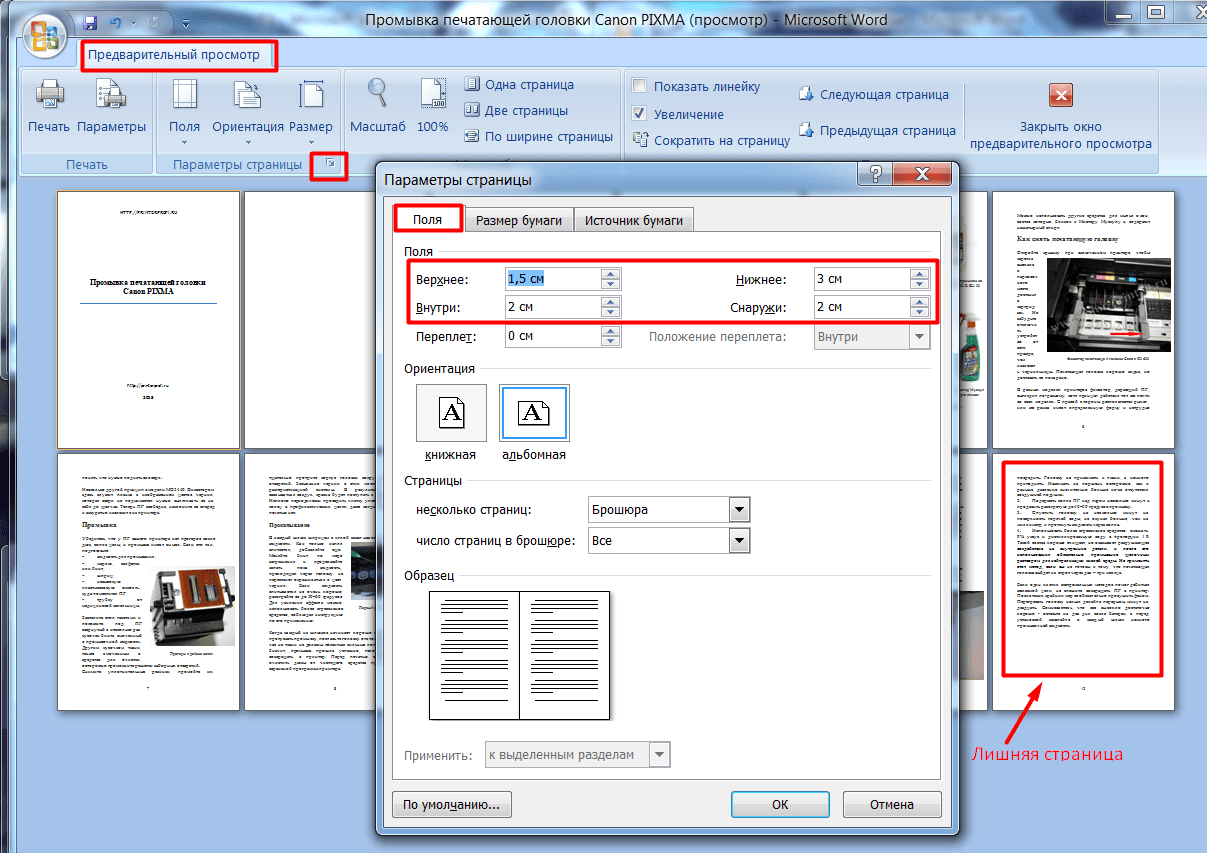
If you need to print a small document, then on one A4 sheet you can place 4 A5 pages on two sides. For example, a book has 12 pages, but the last one is the blank side of the back cover. Then formatting is done:
- set the width of the “red line” indentation;
- all text is aligned in width;
- drawings are removed from the edge and aligned in the center or placed along the line of the text;
- Extra lines and spaces are removed between subheadings;
- fields are decreasing.
Subheadings have a larger font or similar text, but are necessarily located outside the main text at some distance. In the “Paragraph” tab, you should select the “Position” option with the “Keep from the following” mark.
ATTENTION! There may be problems with the picture - if previously it occupied a small space, now it obscures the text or it flows around it unevenly - it’s so inconvenient to read. The object is activated by double-clicking the mouse - you need to click the “Label Format” option. Select text wrapping - from the bottom or top side.
So, the document is placed on 11 sheets, now you can finish the formatting work. Sometimes it is necessary to further reduce the volume by reducing the font. And this action does not require manual work. It is enough to use the “Shorten Page” function during “Preview” - an option has appeared with a reduced font by 0.5-1 points.
How to Print a Book Without Microsoft Word
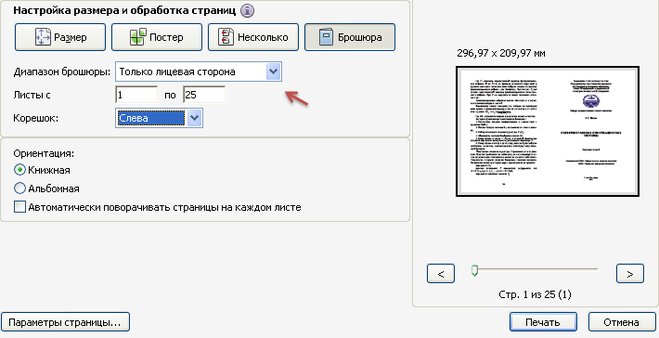
You can print the file using other formats and processors, editors. A common format is PDF (Printable Digital Format). In these files you also select the necessary settings in Adobe Reader format.
In the main menu, you can press the keyboard shortcut Ctrl + P or select “Print” from the menu. Under Page Size Settings and Processing, select Booklet Printing. The file will be similarly printed as a book.
Modern software and hardware capabilities allow you to quickly and economically print any printed product. It is important to update the software and take advantage of all the opportunities that new developments provide.

