How to disassemble a laptop
A laptop is one of the most convenient and indispensable tools when working. With its help, you can carry out many different operations, from filling out documents and preparing educational materials to watching your favorite movies and listening to music. During long-term use and lack of proper care, a large amount of dust and dirt accumulates on the surface.
Crumbs and other food particles may remain inside the cabinet. Such contamination significantly reduces the performance of the device. In order to carry out proper and complete cleaning of external and internal parts, the laptop needs to be disassembled. The process should be carried out in compliance with several rules and recommendations, described in detail in this article.
The content of the article
Self-opening or service center
This question is one of the most important and relevant for every user. A laptop has a more complex design compared to a desktop computer. If there is a large accumulation of dust or severe overheating of the internal parts, the system unit can be easily disassembled and cleaned. A portable device has a different arrangement of components than a home appliance, making the process more complex.
In the absence of the necessary skills and knowledge, it is possible to perform an independent autopsy in some cases. For example, the inner surface is clogged with dust or crumbs.In most cases, this leads to a slight overheating of the system and jamming of the keyboard buttons. In this case, you can handle the cleansing process yourself, without the help of specialists.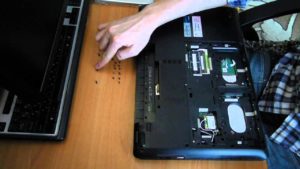
In most situations, deterioration in performance and regular overheating are associated with the need to replace thermal paste, and sometimes the cooling system. It is quite difficult to cope with such a process on your own without the required skill. The best option would be to contact a service center. The company's specialists will carry out full diagnostics, repair work and replacement of necessary parts.
It is recommended to take similar actions in case of accidental damage to the keyboard. During use, this laptop component may be damaged by spilled liquid or fallen food. Many models cannot be cleaned and require complete removal and replacement of buttons. In this case, it is better to entrust the work to professionals.
Note: It should be remembered that if the user opens the device casing independently, the user will lose the warranty from the manufacturer. In the event of accidental damage to any component, the owner will have to pay for replacement and repairs.
Self-disassembly instructions
The process of opening and disassembling is carried out in several stages. First of all, it is necessary to prepare the required tools and materials needed for work.
Preparation:
- laptop;
- crosshead screwdriver;
- napkins;
- small capacity;
- paper;
- marker or pen.
Disassembly must be carried out on a flat, hard surface in a well-lit room. A desk located by the window would be a suitable choice.
Reference: Please note that the disassembly process on some models may differ from that described.In most cases it depends on the manufacturer. For proper operation, you should carefully read the attached instructions.
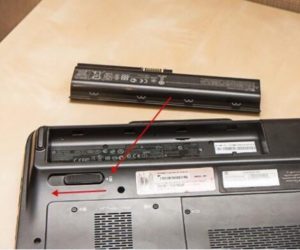
At the initial stage, you will need to disconnect the device from the power supply and wait until it turns off completely. After turning off, the laptop is turned over with the back panel up and placed on the desk. Using a thin Phillips screwdriver, unscrew the bolts holding the back cover. The bolts themselves can be placed in a small container prepared in advance. This will help you avoid losing the necessary components.
After removing the back panel, remove the battery. This will help completely de-energize the household appliance. To remove it, you will need to pull the button to the side and carefully remove the battery.
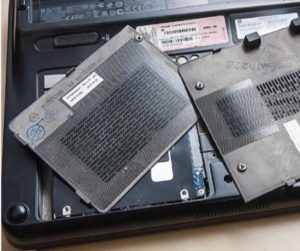
The next step is to remove the hard drive and RAM. They are protected by special covers that hold bolts on four (sometimes two) sides. There are several important points to consider when disassembling. Many manufacturers install a kind of protection - rings located on the inside of the lid. This eliminates the possibility of completely unscrewing the bolts. Such protection will protect the owner from accidental loss. In another case, you may encounter the location of the same bolts on both covers. With this design, the hard drive protection elements also hold the RAM cover. In this case, you will need to unscrew all the bolts at once, and the covers are removed at the same time.
Once the retaining components are removed and the covers are removed, you can remove the drive and RAM. The disk should be directed away from the connector with a slight movement, and then carefully pulled up.The RAM is held in place using special latches. To remove it, you will need to carefully move these latches to the sides and pull out the RAM card. After removing the RAM, the memory bar will rise. Its elimination takes place without any obstacles.
Attention: The clamps should be moved apart at the same time.
After removing the memory stick, you can remove the WI-FI module. To do this, carefully pull the contacts out of the retaining grooves and unscrew the bolts. After carrying out the necessary manipulations, the board can be pulled out.

At this point, you can begin to completely remove all the bolts holding both halves of the laptop. Here you should carefully examine the surface of the device, since many elements can be hidden and placed under legs or stickers. Without a complete inspection, elements may become torn off, requiring re-bonding. If the integrity of the nuts, bolts or stickers is damaged, the laptop will automatically be removed from warranty.
The body itself is held in place with special clamps or clothespins. Such latches are not resistant to damage. If done carelessly, it is very easy to break them. To simplify the process, the surface of the case can be slightly pryed with a thin screwdriver, and then open all the clamps.
Important: Care must be taken during operation to avoid possible damage or breakage of the housing.
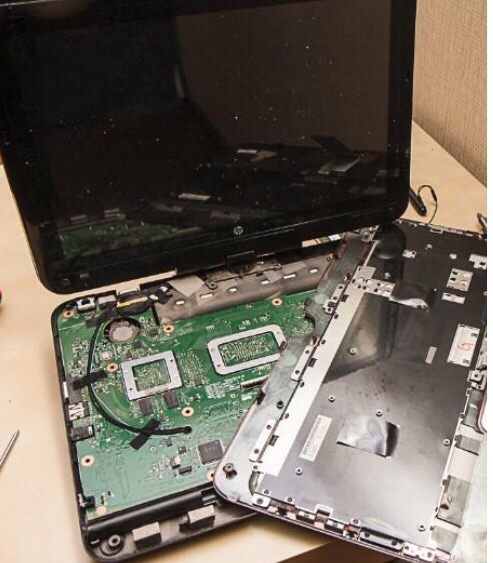
After disassembling the case, you should remove all the buttons, pull out the contacts and wires. If it is necessary to remove the monitor, both cables are also pulled out. The monitor itself can be mounted on one or two bolts, which can be removed with a screwdriver.Some manufacturers mount the monitor with three bolts located on both sides.
Under the monitor is the motherboard, which is also secured with bolts. After unscrewing them, the board can be pulled out. On the back of the board there is a cooling system. The fan is removed after removing the retaining elements.
At the end of the process, it is recommended to thoroughly wipe all components of the disassembled laptop with napkins to remove accumulated dust and dirt.
Basic Safety Precautions
- It is recommended to record each step of the technological process (disassembly) with a camera or mobile phone. During assembly, many users encounter remaining fastening elements. A photo of each process will help avoid the situation.
- Paper and pen will help you remember the exact purpose of each bolt. Elements in each case may differ, have different shapes and sizes. Fasteners can be placed by category and their purpose can be labeled.
- Caution and accuracy are one of the important requirements when disassembling a household device. The covers must not be pulled; the surface itself must be carefully checked for hidden fasteners before removal. If the surface does not lift, the housing should be completely inspected to determine the problem.
- Plastic parts have a fragile structure. When removing plastic, avoid scratches and cracks. If possible, it is advisable to carry out the work without using a screwdriver.
Conclusion
The laptop is more portable than a traditional personal computer. If necessary, you can take the device with you on a trip, to work or study.Over time, the body and inner surface become dirty, which causes a decrease in performance. If you follow all the recommendations and rules, you can disassemble and clean the laptop yourself at home.