Black screen on laptop
 The user turns on the laptop and waits for it to load, but in vain - the display remains black. Restarting does not fix this situation. We will tell you about the sources of this problem and how to fix it in our article.
The content of the article
Why does the laptop work but the screen is black?
This can happen due to both hardware and software failures.
In the first situation, only part of the problems can be eliminated by the user. Sources of violations:
- mechanical, chemical or other damage (for example, overheating, incorrect actions by the owner);
- problems with the cable (it connects the display matrix to the system board);
- weak contact surface of the RAM sticks.

Software failures are easy to fix; as a rule, they are the result of viruses that cause problems in the operating system.
How to remove a black laptop screen after turning it on
Before moving on to more serious actions, you should make sure that some PC elements are intact:
- We inspect the cable and power plug to see if there is any damage to the insulation or serious abrasions.
- We check the performance of the battery, as it can discharge or fail.To do this, connect the laptop to the network and see if the charge and power indicators light up.
- If the backlight does not work, remove the battery. We look at the contacts of the element and the laptop itself for plaque (gray, green) or clogging. Detected defects are removed with a regular eraser.
Important! On some models, you will need to unscrew the back of the housing to access the element. Before replacing the battery, press and hold the Power key (to remove any remaining charge).
If problems are found, replace the wire, charge the battery or buy a new one.
Resetting the settings
If all indicators are functioning, resetting the computer settings may help:
- Disconnect the device from the network, remove the battery and press the start button for 15–20 seconds.
- Then we proceed in the reverse order - install the battery, activate the power.
- Turn on the device and select the standard boot mode in the menu.
- Press "Enter". The process of resetting the settings is completed.
Checking the display for functionality
If the monitor does not work, but you can hear the system booting - for example, the fan is making noise - this indicates a hardware problem.
Let's make sure that the video card (motherboard) cable connected to the screen matrix is active. This can be done by connecting the laptop to another monitor (TV or desktop PC) through the appropriate connector. This connection is supported by HDMI and DVI ports in modern devices, and VGA in older models.
After connecting to the screen, restart the device.
The image that appears indicates a problem with the laptop display (problems with the backlight or cable).
Important! Only an experienced user can do the job efficiently: buy a suitable component, replace the part correctly without damaging the equipment. Therefore, we recommend contacting a service workshop.
Checking the BIOS settings
Errors in parameters can be corrected by resetting all menu indicators.
While the system is booting, press the appropriate key repeatedly. It is indicated in the instructions for the device; these can be Del, F1, F12, or various combinations of buttons.
Attention! In order not to act blindly, we recommend connecting another, working screen to the laptop.
After the BIOS window appears, press the F9 button (reset configuration) or go to the Exit section and activate the Load Setup Defaults line.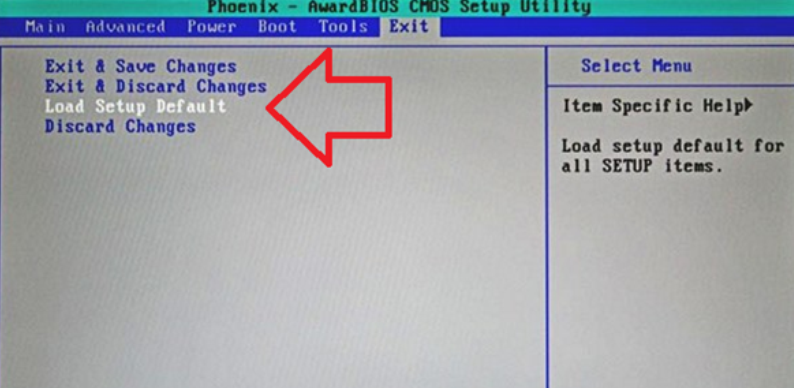
To confirm the operation, click Enter.
Consistently use F10 and Y, thereby saving the changes and closing the interface. Reboot your device.
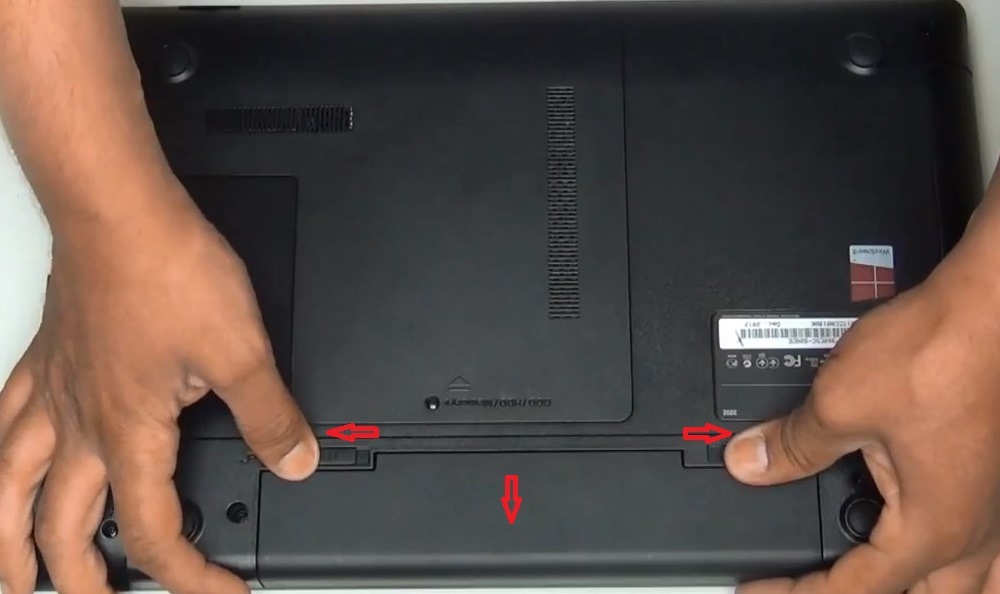
Checking the RAM sticks
Problems may be associated with a violation of the contact density (due to moisture penetration, temperature changes, etc.). Procedure:
- Disconnect the power cable, remove the battery, press and hold the power key.
- The memory card can be located in a special compartment or in a common space. In the first case, we unscrew the bolts on a separate cover, in the second, we remove the rear part of the case. The screws are different lengths, so each one must be installed in the same slot during reassembly.
- The module strips are held in place by latches. To remove the component, we move the mechanisms in opposite directions.
- Clean the contact surfaces with an eraser.
- If there are additional slots, we try to install the board in one of them. When handling contacts, proceed carefully to avoid damage.
- We install the board in place (at an angle of 45 degrees), fix it.
- We tighten the screws in reverse order and connect the power.
Determining the presence of malicious applications
Often the problem lies in viruses introduced into the system. If, in addition to the black screen, the laptop turns off on its own, this indicates a virus infection.
Reference! If necessary, use an additional screen (see description above).
We activate safe mode: during the reboot process, press F8 (or another key) for a few seconds. In the window that opens, select the appropriate option.
After Windows starts, run your antivirus program and activate a full scan of your laptop.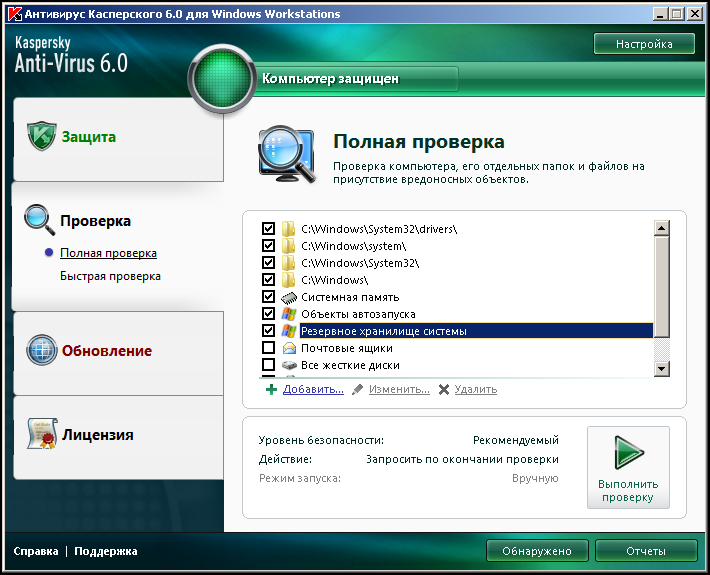
Upon completion of the process, the application will either automatically destroy detected threats, or offer the user a choice (“disinfecting” files, or completely deleting them).
Reference! Safe mode allows you to install an antivirus if it is not present.
Using bootable external media
Serious system failures can be resolved by reinstalling the OS. Algorithm of actions:
- connect the drive to a USB connector or load a disk with the distribution kit into the drive;
- restart the laptop, enter the BIOS interface (using the method described above);
- select the option to boot from an external device (specify the corresponding disk number);
- save changes and exit the menu;
- reboot the device again - now the external media is used;
- in the window that opens, activate “System Restore”, click “Next”;
- To restore boot elements, use the “Startup Repair” item.
At the end of the process, the corrected system starts up and the display should be in working order.
We have described the available ways for a user to fix a black laptop screen on their own. In more serious situations, diagnostics and professional repairs will be required; in this case, contact a service center.


Thank you