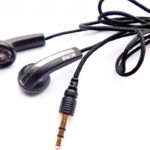
Wiring out headphones with microphone and button
 Many modern people use headphones in everyday life, and are often faced with the fact that they fail. Usually one of the speakers does not work. This happens often because wires tend to bend. Constant impact on the wires causes the internal contacts to break. When such a problem occurs, in most cases, you can restore the headset's operation yourself.
The content of the article
Important points before unwiring headphones
The reason why headphones with a microphone do not work may also be the incompatibility of two headsets: a telephone and headphones. It is for such situations that special adapters have been developed. So if there is a problem with hearing in headphones, then first you need to check the most obvious options.
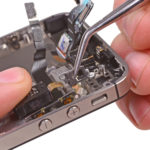
Before you begin repairing your headphones, you need to determine the cause of the problem. Quite often, wire rupture occurs in the place where the wire is constantly subject to twisting, namely in the plug. Less commonly, damage may occur in the cable. In this case, you should simply completely change it to another one. To determine that there is no sound from the speaker due to a fault in the plug, you can try pressing the cable into the base of the connector, twisting it in different directions.If sound appears after this, then this is where the problem lies.
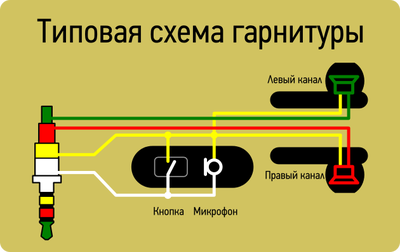
In order to start wiring a headset with a microphone and a button, you should study the types of connectors. There are cables with three wires, four, five and even six. Headphones with a microphone are connected via 4 wires. Some models are equipped with non-standard connectors.
Note! If, when wiring headphones, the new connector is of a non-standard type, then the connection requires the use of an appropriate adapter device.
What is needed for desoldering
To pin out a faulty headset, you must prepare the following:
- New connector for replacement. It should be the same type as the old one.
- For high-quality soldering you need a soldering iron. Its power should not be high - 25 watts.
- Rosin and solder.
Today, there are ways to connect a cable without resorting to soldering elements. However, the procedure carried out using a soldering iron guarantees better quality work. Soldered contacts are more durable and will last a long time.
Wiring headphones with a microphone and a button: step by step
Once the cause of the malfunction has been identified and the necessary tools and elements have been prepared, you can begin desoldering:
- Using a sharp knife, cut off the old connector, leaving about 0.5-1 cm from the base. This way, the problem area is removed.
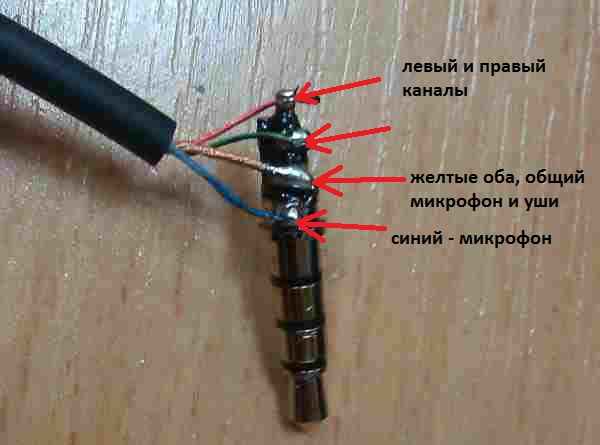
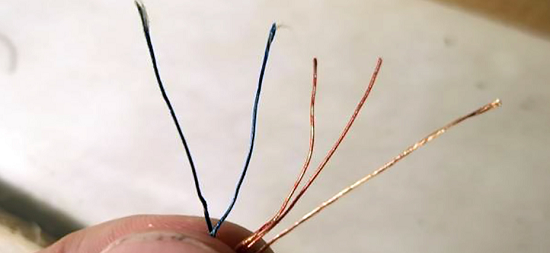
- Carefully, so as not to damage the conductors, use the same knife to remove the insulating sheath. After this you can see 4 wires. Two cables will be covered with insulation, and two will not.
- Wires covered with insulating material must be removed from the coating using sandpaper or a utility knife.The right and left channels are twisted together. The left channel is usually indicated by the green color of the insulating material, the right - by red.
- If there are only 3 cables in a cable, then two of them are channels, and the third is a common shield. In this situation, you only need to strip the cable of insulation without twisting anything.
- The connector that will be attached to the headset must be disassembled and inserted through the hole in the base of the headphone cable.
- Using a soldering iron, you need to solder the contacts to the connector. First, the overall shield is soldered, then the right and left channels are attached.
- The soldered wires and connector should cool down a bit, and then you should check if the headphones are working. If audibility is good and the problem is resolved, then you can start assembling the connector. If after carrying out the work the earphone does not work, then you should check that the wiring has not come loose after soldering.
- The wire must be secured to the connector. Modern connector models have special clamps. The insulated cable must be inserted into the clamp and secured with pliers.
- To be sure, the contacts are wrapped with insulating tape. The connector is assembled, you can listen to music and talk again.
Attention! If after work there is still no sound, even after checking all the wires for solder, then the damage to the wires may be near the speaker itself.
In order to carry out the wiring correctly and quickly eliminate the malfunction, no additional skills or specific knowledge are needed. All that is needed for high-quality work is accuracy and ability to handle a soldering iron. If you can’t work well with a soldering iron or do a great job yourself the first time, you don’t need to give up, but try again until you succeed.