How to solder a plug to headphones
 The most common problem when using headphones is the wire being bent and breaking at the junction of the cable and the plug. Usually, with such a malfunction, the device loses sound on one or two speakers at once.
Also, the sound on the headset may disappear if the plug itself is faulty. In this case, the only way to fix the problem is to completely replace the plug. Absolutely every user can change the plug; this may require several tools and materials, as well as a little experience with a soldering iron.
The content of the article
What tools to prepare
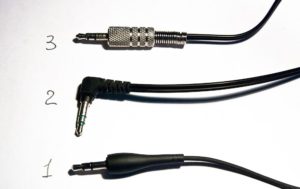
First of all, you need a new connector. Typically, headphones use the 3.5 mm mini Jack format. It is similar in design to the similar 6.3 mm jack, but is correspondingly smaller in size.
You will also need a soldering iron, solder, rosin, as well as insulating material or heat shrink.
Also, for a more comfortable soldering process, tweezers or special clamps may be useful.
REFERENCE! When choosing a soldering iron, it is better to choose a device with a thin tip, otherwise the soldering process may be inconvenient.
What is a headphone plug and in what cases does it need to be changed?
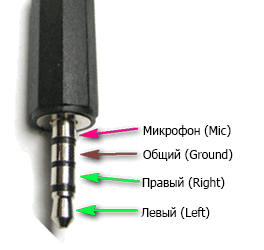
 The headphone plug is made according to the standards of the 3.5 mm mini Jack connector.It is a cylindrical port on the surface of which contacts are located. There are two types of such connectors - three or four pins. The contacting surfaces are separated by black tracks and by their number you can determine the type of plug.
The three-pin connector connects the contacts of the left and right channels, as well as the common one. In addition to the general, left and right channels, the four-pin plug has a microphone channel added, since such connectors are used on a headset.
Usually the menu is plugs, in case of breakdown or poor-quality connection. The connector can also be replaced if the device was previously connected via 6.3 mm, but the adapter could not be found.
Instructions: how to solder a plug
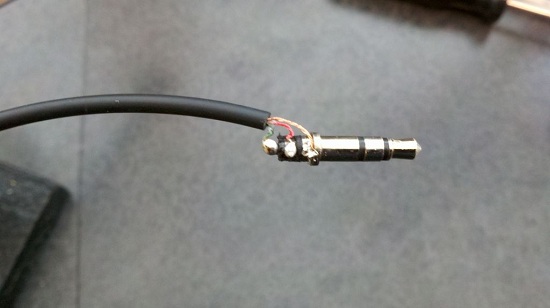
 Before you begin soldering, you should strip the conductive cables. To do this, use a stationery knife or lighter. After the wires have been cleared of insulation, you should check the functionality of the plug. For a three-pin connector, the test will consist of “ringing” each of the conductive surfaces of the left, right and common channels with a multimeter.
REFERENCE! Before you start stripping, you should pay attention to the location of the wires connected to the channels. They should be written down or marked so as not to confuse the left and right wires during soldering.
If, after ringing, it turns out that one of the conductive surfaces of the connector is not working, the plug must be replaced. It is possible to replace a three-pin connector with a four-pin one, but in this case you should be careful with the conductive surface so as not to mix up the connected wires.
REFERENCE! If a replacement occurs and a three-pin plug is connected instead of a four-pin plug, the microphone will not work, since there is no separate place for it to connect the channel from the sound pickup device.
Once the connector has been selected, you should begin soldering the wires. To do this, on the cleaned and treated surface, placing the wire at the soldering site, apply a little solder and wait until it dries. This procedure must be done with each of the contacts, after which you need to insulate all open connection surfaces.
REFERENCE! Before insulating, you should test the soldered wires with a multimeter to make sure that all contacts are connected correctly.
When all the wires are soldered, the surface should be insulated, and the device is ready for use.
The repair process for a four-pin plug is almost no different. Except that there are not two but three information channels, since a separate microphone contact is added to the right and left.
REFERENCE! The base contact serves as the so-called ground and is found on all types of connectors.
Also, when working with a headset plug, you should carefully monitor the separation of the audio and microphone channels, since if they touch, information will flow to the audio channel. Which should go to the speakers. Which creates additional interference.
Why does not it work?
 There are several reasons why a device does not work after repair.
- The contacts are not connected correctly. In order to ensure correct soldering, you should disassemble the connector and check with a multimeter that the connections are correct.
- Isolation between channels is broken.If the soldering process was not carried out carefully, it is possible that the insulation between the connections is broken. This may cause sound distortion or no sound at all. In this case, the connector must be disassembled and the contacts carefully re-soldered.
- Wire malfunction. If the multimeter shows that the plug and all contacts are working properly, but the device still does not work, the reason may be a broken wire. To check functionality. You should “ring” the entire cable from the beginning at the speakers to the end of the plug. Perhaps there are still kinks where the integrity of the conductive material is compromised.
- Recommendations
There are several basic tips that will help make the plug replacement process easier.
- When soldering, you should use tweezers and a clamp, as this makes it easier to fix on the contacts.
- To speed up the solidification process of the solder, you should use a small table fan.
- It is better to choose a smaller soldering iron tip, as this will make the soldering process easier.
- According to safety precautions, soldering should be done in a well-ventilated area, since solder smoke can be harmful to health if you are in a closed area.
- The best way to prolong the life of the plug and protect it from kinks and damage is to use heat shrink tubing.
- The power of the soldering iron used should not exceed 25 watts.
- To facilitate the repair process and improve connections, you should use rosin, solder fat, etc.
REFERENCE! Instead of rosin, you can use solder paste.