Why doesn't the microphone work on my laptop?
 Every device tends to break down, however, this is not a reason to immediately send it for recycling. In this article we will try to analyze in detail the types of malfunctions in both a personal computer and a laptop. In addition, we will find out what to do in this or that situation: how to get rid of the source of the defect. By finding out why the microphone on your laptop or headphones does not work, you can fix the problem.
The content of the article
The microphone on the laptop stopped working - reasons
Below are possible explanations for the problems in order of their prevalence:
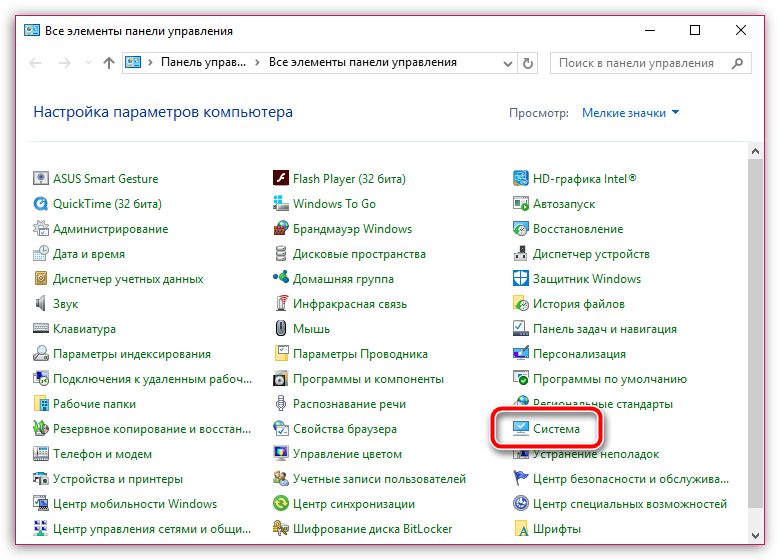
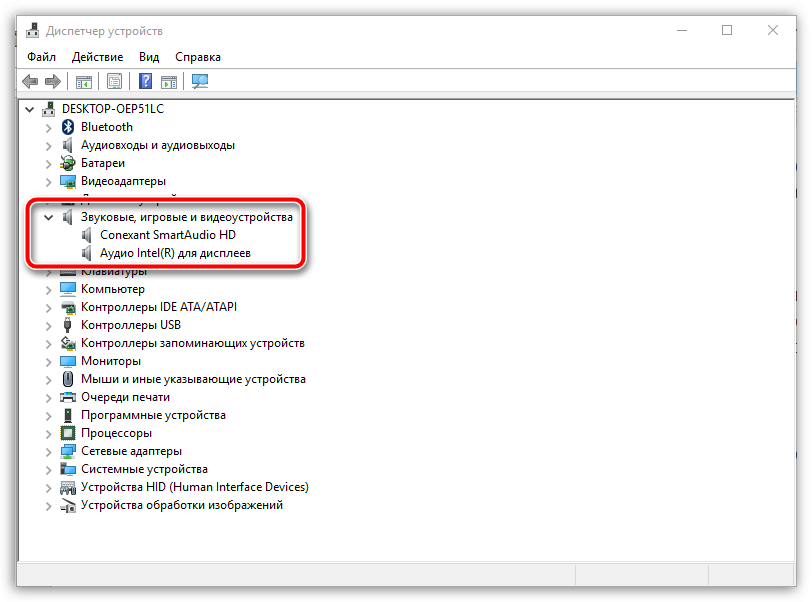
- First of all, you should check your drivers. Since in this case the mechanism itself is built directly into the design, it requires a special program that would establish functionality between the operating system and the laptop. Therefore, for this purpose it is necessary to double-check its presence. To do this, it is advisable to open the control panel and go to the “system” section. Next, you will have access to a window where on the left side you need to find the line “device manager” and click on it. In the section that opens, check “sound and video devices.”If you see unknown names in it, then a driver update is really required.
- In addition, the headset may malfunction. It is clear that Windows is not always able to carry out its activities properly. Accordingly, problems may arise with one or another auxiliary mechanism.
- The possibility of incorrect settings cannot be ruled out. Often the user makes a mistake with the connection beforehand. And because of this, the system incorrectly adjusts the indicator for sensitivity.
- It is also possible that the product is being used by a different application. Most often this concerns Skype, which is why the microphone does not work.
- Next, it’s worth checking to see if another device is connected that is interfering with recording your own voice.
- In conclusion, we need to consider such issues as the malfunction of the mechanism itself. It may completely fail, which indicates the need to replace it.
Thus, when a malfunction is detected, you should be prepared for any outcome of events: from ordinary breakdowns to serious decisions.
Options for solving the problem
For each defect, an individual method is selected to eliminate it. Therefore, the most appropriate option can be found below:
- You can correct the situation in which the required driver is missing in the following way: first you should go to the manufacturer’s official website, where you need to search directly. The exact model of the existing laptop is entered in the line. As a result, you need to specify your own version of the software. And then find the driver that is intended for the microphone. It must be downloaded and installed on your computer.
ATTENTION.Do not forget to reboot the equipment at the end of the procedure.
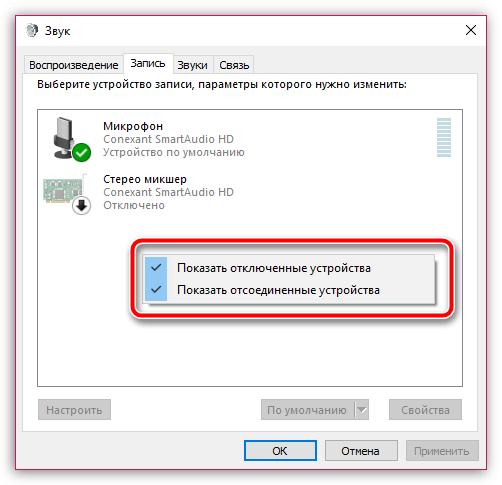
- If there is a failure, click on the tray at the bottom of the screen, namely the speaker icon. In the menu that appears, you need to select the line called “recording devices”. Then click on “record” in the tab. If your headset is not displayed there, you will have to click on any space in the window. Next, an area will open in which you need to check the boxes next to all the proposed parameters. After this, you can mark “enable” in the menu and complete the action with “save”. Then it is recommended to check the functionality again: say a few phrases. In a positive outcome, the noise level will change near the icon.
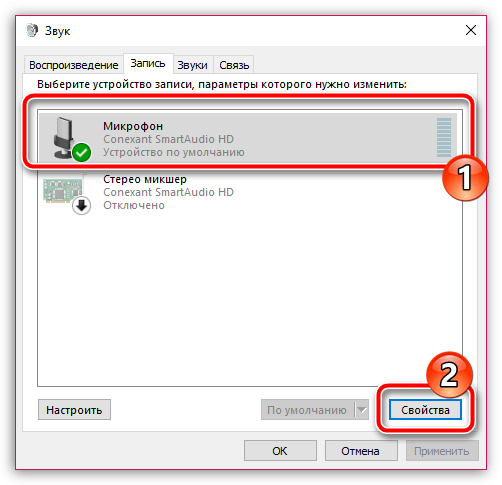
- If the mechanism is configured incorrectly, you need to view the indicators by first clicking on the “properties” item. Through this tab, go to “levels” and specify the parameters that you want.
REFERENCE. Finally, click “ok” to save the updated data.
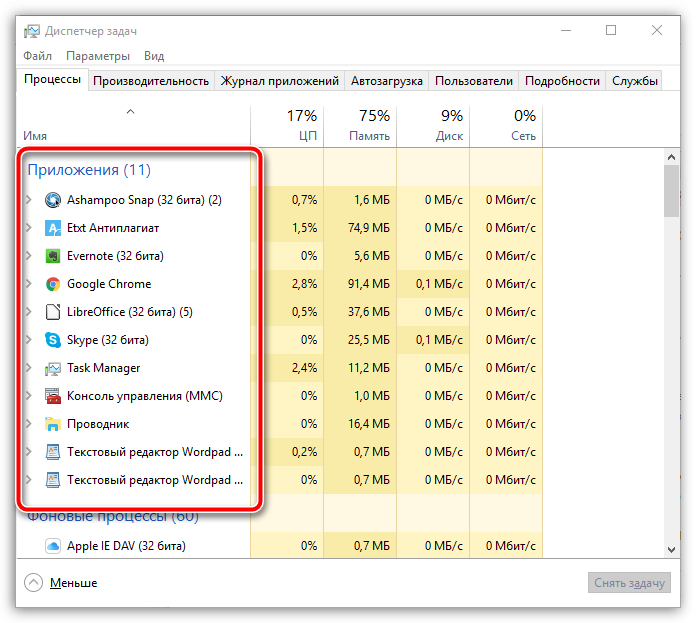
- When the device is busy with another program, you need to launch the task manager using the simultaneous combination of Ctrl+Shift+Esc. If you find an application in the section that may interfere with the microphone, you should turn it off.
- If other accessories are attached to the structure, it is advisable to remove them from the connector. Then check the functionality using “voice recording”. When listening to audio, either the voice will be heard or not. In the latter situation, the program does not select the required invention. Most often we are talking about Skype, therefore, you need to go into it and mark “tools”. There, select “settings” and make sure that your headset is selected there.
The laptop does not detect the microphone from the headphones - what to do?
If the equipment just does not find your device connected, it is likely that the first one contains viruses. To check for their presence and eliminate them, you must follow the following instructions:
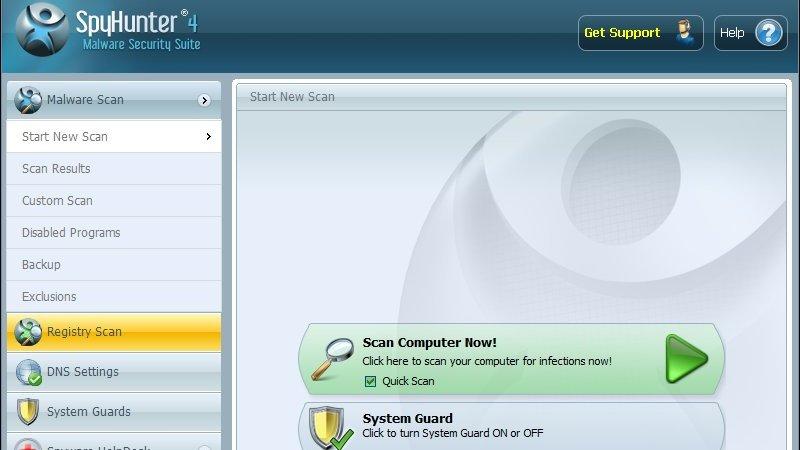
- First, you need to find a special spy program on the Internet and download it directly. The best of all is SpyHunter 4.
- Then you can scan your computer to detect possible pests of the unit.
- After which you should eliminate all malicious information.
- It is now possible to run a deep scan of the operating system. To carry out this manipulation, you will need any antivirus.
- All potentially dangerous files will need to be disinfected. Of course, this procedure cannot happen to everyone. The part that could not be cured must be removed.
- Finally, you need to restart the laptop and update the built-in drivers.
It is possible that the above method will not help. In this case, contacting a service center is inevitable.
What to do if the laptop does not see the external microphone
In such a situation, it is advisable to adhere to the following actions:
- At the beginning of the process, you need to go to the tray, where you should right-click once on the volume control icon.
- After this, a window labeled “sound” will be available to you. Thus, you can find the “record” tab on it. This is precisely what should be noted.
- Next, the “properties” section will open. Then you need to go to “advanced” to select the “default format” section. The available options need to be expanded and it is advisable to familiarize yourself with them. It is usually recommended to select the line in the same place that says about the presence of two channels and studio recording.
REFERENCE.After performing the manipulations, you must agree with the changed settings, and also confirm them using the “apply” button.
Therefore, after this, the microphone should perform its functions with full functionality. To confirm, you can turn to a special program or “dictaphone”, or use any other applications in this matter. Both Skype and Facebook can act as them. In addition, the presented method has one or another effect on the device, despite the sound card model.
Remember that before embarking on particularly important methods for correcting defects, it is worth understanding those that are directly on the surface. This category includes, first of all, such moments as: double-checking the volume of the sound produced or basic verification of the reliability of the cable connection.
