How to mute the microphone on a laptop
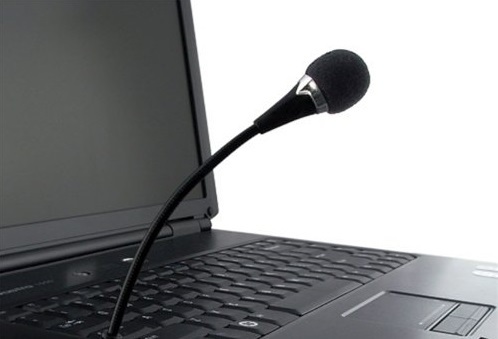
A microphone is a necessary attribute for voice messages. There may be times when you need to turn off the microphone in order to connect something else. With a computer everything is simple, the microphone is connected and disconnected through a specific port. But with a laptop it is more difficult, since the microphone is located inside the device. We have to look for alternative ways.
The content of the article
Mute the microphone on a laptop
In all modern laptop designs, microphones are mounted inside. But the design may include a budget and low-quality version of the device. Replacement may be necessary if it is necessary to supply more modern and high-quality equipment.
Disconnection methods
There are ways to disable:
- Try using the instructions that came with your laptop. Most often, the ability to disable it depends on both the version of the operating system and the type of computer.
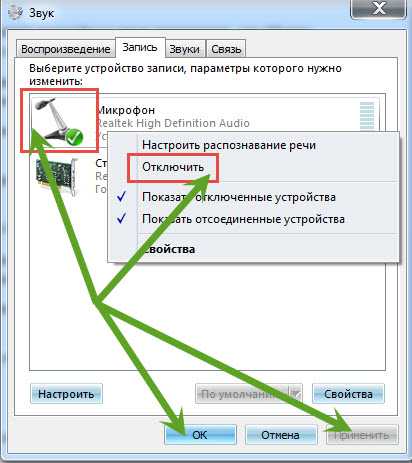
- The standard method is to go to the “Control Panel”. There we look for the “Sounds and Audio Devices” section. Going to it, open the “Sounds” tab. There we turn off the device. If you need to connect it later, we do the same thing.
- If a RealTek device is connected to the laptop, there is a way to disconnect using the manufacturer's utility. First you need to install it. The microphone can be turned off through the “RealTek HD Manager”.This utility also allows you to adjust the volume.
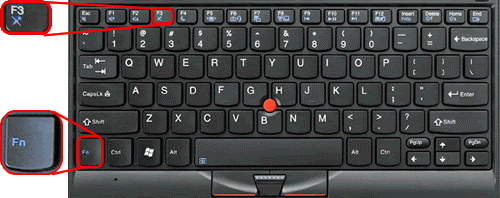
- You can also use a combination of buttons on the keyboard to turn it off. Many device models have an additional key that allows you to turn the microphone on and off. Most often, there is a drawing on it. It works in combination with “Fn” (the key is located in the lower left corner between “Ctrl” and “Alt”).
- Another way to control the device is to use a program that transmits voice messages. For example, Skype. The program allows you to open access to control various audio devices that are connected to the computer.
- There are times when it needs to be disabled to prevent unauthorized access to it. There is no complete confidence that the previous methods will help with this. You can completely disconnect it from the laptop by disassembling the latter and removing it.
What difficulties may arise
Difficulties arise in rare cases. If one method doesn't work, you can try another. One of them will definitely work. A small problem may arise when disabling in different operating systems, since the algorithm of actions is slightly disabled, depending on the version of Windows. For example, for the Windows 7 version you need:
- Go to “Start:. Select “Control Panel”.
- In the panel we find the “System” section.
- A window will appear that describes the characteristics of the computer. There will be a small list on the left side. We are looking for the “Device Manager” section.
- Displays a window with a list of all devices that are currently connected to the laptop. We are looking for a microphone.
- Right-click and select disable.
For Windows XP the algorithm will be slightly different. We do the following:
- Go to the “Start” menu. Select “All programs”.
- Go to “Standard”.
- Now “Entertainment”.
- Click on “Volume”.
- Our window opens. We are looking for “Recording devices”.
- Click on “Options”. Now on to “Properties”.
- We are looking for the right microphone.
- Let's turn it off.
Important! Difficulties may also arise with the removal of the device. For people who are not very well versed in the structure of a laptop, it is better not to open the device so as not to damage the parts.
How to disable the built-in microphone on a laptop
Most often, the speaker is located above the laptop screen (in the middle). To completely disable it, you need to clear the settings. To begin, press the button on the keyboard with the image of a microphone. If there is no such button, go to the quick access panel (where you switch languages). Right-click and select “Recording Devices”. Our window will light up. Select the “Recording” tab. There will be a list of devices connected to the laptop. Select the microphone, right-click, and select “Disable.”
If you have doubts about the previous method, you can also remove the drivers. Then the microphone will definitely not work. To do this, in the same window (where the list of connected devices is), select the microphone by clicking on it with the left mouse button. At the bottom there will be a “Properties” button. Click on it. A new window will appear. On it, at the top of the window, click “Driver”. A menu opens, where at the very bottom of the window there will be a “Delete” option. Click on it. We confirm the deletion. This guarantees a complete shutdown of the device; even viruses will not be able to start it.
Attention! Another way is to lower the microphone sensitivity to zero. It will remain on, but no one will be able to hear you.
The most effective way to disconnect is to remove the microphone.To do this, you need to disassemble the computer and find the microphone inside. The location of the microphone is very easy to find; it is located where the speaker is (in the middle of the frame above the screen). The frame is removed to reveal a small microphone behind it. Let's take it off. It is recommended to first disable it through the control panel so that the settings are not lost. Now you can connect other devices through the corresponding ports. The removed microphone is connected in a similar way. We return it to its place and connect it through the “Quick Launch Panel” or “Control Panel”.