How to set up your camera
Having bought or received a brand new camera as a gift, everyone wants to start learning the basics of this art form as soon as possible. To make the result pleasing, you need to learn how to use the camera. To do this, it is important not only to familiarize yourself with the basic technical aspects, but also to figure out how to properly configure the camera.
This question is especially interesting for people who have a high-quality digital device in their hands. Unlike a simple point-and-shoot camera, it has more advanced settings that help you get high-quality footage. For example, “white balance”, “shutter speed”, ISO. Of course, you can study the instructions for a long time and persistently and photograph the same object in order to obtain optimal quality. To reduce the time spent on self-study, you can use the advice of the professionals presented in this article.
The content of the article
How to set up a camera: basic parameters
A digital camera has a number of important settings on which its operation completely depends. Of course, you can set it to automatic mode, but then the result may be disappointing. That is why professional operators always manually set: “white balance”, ISO, “aperture”, “storage format”, “shutter speed”.
White balance
Responsible for color rendering.Digital technology has presets that allow you to set the white balance taking into account the lighting. These include:
- cloudy;
- daylighting;
- shadow;
- auto mode;
- incandescent lamp;
- fluorescent lamp.
Each light source has its own shades. And while the human eye has the ability to regulate incoming information, the gadget is not capable of this. This means that the yellow light emitted by an incandescent lamp will not change the hue of the photo. Objects around the light source will also be of the same tone. This option allows you to avoid this.
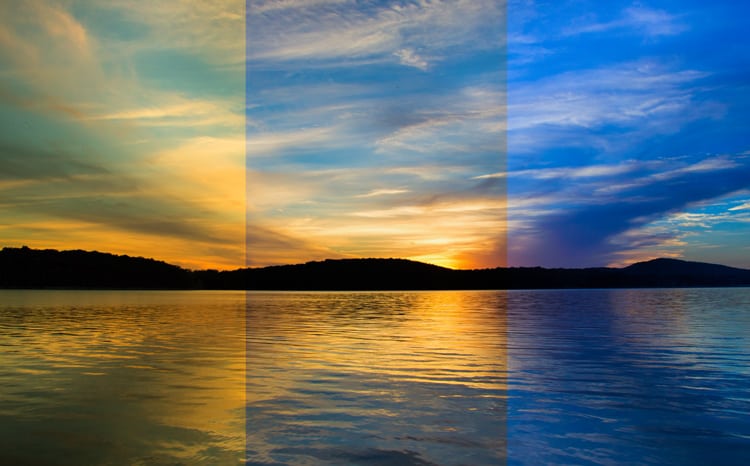
If the balance is set incorrectly, then all colors will shift into the cold or warm spectrum. Of course, this can be corrected, but then you will have to resort to special photo editors.
Excerpt
A function that allows you to set the time interval during which the light beam will affect the photosensitive element. Together with the diaphragm they form an exposure pair. The shortest shutter speeds, equal to 1/4000-1/8000 fps, are used for photographing fast moving objects. For normal shooting, average values of 1/30-1/200 fps are suitable. You can configure not only manually, but also automatically.
Diaphragm
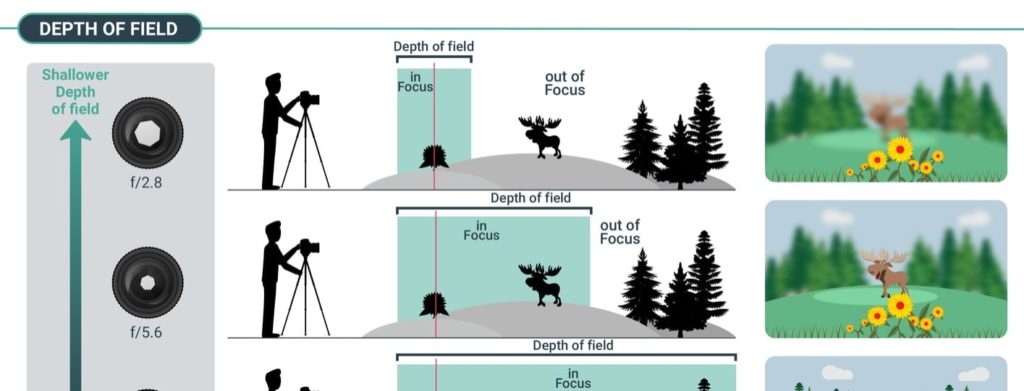
An element included in the design of the lens. With its help, you can adjust the size of the hole through which the light beam penetrates. The brightness of the finished frame directly depends on the amount of the latter. The wider the hole, the brighter the picture.
Also affects depth of field. The higher the parameter, the clearer will be objects located at a considerable distance from the operator. Typically used for landscape photography. For portraits, greater depth is not needed.It is enough to set the position of the element within 1–2.8. Thus, the faces of people in the foreground will be clear, and objects located in the distance will be blurry.
ISO
One of the most important characteristics that a person can regulate with his own hands. Responsible for the sensitivity of the device to light flux. Under good operating conditions, it can be set between 100 and 200 units. The higher the setting, the lighter the photo will be. But not everything is so simple, because by increasing the value, you can get a large amount of noise - the frame will begin to “scatter” into pixels. That’s why professionals recommend setting the minimum parameters.
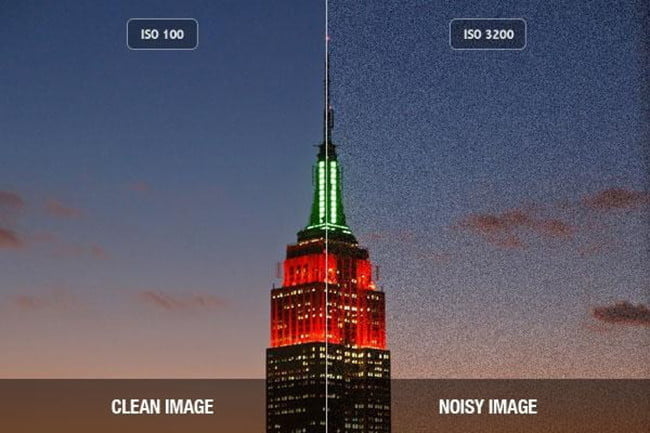
You can remove defects using the “Noise Suppression” option. She compares the received information with the “Black Frame” and subtracts visual defects so that the result is a high-quality picture. However, it is worth keeping in mind that interaction with this function takes quite a long time - the process of photographing one frame can take twice as long. This is why noise reduction is usually not used.
Image saving format
Photos taken with a modern digital camera can be saved to an SD card or other solid-state drive. Moreover, the device allows you to choose the format in which the information will be saved. There are two of them: JPEG and RAW.
The first is especially common among amateurs and novice operators. They prefer to immediately receive the finished image without additional post-processing. In this case, information takes up less space on the media, and recording is carried out with compression and processing using the device’s processor.
Information saved in RAW format is obtained directly from the device’s matrix, without pre-processing by the gadget’s processor or special compression. This allows you to use a photo editor and effortlessly process certain values that cannot be changed when saving as JPEG.
Changeables include:
- "Exposition".
- "Light".
- "Shadow".
- "White Balance".
- “Digital Noise Reduction.”
The main disadvantages of the RAW format are the large size of the stored information and the ability to view the footage only using special software.
Flash Sync
All modern digital devices are configured by default so that the flash always lights up at the beginning of the exposure. This is good when a person is interacting with stationary objects or a short shutter speed.
However, when photographing moving objects or using long shutter speeds, the results may be unpredictable. There is a high probability that the images will turn out blurry, with a distorted trajectory along which the captured object moves.
To avoid this, you need to use the “Flash Sync” option - Real Sync. She will independently change the position of the flash, moving it to the end of the frame. This will help keep the subject in focus, with movement and blur behind the subject rather than in front of it.
Semi-automatic operation
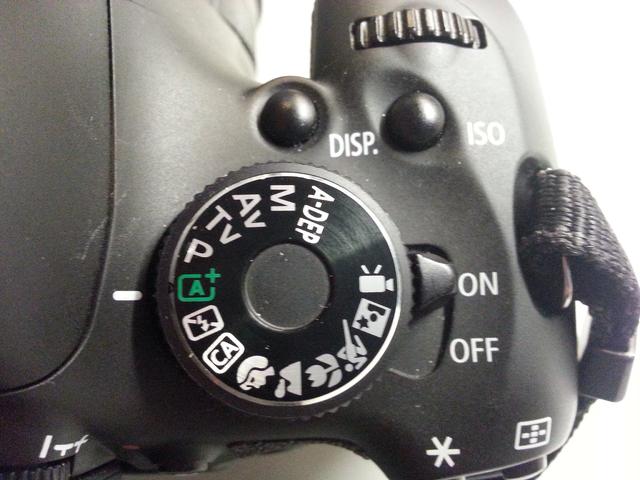
To make exposure selection easier, especially for amateur or novice operators, each device is equipped with a semi-automatic method. It involves photographing with aperture or shutter priority set.If you set shutter speed priority, a person will be able to set the light sensitivity himself, and setting the aperture mode will remain with the device’s processor. Typically, this option is used when shooting at sporting events or photographing moving objects.
The method in which the gadget’s processor adjusts the shutter speed, and the person sets the aperture value with his own hands, is considered more demanding in terms of the necessary skills. It is used for reportage shooting and in cases of insufficient lighting. Setting the aperture allows you to independently control background blur and depth of field. Here it is worth understanding that increasing sensitivity negatively affects the quality of the photograph, in which a large amount of digital noise appears.
Automatic mode: pros and cons
In addition to the semi-automatic mode of operation, the devices are capable of functioning in fully automatic mode. This is the best option for novice operators. But it is worth keeping in mind that it does not allow you to fully reveal the potential of the model; the quality will not differ from photographs taken using an inexpensive point-and-shoot camera. Therefore, having learned to work with the automatic method, you need to gradually comprehend the semi-automatic and manual options.
Using the acquired knowledge in practice, you can quickly and easily master this interesting and creative activity, learn how to work with gadgets and set fine settings.

