Ceiling vapor barrier in a cold attic
Owners of private houses and country cottages often encounter the formation of condensation in the attic. The cause of the trouble is low temperature. A quick and easy way to deal with this is to lay a vapor barrier.
The content of the article
What is a vapor barrier and why is it needed in the attic?
Installing a vapor barrier in attic spaces is one of the most important construction stages. The membrane used does not allow moisture to pass into the space, prevents the formation of condensation, and protects the thermal insulation layer from the appearance and development of harmful microorganisms, mold, and mildew. Installation of such a structure protects the main elements from destructive processes leading to their gradual destruction.
It is difficult to overestimate the role of vapor barrier structures. Every day, the air in the rooms is filled with moisture formed during cooking, breathing, and taking a shower. Air mixed with microparticles of water does not disappear - it penetrates into beams, walls and other load-bearing structures. This leads to gradual rotting of the building materials from which the main elements are made.
Reference. Mold and mildew are big fans of warm and humid rooms. They feel great in them and actively reproduce.The microclimate formed as a result of the activity of harmful organisms has a detrimental effect on all types of building materials!
Most of Russia is located in a temperate and cold climate, so private houses need to be thoroughly heated. The moist warm air that is formed as a result is released into the environment. But his path is blocked by building structures: the ceiling, the roof. To prevent air from accumulating on them, the elements must be protected.
An ordinary attic is formed by a gable roof covered with roofing material. The room is also equipped with insulation, which separates the space from the living rooms. A ventilation window is a must: it helps combat humidity, preventing the formation of condensation on the main elements.
The attic floor also serves as the ceiling of the living space. When the ambient temperature drops, it does not change inside the attic. Because of this, its top cools while the bottom remains warm. Therefore, condensation appears. To prevent accumulated moisture from entering building structures, special material must be placed on them.

Rules for installing vapor barriers
Do not install insulation on roof slopes. It is not recommended to use polyethylene and polypropylene film for it. Roofing felt and glassine are also not suitable. Such materials contribute to the accumulation of moisture and do not allow air to pass through well, which accelerates the formation of condensation and the development of harmful microorganisms.
Reference. Proper insulation is made from durable polymers with improved performance parameters.
Installing film is a serious task that is carried out in several steps:
- The first step is to decide on the installation method. Laying in a horizontal plane begins from the top of the roof. Vertical does not require special conditions.
- A piece of material is applied with the smooth side to the rafters inside the attic. The film is fixed using nails with large heads. The process can be speeded up if you use a construction stapler.
- The second piece is overlapped so that it covers the first piece by 10 cm. All joints are sealed with tape or masking tape.
- The gluing zones of the cuts are additionally fixed with strips or slats. Elements are especially needed if the roof slope reaches 30°.
- When the film is located close to ventilation windows, hatches and other openings, a vapor barrier apron is additionally used. Usually it comes included.
- Thin wooden slats treated with an antiseptic are attached on top of the insulating material every 0.5 m. As a result, a space is formed between the interior decoration and the roof, which will serve as natural ventilation.

Which vapor barrier to choose for the attic
The main criterion for choosing a fabric is the ability of the material to transmit a minimum amount of steam per unit area during the day. The lower this value, the better. Previously, glassine was used for similar purposes. However, it does not have good insulating properties - approximately 80 g/m2. Now more modern options are used for this, with indicators of about 0.02 mg/m2. Externally, they are very similar to membranes for protection against atmospheric humidity. Therefore, when choosing, you need to carefully study the characteristics so that instead of a vapor barrier you do not purchase a hydrobarrier.Otherwise, the risk of getting a wet membrane that has lost its basic properties increases. As a result, you will have to completely change the material, because it is impossible to dry the canvas.
Which vapor barrier is best? The list can include the following products:
- Polymer fabrics. On one side the canvas is smooth, on the other it is rough. It is laid with the rough surface down, which prevents the accumulation of dew.
- Polyethylene and polypropylene. There are two models - reinforced and non-reinforced. When installing, be sure to leave a gap between the film and the roof slope. Due to their low conductivity rates, they have a low cost, which is why they are a good option for budget repairs.
- Foil models. They are used in cases where it is necessary not only to ensure breathability, but also to reflect the sun's rays, directing them inside the room.
- Liquid membranes. After application, a thin film is formed. It helps retain water while allowing air to pass through perfectly. The main advantage is that it eliminates the appearance of harmful microorganisms.
- Fiberglass. It is considered the best option with many advantages. The only downside is the high price tag.

Reference. It is worth keeping in mind that not all liquid products can be used in living rooms. To purchase a suitable option, you must study the instructions before purchasing.
Rules for laying vapor barrier
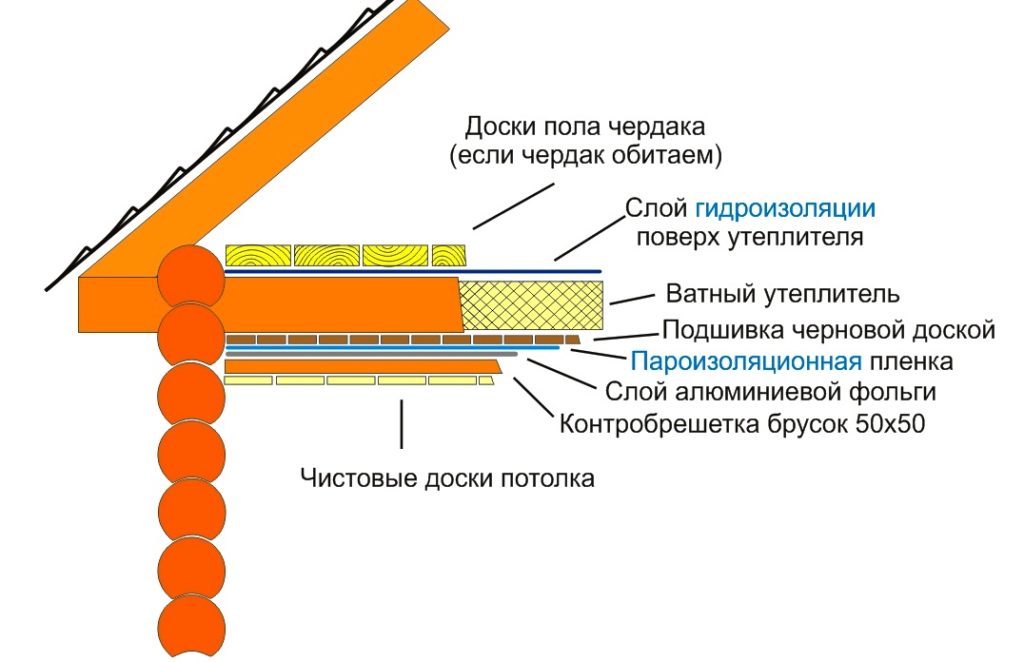
Properly installed insulation looks like a tray with sides. The membrane must completely cover not only the ceiling insulation, but also the joints between the walls and the thermal insulation. Also, the canvas should cover each beam.
Before carrying out work, the surface must be prepared: cleaned of dust and dirt, applied an antiseptic, installed communications, covered with thermal insulation.
Then you can proceed to laying the membrane:
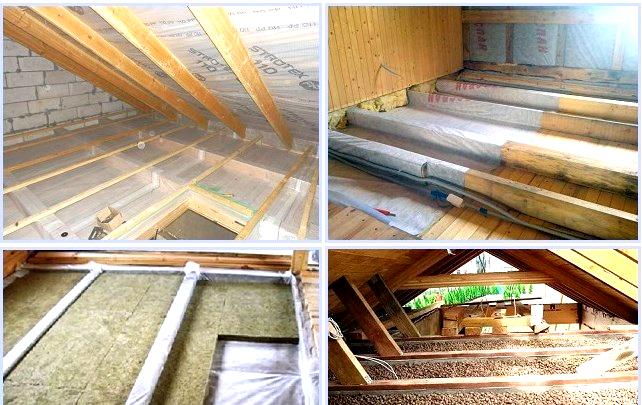
- Installation starts from the wall. Pieces of the required size are cut from the roll or canvas, which are fixed with nails or a stapler to the supporting beams. If necessary, a sheathing is installed.
- The membrane must completely cover each beam. There are two ways to do this. A simple option is to wrap the fabric around the structure, a more labor-intensive option is to glue individual sections.
- Laying should be done with an overlap, covering 10-15 cm of the upper part of the wall.
- All joints are sealed with tape. The first step is to glue the gaps between the cuts. To do this, you need to bend the overlap and secure the adhesive tape to the edge of the membrane. After that, the protective film is removed from the tape, and the second part of the overlap is fixed on top. Then you need to repeat the procedure, but with the walls.
- The second and subsequent layers are laid in the same way.

Reference. It is important to ensure that the seam of the second and next layers does not coincide with the seam of the previous one. The offset must be at least 40 cm.
Installation of a vapor barrier membrane in a private house or country house is one of the most important stages of construction. After all, not only the performance characteristics and durability of load-bearing structures, but also the health of residents depend on proper installation and quality of materials.


