How to make a hood
Manufacturers of household appliances offer a wide range of hoods of various types and models. If for some reason you are not satisfied with the existing range, you can make a hood yourself.
The content of the article
Making a kitchen hood with your own hands
There is nothing wrong with assembling this device yourself. After all, all modern manufacturers once started with one-off pieces. If standard models are not suitable for your kitchen or you want something unique, then assembling your own design is not at all difficult.
Active type hood
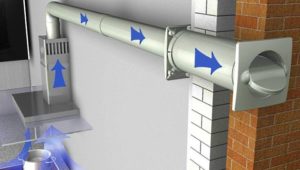
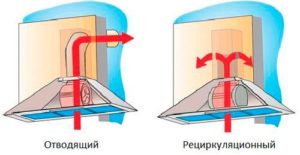 This is the name of a device designed to remove contaminated air from the kitchen into ventilation. The operating mechanism here is a fan, which sucks in fumes and smoke and expels it into the exhaust vent. The device is quite noisy and energy-intensive, but it is not at all difficult to assemble it yourself.
You will need:
- Any non-flammable material for the box (tin, thick foil, drywall);
- Aluminum or metal profile for the frame;
- Fan and motor for it;
- Check valve;
- Corrugated pipe (if the ventilation hole in the house does not coincide with the location of the duct);
- Fasteners and tools.
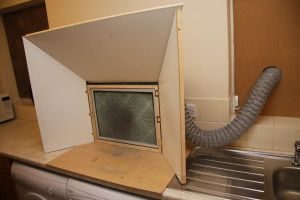 Assembling an active type hood is not difficult.Here are its main stages:
- We mark the dimensions and shape of the future structure and its location on the wall.
- From the profile we assemble the frame of the lower part, the sides and the frame of the upper part.
- We attach the finished “skeleton” to the wall and see if it looks good, if it doesn’t interfere, and if it fits into the overall concept of the interior. At this stage it is easy to make any changes to the design, which will be more difficult to do with a finished frame.
- If all the changes have been taken into account, you can begin covering the frame with non-combustible material. The result will be a ventilation duct - the basis of the future hood.
- The most crucial moment is installing the fan. There are several options here. It is better to install a large unit on spacers inside the socket of the ventilation duct. It should not be close to the narrow part so as not to block the air flow. A small fan can be placed inside the pipe.
- We place the finished box on the wall. If necessary, we connect the top of the frame with the ventilation in the house using corrugation. Don’t forget about the reverse valve, otherwise all the odors from the neighbors will come out of the hood.
- We check the functionality of the device.
- Let's start designing and decorating the outer box.
As you can see, assembling an active type hood yourself is not at all difficult. Any available material and remnants from repairs are suitable for this.
Passive hood
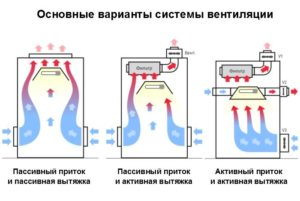 The device of this design is somewhat more complicated than that of the active one. You can make it yourself if you still have a non-working old hood. The principle of operation of the device is similar to a vacuum cleaner: special filters clean the air from dust, grease and smoke and return it back to the kitchen.Such a hood does not require access to ventilation, since the air does not leave the room.
For assembly you will need:
- Grease filters from an old hood.
- Profiles for the frame.
- Material for hull cladding.
- Small exhaust fan.
- Fasteners
Assembly of the case is the same as in the previous model, with the exception of the following:
- There is no need to make a hole to connect the socket to the ventilation in the house;
- Slots will be required in the upper part of the box to allow purified air to escape;
- The fan is placed between two layers of filters - fat at the inlet and carbon at the outlet.
Otherwise, the design of a passive device follows a similar pattern.
Making plasterboard hoods
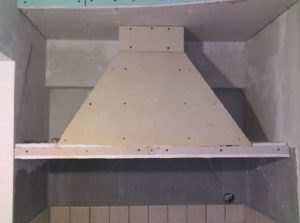 The most popular building material for creating custom hoods is plasterboard. It is endowed with the following important advantages:
- Does not burn or melt under high temperatures;
- Easy to use, allows you to cut out fragments of any shape;
- Easy to install - attaches to any base and does not place a large load on the frame;
- It is decorated and painted, pasted over and plastered, giving the designer complete freedom of action.
Drywall boxes can be turned into a fireplace chimney lined with artificial stone, a strict cube in the style of minimalism, or a painted romantic element of Provence.
Manufacturing from plywood
A plywood box in the kitchen is also appropriate. This material is inexpensive, safe for human health and can be easily cut and mounted on a frame. But you should pay close attention to fire safety.
IMPORTANT! The plywood hood should be located as high as possible from the stove, and it should be covered inside with metal or foil. Fire-resistant impregnations will also be useful.
It is also worth considering the special echo of this material. To prevent cooking from being accompanied by the sounds of a fighter taking off, the inner surface of the box should be lined with sound-absorbing material. Non-flammable mineral wool is ideal for this.
Other options
 What to create your own, unique design from is up to you. You can lay out the hood even from brick or wild stone with support on the floors, to completely imitate a stove or fireplace. Or you can create a chrome-plated metal structure in a high-tech or avant-garde style. The main thing to remember is compliance with fire safety requirements. Covering the frame with plastic or MDF is not the best option. Not only are these materials extremely flammable, but plastic also releases a whole bunch of toxic substances when heated.
Tips and tricks
Whatever model you choose, you should follow a few simple rules:
- The design of the structure should not be built at the expense of performance. After all, the main purpose of the device is to clean the air in the kitchen from burning, fumes and unpleasant odors.
- External and internal surfaces should be coated with easy-to-clean paints. This will make it easier to clean up any splashes of fat or broth.
- Take care of sound insulation so that the operation of the fan does not disturb you or your neighbors.
- When connecting to the network, you should follow the same electrical safety rules as when installing a store-bought device.
- The area of the suction surface should cover the entire area of the stove so that grease, steam and unpleasant odors are completely eliminated.
A DIY hood not only saves your budget, but also allows you to decorate your kitchen with a unique design, created in a single copy.


