The principle of operation of the ham maker
 Today, almost all meat products presented on the shelves contain dyes, nitrates, phosphates, transglutaminases and other “chemicals”. None of these additives have any benefits for the body, but what if you can’t buy products without them in the store? Of course, prepare delicious and healthy homemade ham or sausage!
The content of the article
What is ham?
Ham makers came to the Russian market more than five years ago, but many housewives are still unaware of their existence. This is a big omission. After all, with the help of this simple device you can prepare not only ham, but also rolls, sausages, boiled pork, as well as all kinds of delicacies from poultry, meat or fish. The ham maker is good in every sense: all its components are dishwasher-safe, it is compact, and the price can pleasantly surprise you.
Device
 The design of the ham maker is extremely simple. It is a mold, which is most often made of stainless steel or food-grade plastic. Traditionally, the height of the device is 16–17 cm and the width is 10–11 cm.
The press is driven by two powerful springs, which are attached to the top and bottom covers of the unit. These covers can be easily pulled out and put back in again.
The space in the ham maker is divided into three levels.The less it is filled with products, the higher the level you should choose. The top cover must be set to the highest possible position. Then the spring pressure will be stronger, and the ham will be compressed much better.
REFERENCE! Most ham makers work the same way. However, manufacturers, competing for buyer attention, are increasingly modifying their products by adding new features.
There are ham makers equipped with:
- thermometer;
- stationary bottom;
- a lift mechanism to simplify the removal of the finished product;
- with a single spring, which makes locking the device easier.
It is worth noting that all these modifications, although they significantly simplify the cooking process, do not affect the taste of the final product.
Principle of operation
The cooking principle is based on the temperature treatment of products with simultaneous compression inside the mold. That’s why a ham maker is often used together with a slow cooker, as it makes it easier to maintain the desired temperature for a long time. However, you can cook ham and other delicacies in the oven or in a regular pan.
Despite its apparent simplicity, cooking meat products in a ham maker has its own nuances. Natural, and most importantly, high-quality products are not cheap. Therefore, in order not to waste them in vain, you should follow the following principles:
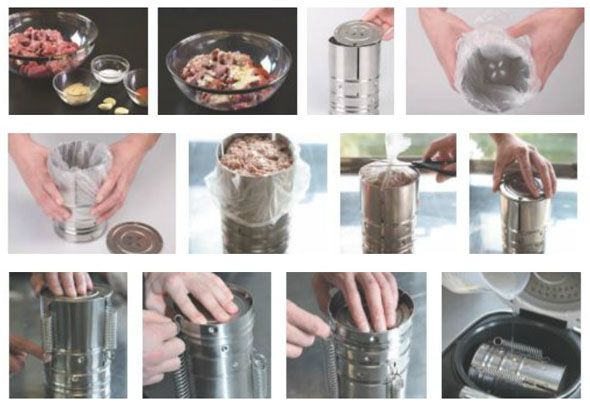
- Before filling the ham pan, you should insert a baking bag into it. Foil or a cooking sleeve will also work.
- To make the ham even tastier, the meat is pre-marinated and beaten.
- Don't skimp on products. You need to fill the ham tin more tightly, so the finished product will not crumble when slicing.
- The minimum cooking time in a ham maker is 3 hours.The meat should simmer slowly in its own juices at 70–80 degrees. The longer it cooks, the tastier the result.
- The finished product should be cooled by placing the ham maker in cold water. After cooling, you need to let the ham brew. To do this, put it in the refrigerator for 9–12 hours.
IMPORTANT! The meat should not be allowed to cook. It should just languish.
What can you cook with a ham maker?
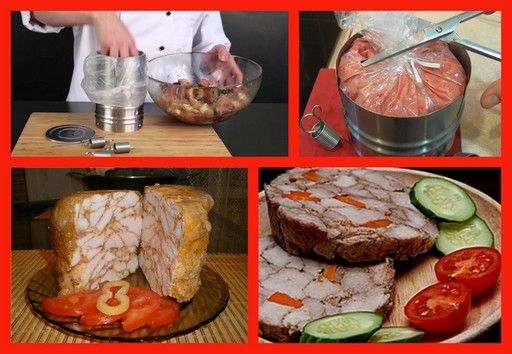
Despite the obvious name, not only ham is cooked in the ham maker. The variety of meat dishes available for cooking is simply huge, and finding a suitable recipe is not difficult.
Experienced housewives boldly improvise, mixing several types of meat and adding a variety of seasonings and fillings. Eggs, mushrooms, herbs and all kinds of spices are especially popular. Ham is often stuffed with prunes or olives.
However, before you start experimenting with seasonings, it is worth mastering the basics of cooking, which will become the basis for future culinary masterpieces.
Traditional recipe
To prepare traditional ham in a ham maker, you need the following ingredients:
- piece pork - 900 grams;
- minced beef - 200 grams;
- egg - 2 pcs.;
- milk powder - 15 grams;
- garlic - 5 cloves;
- salt, pepper - to taste.
IMPORTANT! In order to achieve a real “ham” taste, regular salt should be mixed with nitrate salt in a 50:50 ratio.
Preparation:
- The meat should be washed, cut and placed in a bowl.
- Add finely chopped garlic, egg and other ingredients according to the list. Mix well.
- Place everything in the ham pan, having previously covered it with a baking sleeve. This will help preserve meat juice and make the finished product more juicy and flavorful.
- Place the unit in the oven for 3 hours.
- After this time, the ham maker should be taken out, cooled, and then put in the refrigerator for 6 hours.
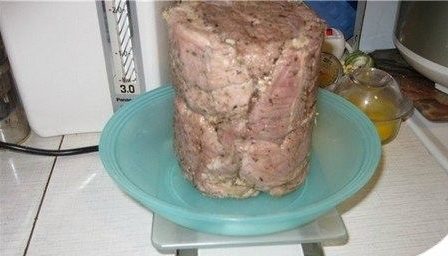
Homemade ham according to the classic recipe is ready!
Classic sausage recipe in a ham maker
To make homemade sausage you will need the following ingredients:
- minced pork - 1 kg;
- minced beef - 400 grams;
- garlic - 4 cloves;
- nutmeg, salt - to taste.
Preparation:
- Cool the minced meat, then mix all the ingredients in a deep bowl.
- Place a baking bag in the ham maker. Fill it with the resulting mixture.
- Carefully close the unit strictly according to the instructions and put it in the refrigerator for a day.
- Before cooking, remove the sausage and let it come to room temperature.
- You can cook it anywhere, it is only important to maintain the temperature regime - 70–75 degrees.
- Cooking time: 3 hours.
- The finished product should be cooled and put back in the refrigerator for 9 hours.
Homemade sausage is ready! You can store it in foil or parchment.