How to correctly insert a needle into a sewing machine
 The question of correctly installing a needle in a sewing machine worries most novice needlewomen. And this is quite understandable, because the consequences of an error will be a torn thread, damaged material and wasted time. To prevent this from happening and to make working with the machine enjoyable, you need to know a few simple rules for working with a needle and its design. This will help you quickly and efficiently make replacements and continue doing what you love.
The content of the article
How the needle works
The sewing machine needle is a simple but ingenious invention that has not changed for about two centuries. Thanks to its design, it easily pierces the fabric and guides the thread into the hole, after which it returns. This creates a loop on the opposite side of the material.
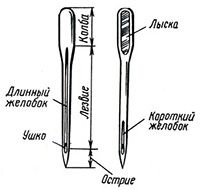
Knowledge of the needle structure and operating principle is necessary in order to understand how to install it correctly and which side to use. The design of this part is as follows:
- Thickened upper part. This is a flask that is attached to a needle holder.
- Kernel. The main part along which the thread groove runs from top to bottom.
- Point. The working part in which the hole is made is the eyelet. It also has a small groove, it is located on the opposite side from the one on the rod.
This device allows the needle to easily pierce the material and pass the thread through it. In order for this to happen without problems, the long groove located on the rod must have the appropriate depth and the tip must be well sharpened.
Types of needles for household sewing machines
Choosing the right needle is the first thing you need to take care of. To prevent it from causing skipped stitches and defective stitching, you need to select it not only according to the material, but also to the thickness of the thread. In addition, if you choose the wrong needle, it can easily break.
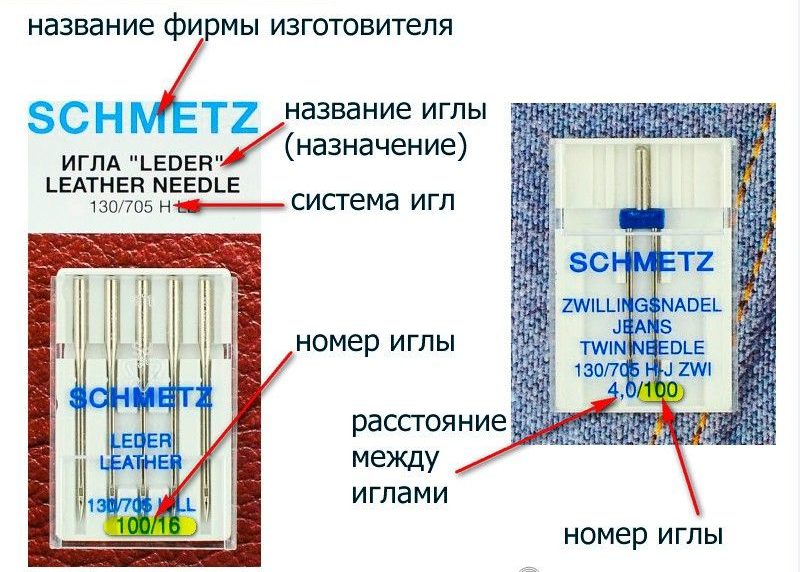
IMPORTANT! When buying a needle for your household sewing machine, pay attention to the presence of a flat (special cut) on the bulb. It is designed for error-free installation of the part into the needle holder.
The markings on the packaging will also help you make the right choice. They are designated by numbers 60–120 (European) or 8–21 (American numbering). To avoid confusing buyers, both are usually used:
- 60/8 – 100/16 with rounded eye are suitable for woolen fabric;
- 90/14 – 110/18 sharp are intended for skin;
- 90/14 – 110/18 with a small eye and a thick shaft work well with denim and other thick fabrics;
- 60/8 – 120/20 with a slightly rounded tip are considered universal.
There are several other types of needles for decorative seams or demanding materials. Self-refueling samples can also be found on sale.
How to correctly insert a needle into a sewing machine
The first thing you need to do for correct installation is to make sure you choose the right needle. For household machines, it must have a cut in the upper thickened part (flask). Its presence reduces the possibility of error to a minimum. Be sure to also ensure that the groove in the rod matches the thread that will be used. This can be easily done by placing it in the groove and seeing if it sticks out too much.

ATTENTION! Do not forget to disconnect the sewing machine from the power supply before replacing the needle. Be sure to follow safety rules.
Once you have made sure that the needle is selected correctly and armed with a screwdriver, you can start replacing:
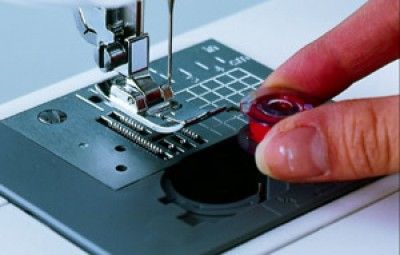
- Place the needle clamp in the upper position.
- Unscrew the fixing screw using a screwdriver.
- Remove the old needle. First, it is advisable to see how it was installed.
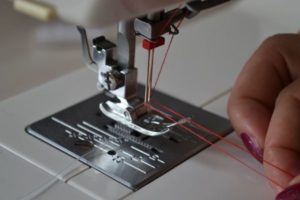
- Insert the new one into place. In household versions of sewing machines, the needle is attached with a groove to the right.
- While holding the part, carefully tighten the screw with a screwdriver until it is completely secured in the needle holder.
Done, the replacement was made, it only took a couple of minutes of time and a screwdriver. The main thing is not to forget to remove the old needle away from children and animals.
Installation Quality Check
In order not to spoil the material, you must first check whether the replacement was made qualitatively. Otherwise, the stitches will be uneven or the part may break. First of all, take a piece of unnecessary material and check the quality of the work on it.
Curves and stitches of different lengths indicate uneven installation of the part in the needle holder. To fix this, loosen the screw and align the needle. Be sure to turn off the power to the sewing machine first. After adjusting and clamping the part, check its operation again. This way you need to achieve a high-quality and even seam.
Consequences of incorrect needle placement
If the needle installation was done incorrectly, it will most likely not be possible to continue working.A crooked part, the presence of rust on it, an incorrect choice or incorrect installation will lead to the following consequences:
- constant thread breaks;
- curved and different length stitches;
- broken needle.
These problems can occur not only due to incorrect installation. You also need to make sure that the needle matches the material and thickness of the thread.
Replacing the needle yourself is not such a difficult task. If you take this seriously, choose the right tool and correctly replace it, working with a sewing machine will be a pleasure. At any time you can please yourself with new, exclusive, hand-made clothes.