Connecting a gas stove
 Since natural gas became available and everyone appreciated its convenience and low cost, it has been widely used. To use gas for cooking, you need to purchase a gas stove and connect its system to the main gas pipeline. Of course, at first glance, such work seems very difficult, because it requires special skills and qualifications, and because of the specifics, there is also the danger of an accident, which can lead to dire consequences.
The simplest option is to call a gas service specialist or private organizations who, for relatively little money, will carry out a complete installation with testing and registration of the household device. The cost of such services in Moscow starts from 870 rubles and reaches 1500 in the case of installation of built-in equipment. Disconnection and dismantling of the old stove, if any, is paid separately.
Thus, it is possible to entrust the connection to professionals, but there are situations when this is difficult. For example, the residents of an apartment are away from home exactly when the gas workers are going to come and it is impossible to adjust to the time. Or it is necessary to install a stove in a private house, which is located far from large populated areas and the arrival of specialists will have to wait a very long time and will cost more. Or a skilled person who is able to carry out simple technical work simply feels sorry for spending extra money on something that he can figure out himself after familiarizing himself with the rules and safety precautions.
If for some reason you want to install it yourself, then this article will help you with that.
IMPORTANT! Many people think that only gas service workers have the right to install such equipment, and you will be punished for doing it yourself. This is true, but only partly. Anyone can connect the stove, not only in the private sector, but also in an apartment. However, you can start using it only after checking with a specialist, who will still have to be called. In this case, you will not face a fine.
The content of the article
Installation procedure for a gas stove
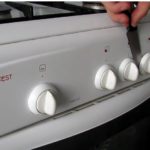
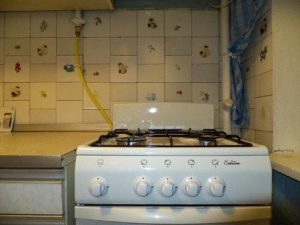
The first step is to prepare for work. Remove the new slab from the cardboard packaging and remove the wooden backing underneath. Set aside removable parts such as baking sheets and wire racks for now so that they are not in the way. Install the legs, if necessary, align them with the height and level of the floor in which the unit will stand. Follow the location rules, which state that there must be gaps from the wall, between the stove and adjacent cabinets, at least 40 cm at the back and 5 cm from the cabinets.
To accurately adjust the evenness of the burners relative to the floor and correctly install the legs, it is useful to use a building level. After all, when the surface is tilted, it will be inconvenient to cook and the oil will become unevenly distributed in the pan. If the legs are non-adjustable, in case of an uneven floor, you can place a piece of chipboard, wood or thick cardboard under the bottom.
According to the regulations, the gas hose should not be longer than 4 meters, and all open parts, including pipes and hose, must be freely accessible. Take this into account when choosing a location for a new stove or if you are going to remodel the room.
For the first time, before installation, even on your own, you need to conclude an agreement for maintenance and gas supply with the appropriate service in your city. To do this, you will need to provide basic documents confirming ownership of the apartment and equipment. This will also be needed if you are the owner of a private home and decide to start using gas for the first time.
Required parts and tools:
- special gas flexible hose or hose. Usually not included in the equipment package and purchased in a store;
- keys, both gas and adjustable 22*24;
- a ball valve suitable for interaction with gases of different pressures (if it needs to be replaced or the diameters of the outlet connecting holes do not match);
- a piece of wet cloth with which you will need to plug the pipe, or another suitable plug (if you need to change the tap);
- gasket (often comes with the stove);
- some kind of sealant: FUM tape, plumbing thread;
- additional household tools: a set of screwdrivers, a knife;
- soap solution and brush to make new connections for leaks.
It is possible to connect a gas stove with your own hands, but you must follow certain rules.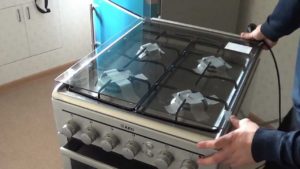
How to connect the stove to the system
The hose you buy must come from a specialized store and in no case from a market or street stall. You should not purchase water hoses that are not designed for this equipment and quickly break down.Gas hoses are usually marked with yellow marks, and water hoses are usually marked with red and blue marks.
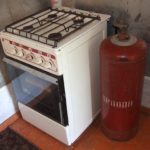
In Soviet-built houses, the stove was connected using steel pipes everywhere. They were replaced by flexible hoses, thanks to which today you can independently install equipment in a short time using simple tools, and also freely move the slab taking into account the length of the hose, which is useful when remodeling or purchasing built-in equipment. However, in rare cases, a metal pipe is also installed.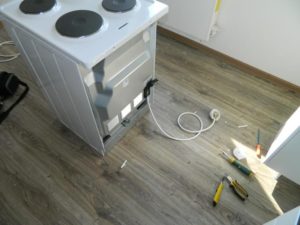
Types of gas hoses
There are currently 3 main types of hoses on sale. Knowing their features, each person can choose what will suit him. The diameters of the connecting nuts or hose threads are standard or inch. For non-standard 3/8 inches, you need an adapter, which can be purchased at the same store. At the ends there are either two nuts or a variant of a nut and an external thread.
The advantages of all modern hoses are their flexibility and sufficient strength, thanks to which the slabs can be moved if necessary and without fear of accidental damage and accidents.
- rubber hose. Frequently encountered and inexpensive products that are popular due to their availability, comparative stability and service life of up to 10 years. They are made of vulcanized rubber; the inside is lined with fabric material for rigidity. The disadvantages of this type include lower stability and service life than other materials, the risks of purchasing poor rubber that can crack, and poor protection against severe damage caused by piercing and cutting objects.
- rubber hose with metal braid.The base here is the same vulcanized rubber, but for increased resistance to sharp objects, metal is used that does not corrode. Just like a simple rubber hose, this type can withstand high temperatures up to 50 degrees Celsius (but does not like temperature changes). The main disadvantage is that it will not be possible to externally assess the condition of the rubber in case of cracking or other damage, which is why its use is not widespread in other countries.
- bellows (or bellows) hose. Consists of durable metal-plastic (sometimes there is a plastic shell on the outside, sometimes not). The most durable and flexible option currently available, it is not afraid of temperature changes, damage and shock, and lasts up to 25 years. Perhaps its only drawback is the high price.
IMPORTANT! Experts and representatives of gas organizations strongly recommend using bellows hoses because of their reliability, as this greatly reduces the risk of breakdowns and serious accidents associated with the operation of gas equipment.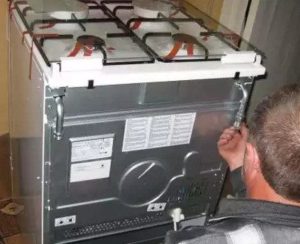
Hose requirements:
- The recommended hose length is 1.5 meters, longer options are possible, but not more than 4 meters.
- No damage, holes, cracks or any defects
- Identical surface and diameter along the entire length, without irregularities
- When purchasing and further using the hose, it should not stretch much, break or twist.
- During use, do not allow the hose to touch hard or sharp corners, hot surfaces or flammable materials.
- The hose must be in a free state and be easily accessible for timely inspection and replacement of an obsolete product.
- When purchasing, there must be a normal expiration date, which can be found out from the quality certificate, which the seller must show.
- The hose in use must be a single product, that is, one-piece, not consisting of several parts.
Connection using a pipe
A steel pipe is, of course, reliable, but it is still an outdated, expensive and complex option for connecting a slab, which will require additional materials and equipment. In addition, it does not involve moving the stove, for example, during cleaning or rearranging. However, in rare cases it is necessary to use this method.
First of all, you need to make a pipe and give it the desired shape and size. Then cut threads at the ends to attach couplings with nuts. If you have a welding machine and welding skills, you can weld the pipe from one or both edges using American adapter couplings. Or, having previously cut a thread, install connecting couplings on both edges, which can be used to screw them to the gas pipeline and to the slab connection.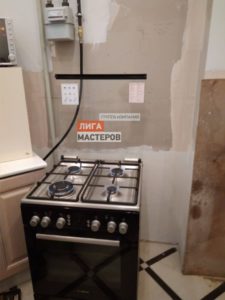
How to connect a gas stove in an apartment: step-by-step steps
- prepare everything you need, open all windows, if possible, turn on forced ventilation, notify other people in the room about the work;
- If you need to dismantle old equipment, you must first turn off the valve and try to light the burner. If gas does not flow and it does not burn, use a gas wrench or an adjustable wrench to disconnect the old hose from the stove and pipe;
- If a tap needs to be replaced, due to wear or if it does not fit with the new equipment, all actions must be carried out calmly and confidently. The new valve must be closed and, for ease of installation, the handle must be removed and sealant applied to the external thread. Then remove the old tap, quickly clean the connection area of the old sealant and quickly screw on the new one. There are pipes with external threads, and the tap has internal threads, then a plug is required. The fabric must be well moistened, since it is the wet material that stops the gas from escaping. The tap plugged with it must be thoroughly cleaned and fresh sealant applied.
All work with a wrench must be done quickly but carefully, without knocking on the pipe, which could cause a spark. After installing the new valve, apply a soap solution with a brush and if bubbles form on the surface, it means there is depressurization and the gas is leaking. Then you have to unwind and wind the sealant more tightly.
IMPORTANT! The popular sealant made from flax tow is not used in the gas field, since its properties are worse than those of other types of sealants.
Now you can finally install the hose. The general scheme is the same: wrap sealant on the external thread, use adapters if necessary, then use a wrench to secure the nuts on both sides of the connection and the structure is checked for leaks. In internal threads, paronite gaskets are used for sealing. Reasonable moderation should be used when tightening the nuts on both the hose and faucet. Too much force will damage the gasket and the seal will be compromised; if tightened too loosely, gas will also escape.