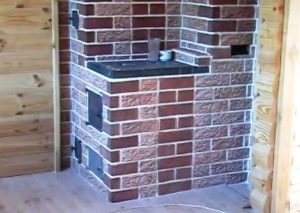
Brick lining of sauna stove
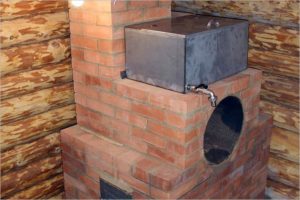 Metal stoves have long won their place in the construction of baths. They are distinguished by their quality characteristics and efficiency, however, their use in a “naked” form is strongly not recommended both in relation to human health and based on existing safety standards. It is for this purpose that metal stoves in a house or bathhouse are lined with brick.
The content of the article
Why are stoves lined with bricks?
Despite the fact that many metal stoves in their original form can serve as decoration for a bathhouse, you should not avoid lining them with brick, especially since with some ingenuity, the design of the stove can be very advantageously played with this.
The lining of a metal furnace is usually done for the following number of reasons:
- Fast heating of the iron structure. This is dangerous for human health, since the body needs more time to adapt to the new bath temperature.
- Rapid loss of temperature. Due to high thermal conductivity, a metal furnace without a lining also rapidly loses its accumulated temperature. To maintain it, constant supervision will be required and more wood and coal will be needed, which significantly increases the consumption of materials.
- Air drying. The metal heats up and dries the air significantly quickly, making being in the steam room less comfortable.
- Possibility of severe burns. Momentary contact of the skin with a metal surface will result in a high degree of burn. Very often the stove gets touched by hands.
You can get rid of these problems separately, for example, finishing with a metal shield will help with a rapid loss of temperature, but at the same time other indicators significantly increase for the worse, which ultimately makes the usefulness of such a shield questionable. Furnace lining can eliminate this set of shortcomings. Most of the models currently produced are initially designed in such a way that it would be convenient to install their cladding in the future.
The lining allows you to reward the furnace with the following number of advantages:
- long and smooth heat transfer;
- reducing the amount of fuel required to maintain the desired temperature;
- pleasant, not overdried heat;
- safer use;
- giving an attractive appearance to even the cheapest and simplest stoves.
What materials are used
 The furnace lining is best made of brick. There are other more exotic options, but this one is the most favorable in terms of price and efficiency.
Important: Sand-lime brick is completely unsuitable for lining a furnace. It is not provided with sufficient resistance to humidity and high temperature, so it very quickly falls into an unusable state and collapses.
The optimal and most commonly used materials for lining the furnace from the inside and outside are the following types of bricks:
- ceramic (light in weight, and has good reliability and durability);
- fireclay (although it is less attractive in appearance compared to ceramic brick, it is much better able to withstand strong temperature changes).
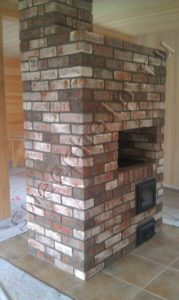
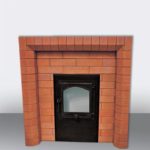
It is also not forbidden to combine materials: for example, the main masonry should be made of fireclay bricks, and the outer cladding around it should be made of ceramic for greater attractiveness. This can be seen very often in photographs.
Technology
To obtain good efficiency when laying bricks for lining a furnace, it is not enough to simply place them side by side like a shield. Such a design will not have sufficient parameters both in terms of temperature control quality and safety. In order for the masonry to achieve the desired result, it must be done with high quality. It’s good if you have the skills and experience of a mason; if not, you will have to spend more time on preparation.
 Currently, the following methods of laying bricks are popular:
- continuous cladding (fast heat transfer, but attractive appearance and better safety);
- heat shield (good safety for humans, slight increase in heat transfer efficiency);
- convector lining with vents (the most optimal option in terms of size and efficiency).
Solution
Laying brick without high-quality mortar is a waste of time and materials, so it is important to approach its preparation wisely. Typically, masons for this purpose use either a special purchased mortar or a homemade one made from clay and cement. There is no ideal proportion due to differences in the quality of the starting materials. When mixing, you should pay attention to the concentration: it should be similar in thickness to rich sour cream.Often sand is added to the mixture to make it thicker.
Important: the concentration of sand in the mixture should not be more than 30%.
The mixture is whipped with a construction mixer until it is as homogeneous as possible. After this, the solution is left to rest for half an hour. During this time, it thickens further, which should be taken into account when mixing.
Be sure to plan how much material you will need for one day. There is no point in preparing the mixture in advance. If you still have a lot of material left, then the next day you can dilute it with a mixture of water and sand.
Base
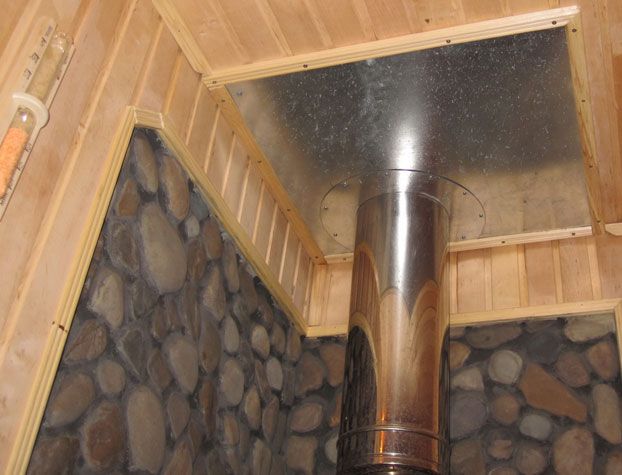
To form the base of the furnace, which weighs more than 700 kg together with the lining, it is necessary to install a foundation. It should be noted that it should not be connected to the base of the bathhouse, so that if it is distorted, the stove will not be damaged. If there is no need for a foundation, then the beams (necessarily not rotten) are covered on top with a layer of fire-resistant material, which must be carefully secured.
Important: according to SNIP. 01/21/97 (Fire safety of buildings and structures) the minimum gap between the brickwork for lining the stove and the wooden wall must be at least 10 cm. A larger gap will significantly slow down the heating of the stove.
 You should start creating the foundation only after the foundation has completely hardened. It must be common to the furnace itself and its lining to ensure uniform load distribution.
Initially, one layer of brick is laid, after which the horizontalness of the masonry is checked with a level. Using roofing felt, it is necessary to provide the base with waterproofing. It is fixed so as to ensure complete coverage of the walls and bottom without gaps.To do this, strips of material are laid overlapping, and the edges are lubricated with bitumen mass and pressed until they set. If it is unavailable, you can replace roofing felt with a double layer of ordinary film.
After forming the base, the furnace is installed, after which the horizontal position of the entire structure is again checked. To protect the stove from mortar during facing work, it should be wrapped in film.
Subsequence
Following a certain sequence when laying bricks as cladding will make it the highest quality, most efficient and durable.
Important: Before laying, it is necessary to prepare the brick. The required amount is thoroughly cleaned and soaked in cold water for 12 hours. This is done so that it does not draw moisture from the mortar during laying.
The shape of the lining is selected based on the furnace model. It is best to give preference to parallelipiped shapes, since the lining of round stoves is much more complex. The distance between the brick and the stove should be no more than 5 cm so that the properties of the heater are improved and not lost in the empty space.
 In general, the entire work appears to be the following set of actions:
- It is best to start a row from a corner. It must be checked immediately with a level. To ensure proper horizontality when laying, use a protractor and a plumb line.
- The solution is carefully applied to the brick with a trowel (excess mixture must be disposed of immediately). Please note that the inside of the cladding should not be covered with mortar. Once it dries, it will negatively affect the air circulation in the gap.
- In the second row it is necessary to make air gaps. For a small stove, it will be enough to install two vents half a brick thick. They also fit on the sixth and eighth rows. You shouldn’t get carried away with them: too much will significantly reduce the thermal insulation properties of the cladding.
- To provide the structure with good rigidity, it is necessary to lay a reinforcing mesh on the second row. After laying the third row, it is tied to the previous one with wire.
- The third row is laid out in accordance with the first in a checkerboard pattern. The seam must be at least 5 mm.
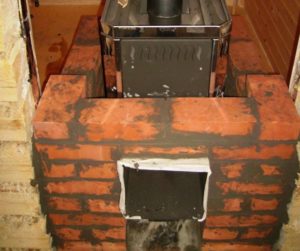
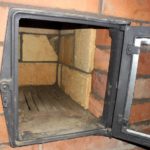
- When laying, do not forget about the oven doors. To decorate it, a metal corner is installed on the desired row. Additional rigidity is created by wire binding. The brickwork must be laid in such a way that the door does not come into contact with it when opening and closing.
- The last row is performed arbitrarily. Often it is at this stage that the furnace lining is given additional decorative features.
- Usually, to completely cover the furnace, it is enough to lay up to 15 rows. In this case, it would be better to divide the work into two days approximately in half. This is done so that the material shrinks overnight, and in the morning it can be verified that it is actually horizontal. If deviations occur with this method, it is possible to correct them.
Upon completion of the furnace lining, it is necessary to carry out several test kindlings (two or three are enough). Reaching the maximum temperature is not at all necessary. This is done in order to dry the solution as much as possible, thereby giving it additional reliability.


This is what I do: covering sauna heaters and metal stoves. Please contact me, I have a lot of experience, I am an old stove maker.