How to create a mini drill with your own hands from a motor: instructions
If you have available materials and basic skills, it is quite possible to make a mini-drill with your own hands. If you follow the step-by-step instructions correctly, you will be able to make a small tool for household use. It can be used for printed circuit boards, plastic, plywood and even wood (if we are talking about soft species). This article describes how to make a device in just a few hours.
The content of the article
Tools and materials
The main way is to make a mini-drill with your own hands from a motor. For this you will need:
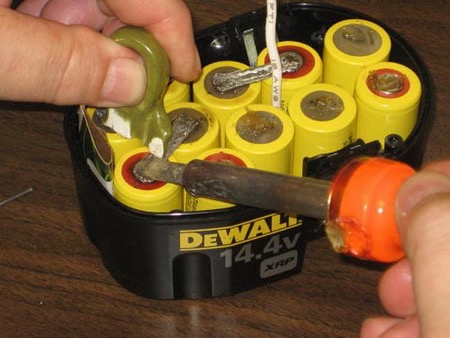
- Mini motor - it is taken from old tools, for example, a hair dryer. They are capable of reaching speeds of up to 1800 rpm, which is quite enough to work even with wood. You can also use a mixer or blender. Engines from a toy mechanism or from an old tape recorder will also work, although such devices develop less power.
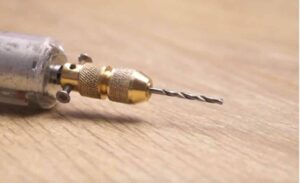
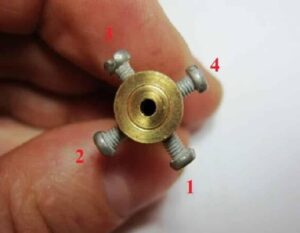
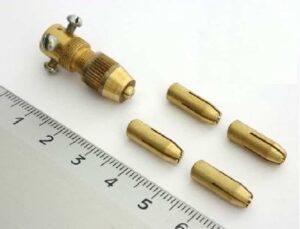
- A mini-chuck for a drill with your own hands is taken from another drill or screwdriver. If there are no spare parts, you can take a collet. It is also possible to use a homemade bushing made from a tube, which is clamped with bolts.
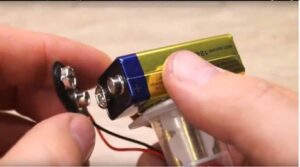
- The energy source can be a regular outlet or batteries. In the first case, you will need to install a cord; in the second, you will need to install a converter or several batteries.
- The body is a plastic part, for example, a fragment of a water pipe, or a bottle of deodorant, or an old lantern. The presence of a housing is of particular importance if the device operates from a 220 V network (insulation is required).
- Connecting wires - you can take regular models with a small cross-section. To install them, you need to prepare a soldering iron or connectors.
- Attachments, including drills - they are installed in the collet, so they are selected based on its diameter.
Thus, you can make a drill with your own hands from a motor. The device diagram looks like this.
How to make an electric model
A homemade mini-drill is made in literally 2 hours. Assembling it is not difficult, but you should act carefully, aligning the parts evenly and avoiding moisture and condensation. The main stages of the process are:
- Separate the electric motor from a household appliance, for example, a hair dryer, and solder 2 conductors to its contacts (they may remain from the previous mechanism). Just in case, the wires are marked in different colors to correctly take into account the polarity.

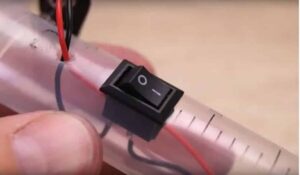
- The mini PCB drill must have a start button. It is soldered into the start circuit. You can skip this step, but if there is a button, it will be more comfortable to work.
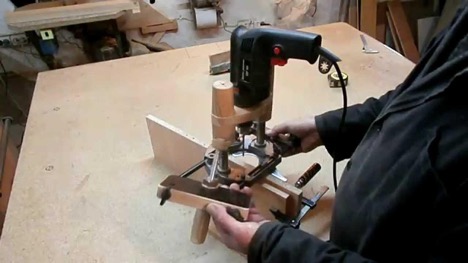
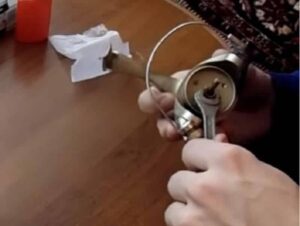
- Next, the drill needs to be secured in a sleeve or collet. It is fixed so tightly that it is impossible to turn it by hand.
- The assembled cartridge is placed on the engine shaft to its maximum depth. Moreover, you need to make sure that the housing with the motor and the cartridge do not come into contact with each other during rotation. Otherwise, the motor may wear out quickly.
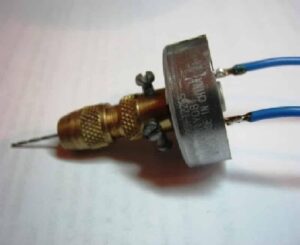
- Next, you need to figure out how to make a mini-drill so that all the parts fit securely. The cartridge is secured to the shaft with bolts.The tie is made one by one, turning each bolt the same number of turns. If some bolts are stuck, you need to tighten the others so that the compression is distributed evenly.
- Now all that remains is to connect the device to a power source - it can be a network or batteries. A mini-drill from a motor is started for trial work and checked how well the engine functions and how the component elements are secured.
Assembling a mechanical drill
Now it’s clear how to make a mini-drill from a motor. But in fact, this is not the only option for a home appliance. It is also possible to make a mechanical tool without a motor. The basis is a mechanism equipped with a transmission gear. A reel for a spinning-type fishing rod is best suited.
If it is not there, you can use an old screwdriver, use a collet or bushing. As in the previous case, when choosing, you need to focus on the shaft diameter.
Step-by-step assembly instructions are as follows:
- Remove the screw from the shaft.
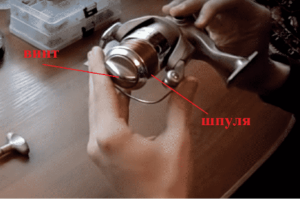
- Remove the bobbin.

- Remove the nut and remove the cassette.
- Make sure that the chuck depth and shaft length match each other and fix them together.
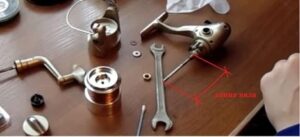
- To secure the cartridge to the shaft, install bolts for the sleeve or collet.
- Next, you need to check the work and, if necessary, adjust the handle. For example, if it is large and catches the object when drilling, you need to make it shorter.
A drill for drilling circuit boards, soft wood, and plywood is made at home. To do this, you need to take an engine from an old device or mechanisms (cartridges, gears). The result will be a medium-power device, but for domestic use this is quite enough.