How to create a drill holder with your own hands? Expert recommendations
It is quite possible to make a drill holder with your own hands. You can use both wooden and metal blanks as a basis. First, the frame is made, after which they move on to the handle and stand. If necessary, additional elements can be supplied. The article describes how to do this.
The content of the article
Materials and tools
Before starting work, you need to prepare the available tools. It’s quite possible to make a holder for a screwdriver with your own hands. To do this you will need the following tools and materials:
- wooden boards, thickness 2 cm;
- furniture guides;
- fasteners;
- clamp;
- Screwdriver Set;
- threaded type stud;
- glue;
- hacksaw or electric jigsaw;
- screwdriver;
- drill;
- emery;
- construction tape;
- pencil.
The holder can also be made from metal elements, but working with them is somewhat more difficult due to the need for welding. Therefore, the manufacturing process of a wooden holder will be discussed below. It is also quite durable, and it is possible to make such a design in a matter of hours.
Step-by-step instruction
A homemade drill holder is made in several stages. First, they make a frame, then a stand and a handle, after which additional elements are installed that expand the functionality. This could be, for example, a fastener that is used to adjust the drilling angle. The main stages are:
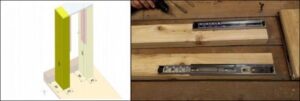
- The frame is made of wood 20 mm thick.The size should be 50*50 cm if the tool is intended to be used only for vertical drilling. If the drill performs several functions at once, the optimal size is 100*50 cm.
- Then they move to the counter. A carriage is made from a block, and a furniture guide is mounted on each edge, also from wooden blocks.
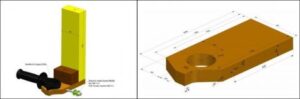
- The next stage of the instructions on how to make a drill holder with your own hands involves assembling the moving elements and checking their smooth movement. The supporting supports are connected using a piece of wood to eliminate unnecessary play.
- Place the device on its side and fix the frame to it. A support is installed below that will secure all structural elements. It is important to make sure that all angles are right.

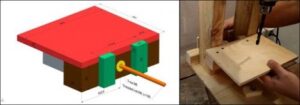
- Next, make a holder from wood. A plastic handle is installed on it, which is convenient to hold on to.
- Take the resulting holder and fix it to the carriage from below using self-tapping screws.
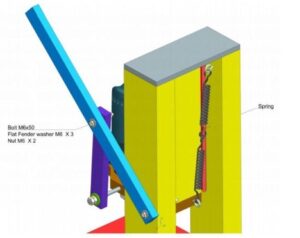
- If necessary, you can additionally install a shelf. To do this, take a beam with a cross-section of 5*5 cm, make a hole through it, which corresponds to the threaded rod. A footer is installed there and the base of the shelf is placed on a block. Thread the pin through and secure it with a nut.
- A return mechanism is mounted at the back of the structure - for this a spring is installed.
- Start assembling the wooden handle - it should consist of a short and a long part. The first is fixed using bolts with a lever, as well as a holder.
Now all that remains is to install the tool and figure out how to secure the drill. After the first use, you can understand that thanks to the holder, working has become much easier. You can make such a design alone, and it will definitely save effort and time.