How to make an egg incubator with your own hands: drawings, materials, instructions
In this article we will look at two ways to make an egg incubator with your own hands. The first - from the refrigerator - can replace professional incubators. The second one - out of the box - is suitable for beginners.
Before you start making an egg incubator, you need to decide on the size of the cells and the incubator. You can use the following size chart:
| Number of eggs, pcs | Length, width, height of suitable cell, cm |
| 45 | 45 by 25 by 28 |
| 70 | 55 by 55 by 28 |
| 100 | 60 by 60 by 28 |
The sizes of such cells are selected taking into account all the distances and temperatures between the eggs. If you are raising or planning to raise several types of eggs, place a replacement grid in the cells.
The content of the article
Making an incubator from an old refrigerator
Materials and tools for creating an incubator for eggs from the refrigerator:
- The refrigerator itself
- 25 watt incandescent lamps and sockets for them
- Wires
- Soldering iron
- Temperature regulator
- Cooler or small fan
- Drill
- Bolts/screws
- Plastic tubes (diameter arbitrary)
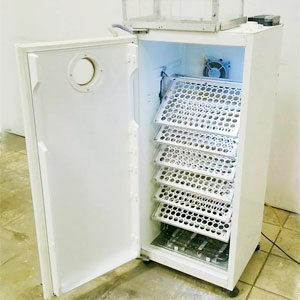
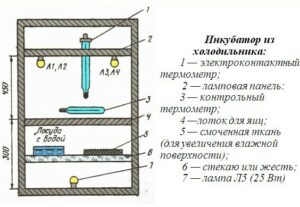
The peculiarity of the incubator is its low, almost zero heat loss - inside the device the temperature is constantly kept at the same level. A refrigerator is suitable for making a homemade incubator. Whether the device works or not is irrelevant. The main thing is that it closes and is airtight. Making an incubator from a refrigerator:
- Clean the refrigerator inside and out. Remove the freezer from it.
- Take out the refrigerator shelves and glue the prepared cells to them. The cells can be a metal plate with holes to suit the size of the eggs or an upside down egg tray.
- In one of the sides, drill two through holes to match the size of your pipes. One hole should be located 10-15 centimeters from the top edge of the refrigerator, the second - at a height of 30-50 centimeters from the bottom edge.
- Insert and seal the tubes into the holes formed. These tubes will serve as ventilation in the incubator. Why insert tubes? You can also use the holes themselves for ventilation. This is necessary so that the circulating air does not come into contact with the glass wool in the device body.
- Inside the refrigerator, at a distance of 15-20 centimeters from the bottom tube to the rear wall of the refrigerator, install a fan/cooler on rubber pads. Place it 10-15 centimeters lower, at an angle, with the back side (from which air is sucked in) should be in front of the tube.
- Measure 10 centimeters from the bottom edge of the side of the fan from which air is blown. In this place, install one socket for an incandescent lamp, after 5 cm the second. Parallel to them at the top at the level of the second tube, install the second two cartridges.
- Install a prepared thermostat between the lower tube and the fan. Set the maximum and minimum permissible temperatures on it.
- Run the wiring - from the plug to the thermostat, from it to the fan, from the fan to the light bulbs.
- Take a flat container and pour water into it. Place the container on the bottom of the incubator under the lower lamps.
- Place the shelves in place.
How a homemade refrigerator incubator works:
Air enters through the bottom tube.It immediately hits the fan, which blows it over the incandescent lamps.
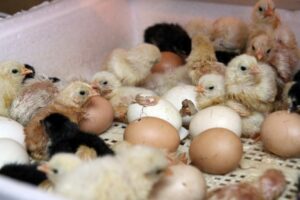
Such lamps serve for heating and lighting - for the development of chickens to proceed without problems, the eggs need light and high temperature, depending on the type (from 37.6 to 39). Eggs also need high humidity. To do this, there is a container of water in the incubator under the lamps. The heat from them evaporates some of the liquid, increasing humidity. This way the humidity in the refrigerator will be consistently maintained at 60-80%.
Warm air rises to the top, heating the eggs along the way, where it is heated by two more incandescent lamps. The air then leaves the incubator through the top tube.
When the air temperature reaches the maximum allowable temperature, the thermostat will turn off the electricity supply to the fan and lamps, and vice versa.
Additionally, you can equip your homemade egg incubator with automatic turning.
Egg incubator from a box
Materials for making a homemade egg incubator from a cardboard box:
- Shallow cardboard box (10 cm)
- Egg Tray
- 25 watt incandescent lamp and socket for it
- Table lamp cover
- Scissors
- Wires
- Soldering iron
Making an egg incubator from a box:
- Place the upside down egg tray into the main part of the carton. If there is any free space left in the box, place hay or other packing material inside.
- Place the lid of a table lamp on the center of the box lid. Make a hole in the cardboard the size of the lid, but so that it does not fall inside.
- Make a second hole in a random location on the box lid - for a thermometer.
- Install the socket into the lid of the table lamp and run the wires from it to the plug.
- Insert the lamp into the socket.
- Cover the bottom of the box with the tray with a lid, the large opening of which should be covered with the lid of a table lamp.
- Plug in the lamp.
How a homemade incubator works out of the box:
The eggs are heated and illuminated by an incandescent lamp. There is a small hole in the lid for air ventilation. To check, a thermometer is inserted into it and the temperature inside the incubator is measured. When it is maximum permissible, the device turns off, and vice versa.