How to install steam-drip heating for a private house with your own hands
The heating problem has always been acute for residents of private houses. According to statistics, 29% of the Russian population lives in a private house. Connecting any of the government services to a private home is difficult, time-consuming and expensive, therefore, as a rule, residents of private houses provide themselves only with cold water from the central network and electricity. Sometimes gas is connected, and therefore they install a boiler, boiler, stove or other structure on the territory of the house to provide themselves with hot water and heating. We will talk about the latter, or more precisely, about the type of steam-drip heating for a private house.
If you want to understand the topic of steam-drip heating, find out what types of steam-drip heating there are, the principle of operation, the advantages and disadvantages of steam-drip heating, as well as how to arrange steam-drip heating for a private home, read on.
The content of the article
Steam-drip heating - what is it and what is the principle of operation
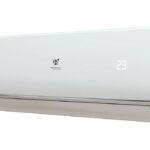
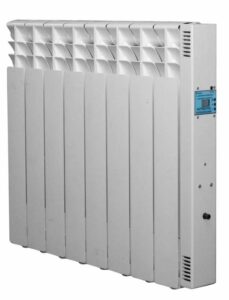
Steam-drip heating is one of the methods of electric heating. It is a design with a coolant - water or other liquid - a heating element and a control panel.
What happens during steam-drip heating? It all depends on the design/model of the heater, but the basic concept of all vapor-drip heaters is based on the conversion of electrical energy into thermal energy.
Principle of operation:
- A small amount of water is poured into the heater. This is done only once upon first launch. Afterwards, you can fill in water only after cleaning the device and completely draining the previous coolant.
- There is an electric heating element inside the structure. Powered by a regular outlet and connected to the control panel.
- Energy is supplied to the element and it heats the water. Water boils and turns into steam.
- The steam rises through the pipe to the convector/radiator or other structure and transfers heat to the room.
- When the steam cools, it condenses and turns back into a liquid. The water flows back through the pipe to the coolant reservoir. There it is again heated by the element, and the cycle repeats.
Types of steam-drip heating
Steam-drip heaters are distinguished by several factors - the number of sections, type of placement, power, housing material.
Number of sections:
- 4 sections
- 6 sections
- 8 sections
- 10 sections
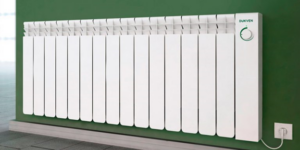
What is the body made of:
- Aluminum
- Steel
Aluminum models are abbreviated as PKNA - aluminum vapor-drip heater. Steel ones based on the same principle - PKNS.
Power:
- 0.4 kW
- 1 kW
- 1.5 kW
- 2 kW
Heaters of this type can only be placed on the floor or wall.
PKN characteristics:
- They are powered from an outlet, the frequency of electricity is 60 Hertz, the voltage is 220 Volts, the power depends on the model (1.9 Amps is the minimum value, 9 is the maximum).
- Power is adjustable.
- There is protection against overheating.
- Heated area – depends on the model. The smallest heater heats a room up to 8 square meters. The largest (from the products of the Volgograd Energy Saving Technologies plant) easily heats rooms up to 35 square meters.
- The weight of the equipment also depends on the model - there are devices that weigh 5 kilograms, and others that weigh 35 kilograms.
Pros and cons of steam-drip heating
In the reviews of users who bought steam-drip equipment, and in the responses of users who use such factory-made/home-made devices on the forums, we highlighted the following advantages of steam-drip heating:
- High heat output - they release up to 35% of the heat to the air.
- They are explosion-proof - there is nothing to explode in them; the wiring may burn out or the bolt may fail - steam will simply escape into the room.
- Environmentally friendly - they do not emit anything into the atmosphere.
- Heating power and temperature are adjustable.
- Autonomous - you only need electricity.
- Clean – no need to constantly clean like solid fuel heaters.
- Easy to use.
- Easy to install.
- They serve for a long time - there is nothing to break in them.
Flaws:
- They waste a lot of electricity - not economical.
- The wiring may burn out - electrical unsafety.
How to make steam-drip heating at home
Here you need to figure it out - do you want to make steam-drip heating from factory equipment or make it yourself. With the first option, you will need more information about installing the heater. Usually it is indicated in the instructions for the device, but if it is not there, then:
- Select a location to install the heater.
- Attach the device and make marks on the wall/floor through the mounting holes.
- Drill holes according to the marks.
- Insert the dowels.
- If necessary, insert the heating element inside the device.
- Secure the heater using self-tapping screws/bolts, nuts, rubber bands, if any are included in the kit.
- Connect the wires of the device to the thermostat, and from it to the electrical network.
- Pour the specified amount of coolant water into the hole in the upper part of the structure. Depending on the size and power of the model, different amounts of water are required. It is usually indicated in the instructions.
- Close the filler hole with the insert bolt/pump.
- Turn on the device, select the operating mode, power and heating temperature.
If you want to make a vapor-drip heater with your own hands, then you will need:
- Tools and consumables - drill, grinder, soldering iron, tap, welding, sandpaper, dowels, screws, bolts, wires
- heating element
- Thermostat
- Water
- Housing - old cast iron or steel battery
First, make a drawing; it may differ depending on your building, room, needs, materials. The following are the instructions:
- If necessary, clean the battery/case.
- Drill a hole in the top of the housing for the bolt.
- Go through this hole with a suitable tap to make a suitable thread.
- Prepare one of the battery holes for the heating element, close the second - you can weld a steel plate.
- Insert the heating element into the hole and seal it. The hole must be completely sealed, otherwise water will leak out, steam will escape, and heating efficiency will decrease.
- Install the battery in the selected location. You can use the installation instructions above.
- Connect the wires of the heating element to the thermostat, and it to the electrical network.
- Pour water through the hole - 3-4 liters is enough to heat an average room of 20 square meters. But the amount of water also depends on the size of your battery, keep this in mind.
- Close the hole with the bolt. It needs to be screwed all the way.
- Turn on the device, select heating power/temperature.