What is a dry screed, why is it needed and what is the minimum thickness?
Dry screed is a simplified floor leveling technology that does not involve preparing a concrete mixture. Instead, lighter materials are used, for example, expanded clay or vermiculite. Thanks to this, the work goes much faster and easier. The pros and cons of this method, as well as the installation technology, are described in detail in the presented material.
The content of the article
The essence and structure of dry screed
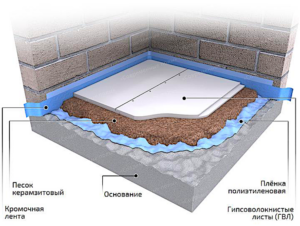
First of all, you need to understand what a dry screed is. This is one of the common methods of floor leveling, which does not involve filling with cement-sand mortar. That is, this is a simplified technology that differs significantly from the installation of a traditional concrete floor. We can say about a dry floor screed that it is a leveling that consists of 5 layers:
- Dividing - it is laid directly on a concrete or other base. Serves to protect against moisture - as a rule, a vapor barrier or polyethylene film is used for this. Bituminous, corrugated or perforated paper is placed on wooden bases.
- Edge tape is a layer that is laid out in the spaces between the edges of the floor and the surface of the wall. Performs a soundproofing function.
- It can also be said about dry floor screed that this is a leveling layer - the basis of the entire structure.It uses fine-grained material with a moisture content within 1%. Usually this is expanded clay sand with particles no more than 5 mm. But since it sags over time, it is better to use a mixture of loose flooring from well-known brands.
- When the surface does not have significant flaws or height differences of more than 10 mm, polystyrene foam boards can be used instead of dry backfill. It not only provides a smooth surface, but also has thermal insulation properties.
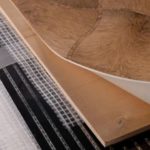
- Finally, the last layer is the finishing layer. These are sheets of gypsum fiber that are used as a base for flooring. One of the most reliable options is glass panels with connectors that are easy to install yourself.
Pros and cons of technology
From the description it is clear that dry screed is a multi-layer structure, which, unlike concrete, does not require preliminary mixing of the solution. Due to the characteristics of the materials used, this technology provides several tangible advantages:
- light weight, can be used on any floors;
- Smooth surface;
- simple installation, without “dirty” processes;
- saves time - no need to wait for it to dry;
- good heat and sound insulation;
- The finishing coating can be laid immediately after the installation of the screed is completed.
If we talk about shortcomings, there are not many of them. It is important to understand that dry screed is a method that is only suitable for ordinary residential or commercial premises. It is not worth using it on the floor in a bathtub, shower, bathhouse, or swimming pool - it is appropriate to use a concrete screed here.
Materials for dry screed
It is clear that dry screed is a simplified floor leveling technology.For this purpose, bulk compositions based on different components are used. The main options are as follows:
- Expanded clay of medium fraction. Good insulation, lightweight and porous surface. The material is affordable, so it is often used for screeding. The weight of a cubic meter ranges from 250 to 600 kg.
- Vermiculite is another lightweight, low-density material. The weight of a cubic meter is only 160 kg. It is worth keeping in mind that for laying the floor you need to take only vermiculite that has undergone swelling.
- Perlite is a natural material, a rock of volcanic origin. It is lightweight and durable.
- Compavit is a material based on rounded expanded clay, no more than 4 mm in diameter. At the same time, it is denser, so it does not sag over time and provides a smooth surface.
Understanding dry screed, what it is, it should be noted that in some cases you can do without backfilling, if the floor surface is fairly flat, it is enough to lay polystyrene foam slabs on it.
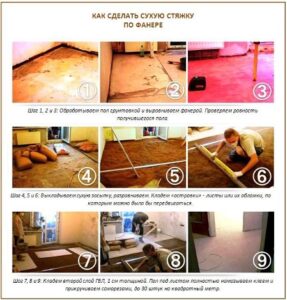
Step-by-step installation instructions
Before starting work, you need to take measurements of the room and decide what the minimum thickness of the dry screed will be. This indicator depends on the quality of the surface - the smoother it is, the less backfill can be used.
On average, the value ranges from 30 to 50 mm. In this case, the minimum requirement is 15 mm. If the floor has serious defects, it is better to take a thickness with a margin of 50-60 mm. It is worth considering that the material consumption per square meter ranges from 54 to 75 kg (assuming that the thickness of the dry floor screed is 30 mm).
After the calculations have been completed, work can begin. The main stages are as follows:
- Prepare the base - remove debris, clean the surface, if there are defects, fill them with a dry mixture so that the floor is relatively flat.
- A film of dense polyethylene is placed on the base, overlapping at least 25 cm. An overlap of 10-15 cm is made on the walls.
- Edge tape is attached to the gaps between the walls and the floor.
- Place beacons around the perimeter using a building level.
- The mixture is poured, focusing on the calculated thickness of the dry screed. Start from the highest point of the floor (use a level to estimate the height).
- Level the embankment and compact it using a rubber hammer.
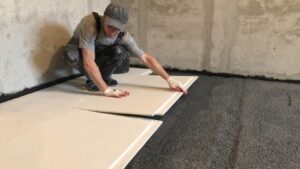
- Lay the finishing layer - for this you can use two-layer gypsum fiber boards, fixing them with glue.
- At the very end, cut off the excess parts of the edge tape and clean up traces of glue. All joints are treated with putty.
After completing the work described, it is advisable to wait 2-3 days and then lay the flooring. Thanks to this, the screed will gain sufficient strength and last for many years.