Clear and simple: how to make an air ionizer with your own hands at home
sdelay.sam.ua
The quality of oxygen in our room directly depends on the charge of ions in the atmosphere. If there is an imbalance, there are almost no advantages for our body from such air. You need to quickly correct the situation and make an air ionizer with your own hands.
In our article we will share several ionizer assemblies that you can make at home using available materials. Go!
The content of the article
How a homemade ionizer works
Before we start assembling the ionizer with our own hands, we will talk about the basic operation of the device: how it works and why you should use the device.
In the air mass of an apartment or house, according to statistics, there are tens of times fewer ions that have a positive effect on the human body than negative ones. This is abnormal, since in natural conditions the average is up to several tens of thousands of cubic meters. see. Divide the number by 10 and get the state in your apartment.
Therefore, we need to saturate oxygen with useful ions in a short time. For this purpose, an air ionizer circuit is used. It has been scientifically proven that ionization has a positive effect on general immunity, and also restores the functioning of the respiratory and cardiovascular systems.
Fatigue, allergic reactions to foreign organisms (dust, fur, fungus) are also noticeably reduced, and the chance of getting infectious inflammation is reduced. This applies not only to a homemade air ionizer; with factory models the results are even better.
The basic principle of the operation of a do-it-yourself air ionizer: charges with a “-” sign are transferred to atmospheric particles - they affect the improvement of the environment and human health. However, to obtain negative particles, the entire air mass must slip through the apparatus and receive the necessary charges through a discharge of increased power.
Additionally: various allergens in the air, passing through the ionizer circuit, assembled with your own hands, are destroyed under the influence of electricity. After the air flow reaches the ionizer plate, all particles with the opposite charge settle on the surface and are attracted by the same plate. Thus, all dirt and dust settles on the surface of the device. Then she cleans up during the weekly cleaning of the apartment.
The current required for ionization can only be recreated with an assembly rate of at least 15,000 Watts. It is supplied to the electrodes.
There are also contraindications for using the ionization system. For example, the device cannot be installed and turned on when your home has:
- cancer patients;
- people with colds and flu (high temperature or fever);
- newborn children.
It is recommended to stop using ionization equipment and replace it with analogues (for example, cleaners).
We assemble an ionizer with our own hands from available parts at home
sdelay.sam.ua
The installation of homemade equipment should be based on the airflow pattern itself.Let’s say in advance that incorrectly assembling an air ionizer with your own hands at home may not only not give a positive effect, but also cause irreparable harm. Only a person who understands the matter is insured against burns and electric shocks.
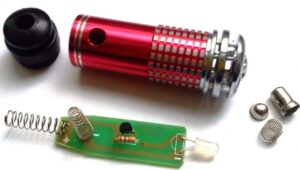
The basis of our homemade ionizer can be a system unit from a computer (empty, just the case). The ventilation system is a cooler from the same PC. We also need a boost transformer. Anyone can choose him, the main thing is his performance. They should be within 220/18-20 watts.
For a do-it-yourself air ionizer for an apartment, we will need additional equipment:
- Textolite electronic board with a thickness of about 3 mm.
- Fastening elements.
- Cables for connecting the structure.
Assembly is carried out according to a pre-printed electrical diagram. For the ionizer, also purchase KT315 transistors and 815 stabilizers.
In professional designs, so-called diode bridges are used, but there is nothing to build them from at home, so a simple chain of diodes will do. The diode readings must be at least 400 Volts and half an Ampere.
The remaining components of the ozonizer are either used in their original form or replaced with analogues.
First of all, we need to make ozonizer electrodes. To do this, take a multi-core copper cable, clean it of insulation and bend each core at a right angle. The result should be an “umbrella” design.
The umbrella is installed at the optimal distance from the ionizer to produce a sufficient number of negative ions.
The veins must be constantly purged so that the air flow is constantly replaced by a new mass. To do this, a power supply and a fan (cooler) are installed inside the system unit.A correctly assembled ozonizer will work the first time it is connected; the main thing is to configure the system for optimal air flow and ozonation.
Do-it-yourself machine air ionizer - how to make it
Since there is even less space in a car interior than in a living room, there is almost no air circulation there. Therefore, a do-it-yourself air ozonator for a car is a good way to saturate the atmosphere with useful particles. Believe me, the air conditioner in a car does not give any result at all - only cool air. There can be no talk of benefit.
The assembly begins with the creation of an electricity flow generator. It consists of a core (can be found in any electronics) and wires. Then you need to make two circles of winding: the first cycle - 14 times and the second - 600 turns of wire.
After wrapping the system for the first time, you need to isolate the circuit. Scotch tape or tape will come in handy. We insulate the secondary winding 6 times - after every hundred turns of the cable around the transformer.
Next we need a current amplifier. It can be made from 10 kW capacitors and diodes of the KTs 106 brand. The distance of the diode bridge for the multiplier should not exceed 3 cm between the diodes.
After assembling the structure, the ozonizer is connected to the vehicle system panel. The ionizer is ready for use.
How to make an air ionizer with your own hands. Another option - for the most advanced
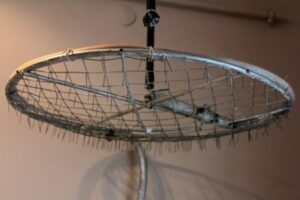
Another option for making an air ionizer for your home is Chizhevsky’s scheme. It consists of only 2 elements:
- The chandelier itself.
- Multiplier (converter).
A chandelier is an aluminum hoop up to a meter in diameter. On it we wrap copper millimeter cables. Wrapping is carried out in such a way that a mesh is obtained in increments of up to 5 cm.In the area where the wires intersect, a metal needle is attached with a soldering iron. Its dimensions are up to 4 cm.
The sharper the needles, the better. The quality of the homemade device depends on this. Three copper cables are attached to the hoop so that they cover the entire plane at the same distance. If the circle has 360 degrees, then the wire is located at every 120. The ends of the cable are soldered above the structure.
The soldering point of the copper cable is connected to the current converter. We need to get a voltage of at least 25 kV. The larger the room, the higher the voltage the ionizer should have.
To increase the processing area, the chandelier is supplemented with diode multipliers. After assembly, you can test the device and adjust it to your room.
Now you know how to make an air ionizer (ozonizer) at home. It doesn’t require any supernatural elements – just go to an electronics store and pick up a high-quality circuit.
We strongly recommend: if you do not know or do not understand what is needed for a homemade ionizer, do not make it yourself! It’s better to buy a ready-made device in a store or use analogues. Good luck with your builds and have a nice day!


Everything is fine!